Google Cloud Messaging with Android
Join the DZone community and get the full member experience.
Join For FreeYou have probably heard a lot of talk about the wonderful things the cloud can do for you, and you are probably curious about how those services may come into play in your daily life. If this sounds like you, then you need to know that cloud services are playing an increasingly important role in our lives, and we need to look at how they can change how we message one another.
Many people are looking at Android cloud messaging as the next leap forward into a future where it is possible to reach out to the people we care about and save those messages directly in the cloud. Never miss the opportunity to communicate with someone who truly matters to you, and start using cloud storage to back up your messages. It is as simple as that!
You might have heard of c2dm (cloud-to-device messaging), which basically allowed third-party applications to send (push) lightweight messages to their android applications. Well, c2dm as such is now deprecated and replaced with its successor up the evolutionary ladder: GCM, or google cloud messaging.
GCM is a (free) service that allows developers to push two types of messages from their application servers to any number of android devices registered with the service:
collapsible, "send-to-sync" messages
non-collapsible messages with a payload up to 4k in size
"Collapsible" means that the most recent message overwrites the previous one. A "send-to-sync" message is used to notify a mobile application to sync its data with the server. In case the device comes online after being offline for a while, the client will only get the most recent server message.
If you want to add push notifications to your android applications, the getting started guide will walk you through the setup process step by step, even supplying you with a two-part demo application (client + server) that you can just install and play around with. The setup process will provide you with the two most essential pieces of information needed to run GCM:
An API Key is needed by your server to send GCM push notifications
- A Sender ID is needed by your clients to receive GCM messages from the server
Everything is summarized in the following screen you get after using the google API console:
The quickest way to write both server and client code is to install the sample demo application and tweak it to your needs. In particular, you might want to at least do any of the following:
Change the demo's in-memory datastore into a real persistent one.
Change the type and/or the content of push messages.
- Change the client's automatic device registration on start-up to a user preference so that the handset user may have the option to register/unregister for the push notifications.
We'll do the last option as an example. Picking up where the demo ends, here's a quick way to set up push preferences and integrate them into your existing android application clients.
in your android project-resources ( res/xml) directory, create a preference.xml file such as this one:
 <?xml version="1.0" encoding="utf-8"?>
<preferencescreen xmlns:android="http://schemas.android.com/apk/res/android" >
 <preferencecategory
 android:title="push information" >
 <edittextpreference
 android:key="sname"
 android:summary="enter the server name"
 android:title="name" />
 <edittextpreference
 android:key="sip"
 android:summary="enter the server ip address"
 android:title="ip address" />
 <edittextpreference
 android:key="sport"
 android:summary="enter the server port"
 android:title="port" />
 <edittextpreference
 android:key="sid"
 android:summary="enter the sender id"
 android:title="sender id" />
 </preferencecategory>

<preferencecategory
 android:title="push settings" >
 <checkboxpreference
 android:key="enable"
 android:summary="on/off"
 android:title="enable server push" />
 </preferencecategory>
</preferencescreen>
and the corresponding activity:
// package here
import android.os.bundle;
import android.preference.preferenceactivity;

public class pushprefsactivity extends preferenceactivity {

	@override
	protected void oncreate(bundle savedinstancestate) {

	   super.oncreate(savedinstancestate);
	   addpreferencesfromresource(r.xml.preferences);
	}

}
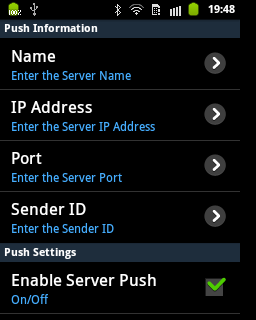
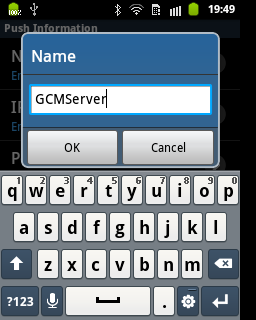
the above will provide the following ui:
The "enable server push" checkbox is where your android application user decides to register for your push messages. Then, it's only a matter of using that preferences class in your main activity and doing the required input processing. the following skeleton class only shows your own code add-ons to the pre-existing sample application:
// package here
import com.google.android.gcm.gcmregistrar;
// other imports here

public class mainactivity extends activity {

      /** these two should be static imports from a utilities class*/
      public static string server_url;
      public static string sender_id;

      private boolean push_enabled;

      /** called when the activity is first created. */
    @override
    public void oncreate(bundle savedinstancestate) {

        super.oncreate(savedinstancestate);
        // other code here...
        processpush();
   }

    /** check push on back button
      * if pushprefsactivity is next activity on stack
      */
    @override
    public void onresume(){

    	super.onresume();
    	processpush();
    }

    /**
     * enable user to register/unregister for push notifications
     *  1. register user if all fields in prefs are filled and flag is set
     *  2. un-register if flag is un-set and user is registered
     * */
    private void processpush(){

        if( checkpushprefs() && push_enabled ){
    	   // register for gcm using the sample app code
        }
        if(! push_enabled && gcmregistrar.isregisteredonserver(this) ){
        	 gcmregistrar.unregister(this);
        }
    }

    /** check server push preferences */
    private boolean checkpushprefs(){

    	sharedpreferences prefs = preferencemanager
                                 .getdefaultsharedpreferences(this);
    	string name     =  prefs.getstring("sname", "");
    	string ip       =  prefs.getstring("sip", "");
    	string port     =  prefs.getstring("sport", "");
    	string senderid =  prefs.getstring("sid", "");
    	push_enabled    =  prefs.getboolean("enable", false);

    	boolean allfilled = checkallfilled(name, ip, port, senderid);
    	if( allfilled ){
    		sender_id = senderid;
    		server_url = "http://" + ip + ":" + port + "/" + name;
    	}
    	return allfilled;
    }

    /** checks if any number of string fields are filled */
    private boolean checkallfilled(string... fields){
    	for (string field:fields){
    		if(field == null || field.length() == 0){
    			return false;
    		}
    	}
    	return true;
    }

}
The above is pretty much self-explanatory. Now GCM push notifications have been integrated into your existing application. If you are registered, you get a system notification message at each server push, even when your application is not running. Opening up the message will automatically open your application:
GCM is pretty easy to set up since most of the plumbing work is done for you. a side note: if you like to isolate the push functionality in its own sub-package, be aware that the GCM service gcmintentservice, provided by the sample application and responsible for handling GCM messages, needs to be in your main package (as indicated in the-set up documentation)—otherwise GCM won't work.
When communicating with the sample server via an HTTP post, the sample client does a number of automatic retries using exponential back-off, meaning that the waiting period before a retry in case of failure is each time twice the amount of the preceding wait period, up to the maximum number of retries (5 at the time of this writing).
You might want to change that if it doesn't suit you. It may not matter that much, though, since those retries are done in a separate thread (using asynctask) from the main UI thread, which therefore minimizes the effects on your mobile application's pre-existing flow of operations.
Opinions expressed by DZone contributors are their own.


Comments