How Can Perform Monkey Testing in Android App?
Learn what Monkey Testing is, and the ways to implement it through either Command-line testing and Android studio.
Join the DZone community and get the full member experience.
Join For Free
What Is Monkey Testing?
Android Monkey is the python-based testing script process that can be run by writing any specific python script or we can directly apply a test for the installed application using the command line.
Once the test process will be done then it will generate a log file of the events and crash if any. Generally, these testing tools are for the application developers while development in progress. Android SDK should be available in the system.
This will randomly check for user events such as clicks, touches, or gestures, as well as several system-level events.
Also, if we try Monkey testing Using the Command line and Using Android Studio, then both will generate the same logfiles with a different extension.
There Are Two Processes to Go Through This Testing Process
- Using Command-Line.
- Using the Android Studio.
Using Command Line
For this process, the app should be installed on the device. Install the app first and then execute the below command in the command line.
- Install APK and Run the application in the device.
- Go to ../Android_Sdk/Platform-Tools directory.
- Execute command ‘adb shell monkey -p yourpackageneme -v 1000 > app_log.txt’.
Output
Also, I have added one video tutorial link below (#4). If you will go through the video, then there is one ADB command with the output file name.
To check the exported log, Go to /Android_Sdk/Platform-Tools directory. You will find the app_logs.txt file there.
Using Android Studio
You can also execute this test from the Android studio by adding some required plugins.
- Import Project into Android Studio.
- File – New – Import Project – Choose Your Project Directory and Click Ok.
- Wait until all process is done.
- Install Monkey Plugin
File – Settings – Plugins
a. Click on Marketplace and Search for “MonkeyMaster” and click “Install”
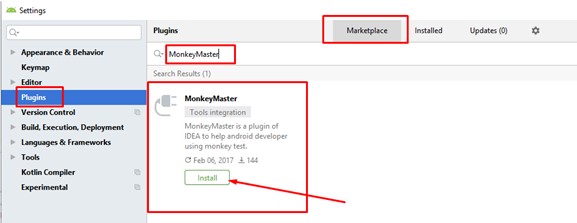
b. Once Install Done, the button will change with “Restart IDE”. Click to Restart Android Studio.
c. Once Restart, you can see Monkey Plugin installed in the Android Studio.
3. Run the Application in Device.
4. Click on Monkey at the bottom bar.
a. Click on [+] Button.

b. Click Refresh, if you cannot see your attached device.
c. Once Refresh, you will see Device ID inbox.
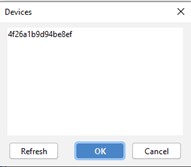
d. Choose it and click OK.
e. Click on Play Button and One popup will open to set Monkey Configuration.

f. Add provided Your app package name in the “Allowed Packages” box and press Run.
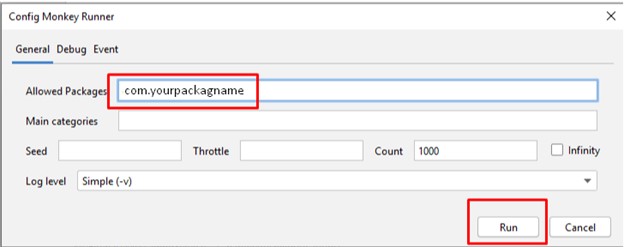
5. Money Testing will start and you can see Process and Log data at the bottom.
Output
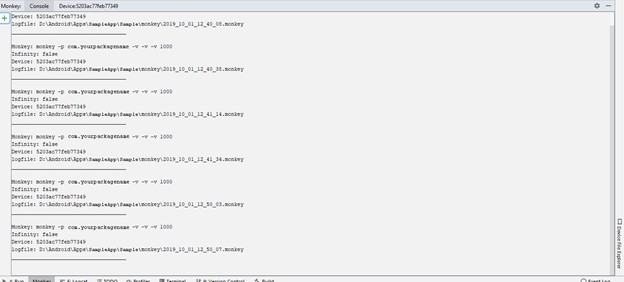
If you will execute monkey testing from the android studio, then you can see the testing log output at the bottom under the "monkey" tab.
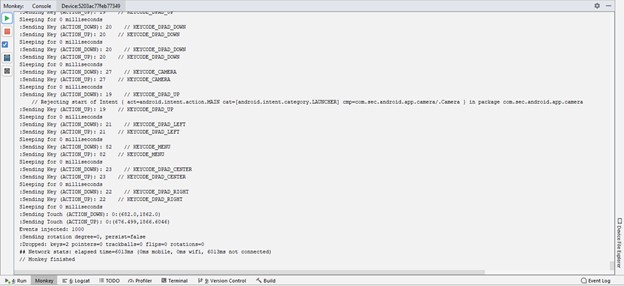
If you will execute Monkey Testing using Android Studio then IDE will generate a file with the ".monkey" extension inside the project itself. Once the testing process will be done by IDE then your code will have one new “Monkey” directory.

Some Ref Links:
#1: https://developer.android.com/studio/test/monkey
#2: https://medium.com/@soonsantos/guide-to-run-monkeyrunner-e9363f36bca4
Some Video Tutorials:
#3: https://www.youtube.com/watch?
#4: https://www.youtube.com/watch?-6RXVc
#5: https://www.youtube.com/watch?-Ktvk4
Conclusion
This post will give you a basic idea and information about how we can perform monkey testing in Android App.
Further Reading
Opinions expressed by DZone contributors are their own.

Comments