How to Deploy an Angular Application to GitHub
Learn how to create a basic calculator application in Angular, and then deploy that applicaiton to GitHub so other devs can use the code!
Join the DZone community and get the full member experience.
Join For FreeIn this article, we will follow a step-by-step approach to deploy an Angular calculator application to GitHub. We will create a project using Angular CLI and then deploy that to GitHub. Let us get started.
Step 1
To create a project using Angular CLI, run the command:
ng new demo
You need to make sure that Angular CLI is installed globally on your machine.
Step 2
Change the directory to demo and open the project in VS Code or any other IDE of your choice. Modify AppComponent to add, subtract, multiply, and divide two numbers as shown in the below listing:
export class AppComponent {
    title = 'Calculator App';
    num1: number;
    num2: number;
    result: number;
    add() {
        this.result = this.num1 + this.num2;
    }
    substract() {
        this.result = this.num1 - this.num2;
    }
    multiply() {
        this.result = this.num1 * this.num2;
    }
    divide() {
        this.result = this.num1 % this.num2;
    }

}
As you can see, AppComponent is very simple and it contains code to perform basic calculator operations.
Next, modify the AppComponent template:
<div class="container">
    <br />
    <div class="row">
        <h1>
            Welcome to {{ title }}!
        </h1>
    </div>
    <br />
    <div class="row">
        <div class="col-md-6">
            <input type="number" [(ngModel)]="num1" placeholder="Enter Number 1" class="form-control" />
        </div>
        <div class="col-md-6">
            <input type="number" [(ngModel)]="num2" placeholder="Enter Number 2" class="form-control" />
        </div>
    </div>
    <br />
    <div class="row text-center">
        <div class="col-md-3">
            <button class="btn btn-info" (click)='add()'>Add</button>
        </div>
        <div class="col-md-3">
            <button class="btn btn-info" (click)='substract()'>Substract</button>
        </div>
        <div class="col-md-3">
            <button class="btn btn-info" (click)='multiply()'>Multiply</button>
        </div>
        <div class="col-md-3">
            <button class="btn btn-info" (click)='divide()'>Divide</button>
        </div>
    </div>
    <br />
    <div class="row">
        <div class="col-md-5 col-md-offset-4">
            <h2>Result = {{result}} </h2>
        </div>
    </div>
</div>
Like the component class template, it is also very simple. It uses:
ngModelfor two-way data binding between input controls and properties.- Event binding to call a function when the button is clicked.
- Interpolation to display the result.
Step 3
Before we publish this application to GitHub, let us run it locally. To run it locally, run the command:
ng serve
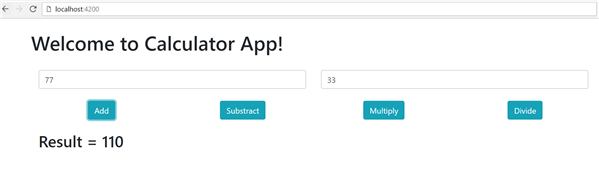
Your application should run on the default port 4200 of your localhost, as shown in the image below:
Step 4
To deploy your Angular application, first create a repository on GitHub. To do that navigate, to https://github.com/ and click on New Repository. I am creating a repository named " demo9."
After the repository is created, use a git command to add this repository as a remote file to the local project. To do that, run the below command:
git remote add origin https://github.com/USERNAME/PROJECT_NAME.git
Do not forget to change the username and project name. Once the remote repository is added, you can verify that using the below command:
git remote -v
As output, you should get a repository listed as below:

Step 5
To deploy the Angular application to GitHub, you need to first globally install the angular-cli-ghpages:
npm install -g angular-cli-ghpages
After installing ghpages, use Angular CLI to build the project. For that, run the command as shown below:
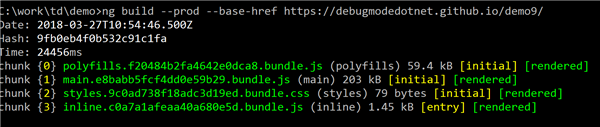
ng build --prod --base-href https://debugmodedotnet.github.io/demo9/
Make sure that you are using your GitHub username and repository name. After the successful execution of the command, you should get bundle.js created as shown in the image below:
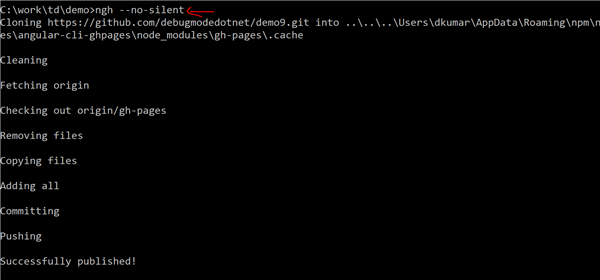
For the last step, run the command ngh -no-silent to publish the application as shown in the image below:
After successfully publishing your app, navigate to https://<username>.github.io/<reponame>/ to see it on GitHub. This is all you need to do to deploy the Angular application to GitHub.
Published at DZone with permission of Dhananjay Kumar. See the original article here.
Opinions expressed by DZone contributors are their own.
Comments