How to Develop a Boilerplate for an API With Node.js, Express, and MongoDB
Learn how to develop a boilerplate for an API with Node.js, Express, and MongoDB.
Join the DZone community and get the full member experience.
Join For FreeFor the most part, developers work with the ready project’s code usually created by someone else or developed pretty long ago.
That’s why, when it comes to writing their own project from scratch, developers' minds are usually cluttered with the following questions: What should I begin with? How can I make it work well? Why should I do this?
In this article, I want to share some tips about how to set a boilerplate for an API based on Express (on the example of forum application like StackOverflow).
API for the Application. Where Should I Begin?
First and foremost, analyze the functional requirements of your future application. Depending on them, the structure of your API can vary. For example, figure out if your app needs the authorization mechanism, integrations with other services, or additional functional requirements such as report generation (pdf, xml, csv), email sending, etc.
Here are the main things you should consider before diving into API development:
- Functional requirements of your app
- Data it will process
- Development methods
Can the Boilerplate Be Perfect?
To begin with, you have to design a structure of your boilerplate. You can do it by creating each file manually. For this, you can use a utility (there are more than enough of them on the Internet) and modify it to your needs. We, instead, will go another way and use the express-generator utility.
Now we are set and ready for Express API boilerplate development.
Step 1. Generate the Project’s Structure
Set up express-generator and create the directory for your project.
npm install express-generator -g
express <your-project-name>
As express-generator creates the general structure of the Express app, it is not sufficient enough for our needs. We are interested only in the API development itself. So let’s modify it a little. Below, you can see what changes you should make.
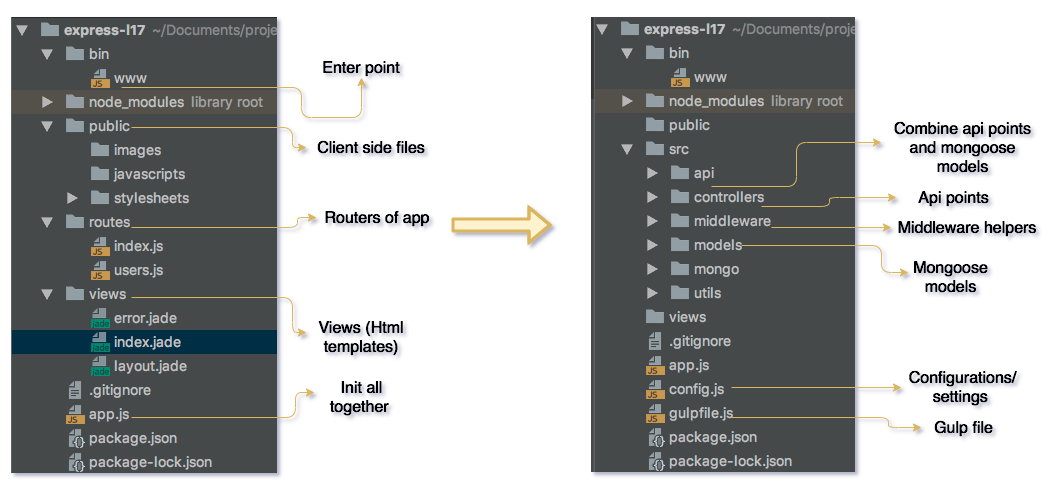
The picture on the left shows the generated boilerplate. The picture on the right - the boilerplate with the changes you should make. Let’s analyze the structure of the project in more detail
Controllers— here, you should store all your API endpointsModels— for storing the data modelsAPI— here, the interaction of your data with your API endpoint is stored (I will explain it in more details further in the article)Utils— here, the entire supporting code of the app is stored (email sending, PDFs generation,etc.)Middleware— here, you can find all Express middleware of the applicationMongo or db or <yourDatabaseName>— it contains all the work with your databaseСonfig or .env— it is better to store all your app’s settings in a separate file (such as js. Json or env.)
With such a structure, your code will be in a logical order that is easy to deal with. So what’s next? Where to start? As the main task of the API is to operate the data, let’s start from this data. Many people skip the right data organization and proceed right to the development. And this is not a good thing to do. Improper structure of your data (your database in particular) can lead to serious problems in the future. That’s why it’s better to spend more time and design a robust data structure than scratch your head later.
Dealing With Data
Step 2. Models Declaration
Each API usually works with some data. Our future API is not an exception. Let’s start the API development from data structure declaration. In our case, it is the work with schemes and models. To better understand and process the data you should operate, organize their structure in a graphical scheme. It will help you to get your thoughts into shape.
Below is the approximate database for the app like StackOverflow.
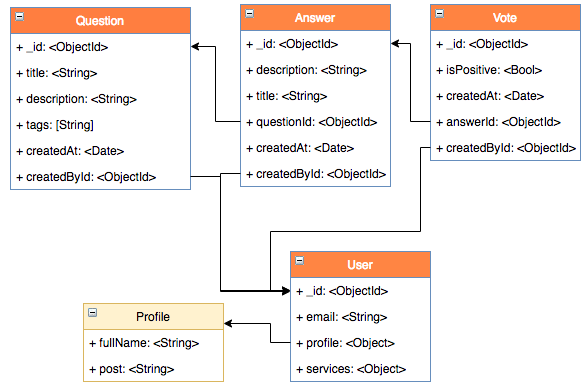
According to this structure, we declare our models. As we use Mongo database for data storage, let’s build our model with mongoose.
The directory models will look like these:
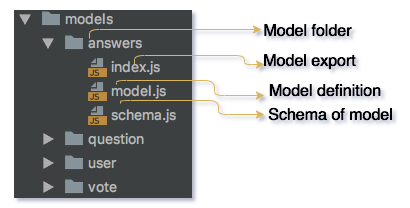
- Schema. Js — Below is an approximate implementation of the scheme. Everything is fairly straightforward. First, you declare the fields and types of your models. You may also add extra verifications and validations you can read about in the documentation.
const mongoose = require('mongoose');
const Schema = mongoose.Schema;
const ObjectId = Schema.Types.ObjectId;
const schema = new Schema({
  title: {
    type: String,
    required: [true],
  },
  description: {
    type: String,
    required: [true],
  },
  questionId: {
    type: ObjectId,
    ref: 'Question',
      },
  createdAt: {
    type: Date,
    required: [true],
  },
  createdBy: {
    type: ObjectId,
  }
});

module.exports = { schema };
After declaring the scheme, we simply export it to use it in model.js.
Model.js— the combination of the mongoose model and scheme. It is done in separate files, as mongoose enables to expand your models with different methods and hooks. Storing all these data + the scheme, that is capable of extending, will result in the file with 500+ lines. Not very classy, right?
// models/answers/model.js
const mongoose = require('mongoose');
const { schema } = require('./schema');
// add hooks here
schema.pre('save', function() {
  return doStuff().
    then(() => doMoreStuff());
});
const Answer = mongoose.model('Answer', schema);
module.exports = { Answer };
As you can see, the hook (pre (save) is declared here. This code will be called each time the model is saved. This [Middleware] is used for complex operations (such as sending letters, complex validation, etc). However, keep in mind that it is not appropriate for model validation. It’s better to use built-in validators for this purpose.
Announce other models and their schemes using the same approach.
What About Routes?
Step 3. Controllers Declaration
Now let’s proceed to the routes or controllers. Divide the controllers according to your models, as shown below.
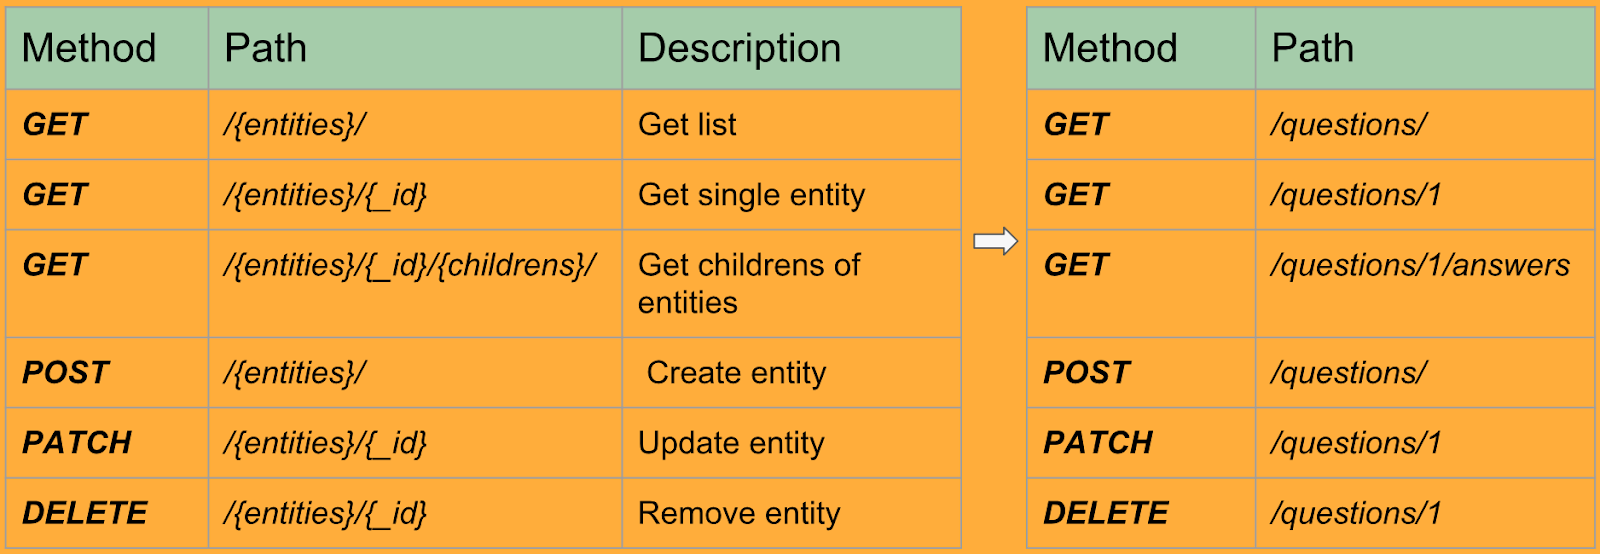
In such a way, each subdirectory in the controllers directory will represent a certain model. Consequently, each file will represent a single API endpoint.
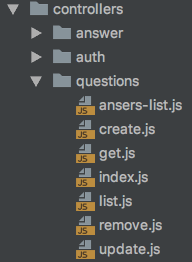
This approach allows to maximally split the code of your API and forget about cumbersome storage of all API endpoints in a single file. Here is how the example of GET /questions та GET /questions:_id implementation will look like
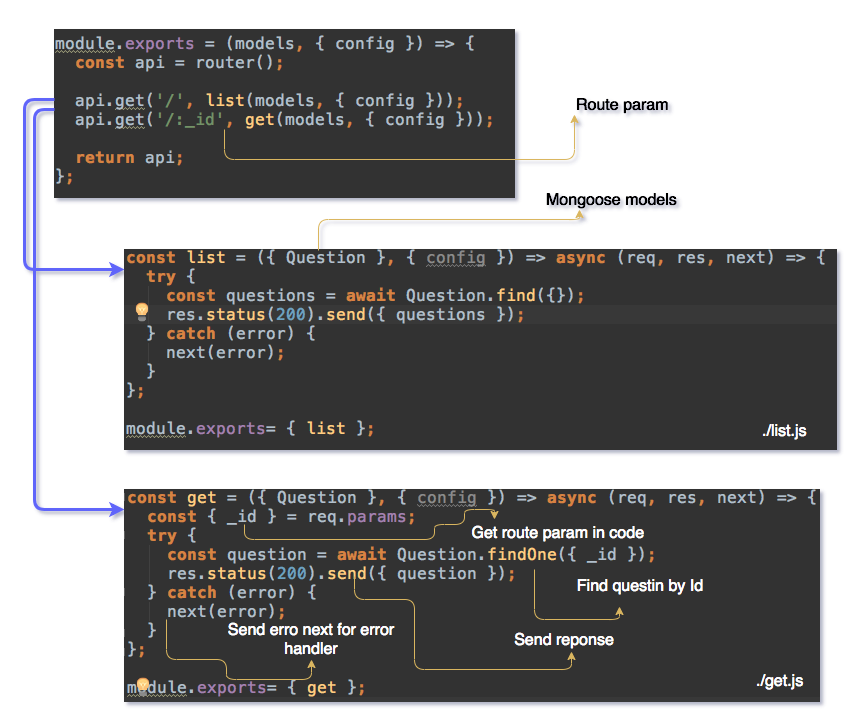
As you could notice, question is the first parameter that appears in ./list.js. This is a ready-to-use mongoose model. This object also contains all the models in our API. As a result, you can use any model in any controller without its importing.
It organizes your code and makes importing hassle-free. Let’s see how to implement this in the next section.
Routes and Data Together. How to Not Get Lost
Step 4. Registration of the Models and Controllers
We have analyzed how to create models and controllers in our API. In addition, I have shown how to use the models inside the controllers. Now it’s high time to see how to connect models together with controllers. This is done in the file .src/api/index.js.

Here the three main things are happening:
- Import and registration of the controllers
- Import and combination of the models and their transmission in the controllers
- Registration of the error handler, that will fetch errors from the controllers (in the next section I will show how to implement it)
In such a way, when the project grows, you register new models and controllers in one place.
The last step is the creation of entry point in your API. It will be app.js- so-called glue that will connect all the files, allow to describe the additional functionality and register static files if necessary. Its implementation is described below.
const express = require('express');

const config = require('./config');
const api = require('./src/api');
const { mongoManager } = require('./src/mongo');

const app = express();
mongoManager.connect();

// api routes v1
app.use('/api/v1', api(config));

module.exports = app;
Three main things are happening here:
- Import of configs
const config = require('./config'); - Connection to our database
mongoManager.connect(); - Registration of all controllers in express "app.use (‘/api/v1, api (config));".
Now express will redirect all requests in /api/v1 into the file api.js (Step 4). This file, in its turn, will redirect them to controllers (Step 3), and controllers will use the models (Step 2).
Now you only have to scale your API according to these rules. To run the app, just install the ‘npm’ packages and run node ./bin or write this command in npm script.
Step 5. Additional Functionality
- How to handle errors and bugs
It is better to deal with errors in one place of your application. It is very convenient if you would like to make some changes (e.g. add the logger, process dev/production mode, etc.). In our case, this place is ./midlleware/error-handler.js'.
const { APIError, InternalServerError } = require('rest-api-errors');
const { STATUS_CODES } = require('http');

const errorHandler = (err, req, res, next) => {
  const error = (err.status === 401 ||
    err instanceof APIError) ? err : new InternalServerError();

  if (process.env.NODE_ENV !== 'production') {
    // do something here
  }
  if (['ValidationError', 'UserExistsError'].includes(err.name)) {
    // if it special error
    return res.status(405).json(err);

  }
  // log error if needed
  // logger.info('API error', { error: err });

  return res // return 500 for user
    .status(error.status || 500)
    .json({
      code: error.code || 500,
      message: error.message || STATUS_CODES[error.status],
    });
};

module.exports = { errorHandler };
As we have registered this processor in .src/api/index.js, it is enough to call next(new Error()), and this error will get to our processor.
How to Implement Additional Features for the App
One more task a developer faces is to provide the hassle-free project launch.
It is also nice to have so-called hot-reload of your application. In node.js, you can do it with the help of nodemon.
You have to write a simple npm script nodemon --watch src --exec 'npm run start or sh script. However, sometimes there is a need to run several processes simultaneously, e. g.:
- Database launch (Mongo)
- API launch
- UI launch.
Gulp is the best choice for this purpose. Below, you can see an example of the gulp file for Mongo API and react-script launch as a single project with a single command.
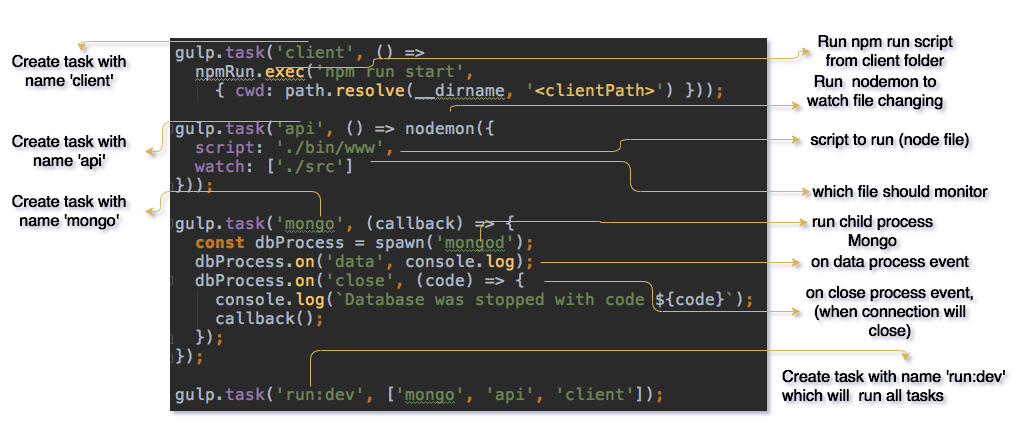
Now it’s enough to create npm script dev ./node_modules/.bin/gulp run:dev and just run your project npm run dev
Tips
- Always document your API. As your API will be used by other developers, it’s vital to create detailed documentation for each API point. It will also free you from such questions as “Where can I get the list?” “How can I change..?”
- Document all your utils. As they will be used throughout the whole project and by all developers, it is nice to have a brief description of your util purpose and example of its usage.
- Keep Readme structured and updated. It is good to explain how to launch the project, its structure, development process, etc. to help other developers.
Summary
In this article, I have shown how to create a boilerplate for a forum-like app based on Express. The examples I provided are general, so they can be used as a base for any Express application. Keep in mind that these are not the strict rules to follow, but just useful tips that will refine the structure of your API.
Published at DZone with permission of Mykola Striletskyy. See the original article here.
Opinions expressed by DZone contributors are their own.
Comments