How We Trained a Neural Network to Generate Shadows in a Photo: Part 2
In this article, we prepare for training and look at loss functions and metrics.
Join the DZone community and get the full member experience.
Join For FreeIn this series, Artem Nazarenko, Computer Vision Engineer at Everypixel shows you how you can implement the architecture of a neural network. In the first part, we were talking about the working principles of GAN and methods of collecting datasets for training. This part is about preparing for GAN training.
Loss Functions and Metrics
Attention. At this point, we deviate from the reference article. We take the loss function to solve the segmentation problem. Generation of attention maps (masks) can be considered as a classic image segmentation problem. We take Dice Loss as the loss function. It is well resilient to unbalanced data.

We take IoU (Intersection over Union) as a metric.

Learn more about Dice Loss and IoU.
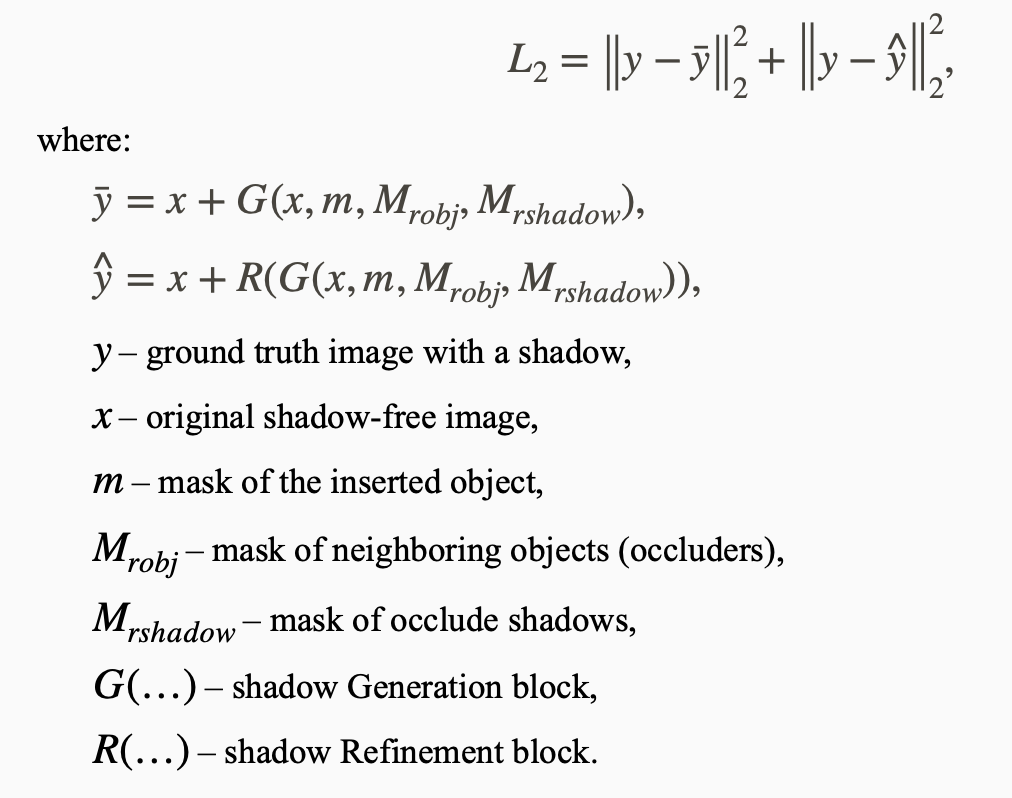
Shadow Generation. We take the loss function for the generation block similar to the one given in the original article. It consists of a weighted sum of three loss functions: L2, Lper and Ladv:

L2 estimates the distance from the ground truth image to the generated ones (before and after the refinement block, denoted as R).
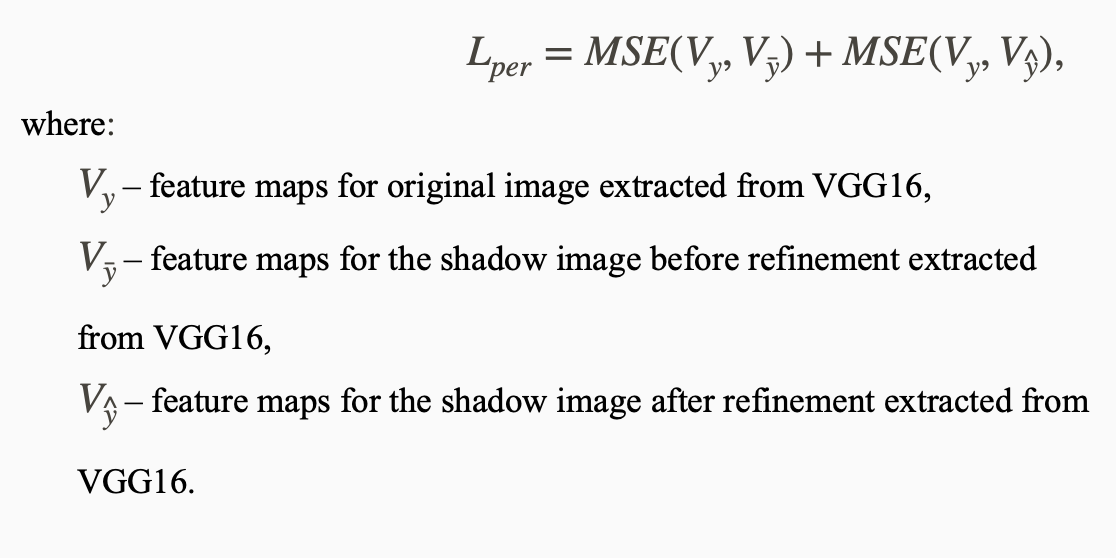
Lper (perceptual loss) is a loss function that calculates the distance between feature maps of the VGG16 network when images are run through it. The difference is considered the standard MSE between the ground truth image with a shadow and the generated images — before and after the refinement block, respectively.
Ladv is a standard adversarial loss that takes into account the competitive nature of the generator and the discriminator. D (.) is the probability of belonging to the "real image" class. During training, the generator tries to minimize Ladv, while the discriminator, on the contrary, tries to maximize it.
![]() Preparation
Preparation
 Preparation
Installing the required modules. To implement ARShadowGAN-like, we will use Python deep learning library – PyTorch.
Libraries in use. We start the work by installing the required modules:
- to import U-Net architecture,
- for augmentations,
- to import the required loss function,
- for rendering images inside Jupyter notebooks,
- to work with arrays,
- to work with images,
- to visualize training schedules,
- for neural networks and deep learning,
- to import models, for deep learning,
- for progress bar visualization.
xxxxxxxxxx
pip install segmentation-models-pytorch==0.1.0
pip install albumentations==0.5.1
pip install piq==0.5.1
pip install matplotlib==3.2.1
pip install numpy==1.18.4
pip install opencv-python>=3.4.5.20
pip install tensorboard==2.2.1
pip install torch>=1.5.0
pip install torchvision>=0.6.0
pip install tqdm>=4.41.1
Dataset
Dataset: structure, download, unpacking. For training and testing purposes, I will use a ready-made dataset. The data is already split into train and test samples. We download and unpack it.
xxxxxxxxxx
unzip shadow_ar_dataset.zip
The folder structure in the dataset is as follows. Each of the samples contains five folders with the following images:
- noshadow (shadow-free images),
- shadow (images with shadows),
- mask (masks of inserted objects),
- robject (neighboring objects or occluders),
- rshadow (shadows from neighboring objects).
You can prepare your dataset with a similar file structure.
We prepare the ARDataset class for image processing and issuing the i-th batch of data on request.
xxxxxxxxxx
import os
import os.path as osp
import cv2
import random
import numpy as np
import albumentations as albu
import torch
import torch.nn as nn
from torch.utils.data import Dataset, DataLoader
from torch.autograd import Variable
from piq import ContentLoss
import segmentation_models_pytorch as smp
Then, we provide the class. The main function of the class is __getitem __ (). It returns the i-th image and the corresponding mask on request.
xxxxxxxxxx
class ARDataset(Dataset):
def __init__(self, dataset_path, augmentation=None, \
augmentation_images=None, preprocessing=None, \
is_train=True, ):
""" Initializing dataset parameters
dataset_path — path to the train or test folder
augmentation — augmentations applied to both images and masks
augmentation_images — augmentations applied only to images
preprocessing — image preprocessing
is_train — flag (True - training mode, False - prediction mode)
"""
noshadow_path = os.path.join(dataset_path, 'noshadow')
mask_path = os.path.join(dataset_path, 'mask')
# Collect paths to files
self.noshadow_paths = []; self.mask_paths = [];
self.rshadow_paths = []; self.robject_paths = [];
self.shadow_paths = [];
if is_train:
rshadow_path = osp.join(dataset_path, 'rshadow')
robject_path = osp.join(dataset_path, 'robject')
shadow_path = osp.join(dataset_path, 'shadow')
files_names_list = sorted(os.listdir(noshadow_path))
for file_name in files_names_list:
self.noshadow_paths.append(osp.join(noshadow_path, file_name))
self.mask_paths.append(osp.join(mask_path, file_name))
if is_train:
self.rshadow_paths.append(osp.join(rshadow_path, file_name))
self.robject_paths.append(osp.join(robject_path, file_name))
self.shadow_paths.append(osp.join(shadow_path, file_name))
self.augmentation = augmentation
self.augmentation_images = augmentation_images
self.preprocessing = preprocessing
self.is_train = is_train
def __getitem__(self, i):
""" Getting the ith set from the dataset.
i — index
It returns:
image — image with normalization for the attention block
mask — mask with normalization for the attention block
image1 — image with normalization for the shadow generation block
mask1 — mask with normalization for the shadow generation block
"""
# Original image
image = cv2.imread(self.noshadow_paths[i])
image = cv2.cvtColor(image, cv2.COLOR_BGR2RGB)
# Mask of the inserted object
mask = cv2.imread(self.mask_paths[i], 0)
if self.is_train:
# Mask of neighboring objects
robject_mask = cv2.imread(self.robject_paths[i], 0)
# Mask of shadows from neighboring objects
rshadow_mask = cv2.imread(self.rshadow_paths[i], 0)
# Resulting image
res_image = cv2.imread(self.shadow_paths[i])
res_image = cv2.cvtColor(res_image, cv2.COLOR_BGR2RGB)
# Apply augmentation to images separately
if self.augmentation_images:
sample = self.augmentation_images(
image=image,
image1=res_image
)
image = sample['image']
res_image = sample['image1']
# Collect masks into one variable to apply augmentations
mask = np.stack([robject_mask, rshadow_mask, mask], axis=-1)
mask = mask.astype('float')
# Do the same for images
image = np.concatenate([image, res_image], axis=2)
image = image.astype('float')
# Apply augmentation
if self.augmentation:
sample = self.augmentation(image=image, mask=mask)
image, mask = sample['image'], sample['mask']
# Normalization of masks
mask[mask >= 128] = 255; mask[mask < 128] = 0
# Normalization for the shadow generation block
image1, mask1 = image.astype(np.float) / 127.5 - 1.0, \
mask.astype(np.float) / 127.5 - 1.0
# Normalization for the attention block
image, mask = image.astype(np.float) / 255.0, \
mask.astype(np.float) / 255.0
# Preprocessing
if self.preprocessing:
sample = self.preprocessing(image=image, mask=mask)
image, mask = sample['image'], sample['mask']
sample = self.preprocessing(image=image1, mask=mask1)
image1, mask1 = sample['image'], sample['mask']
return image, mask, image1, mask1
def __len__(self):
""" It returns the length of the dataset"""
return len(self.noshadow_paths)
Declare augmentations and functions for data processing. We take augmentations from the albumentations repository.
xxxxxxxxxx
def get_training_augmentation():
""" Augmentation for all images, training samples. """
train_transform = [
albu.Resize(256,256),
albu.HorizontalFlip(p=0.5),
albu.Rotate(p=0.3, limit=(-10, 10), interpolation=3, border_mode=2),
]
return albu.Compose(train_transform)
def get_validation_augmentation():
""" Augmentation for all images, validation/testing samples """
test_transform = [
albu.Resize(256,256),
]
return albu.Compose(test_transform)
def get_image_augmentation():
""" Augmentation for images only (not for masks). """
image_transform = [
albu.OneOf([
albu.Blur(p=0.2, blur_limit=(3, 5)),
albu.GaussNoise(p=0.2, var_limit=(10.0, 50.0)),
albu.ISONoise(p=0.2, intensity=(0.1, 0.5), \
color_shift=(0.01, 0.05)),
albu.ImageCompression(p=0.2, quality_lower=90, quality_upper=100, \
compression_type=0),
albu.MultiplicativeNoise(p=0.2, multiplier=(0.9, 1.1), \
per_channel=True, \
elementwise=True),
], p=1),
albu.OneOf([
albu.HueSaturationValue(p=0.2, hue_shift_limit=(-10, 10), \
sat_shift_limit=(-10, 10), \
val_shift_limit=(-10, 10)),
albu.RandomBrightness(p=0.3, limit=(-0.1, 0.1)),
albu.RandomGamma(p=0.3, gamma_limit=(80, 100), eps=1e-07),
albu.ToGray(p=0.1),
albu.ToSepia(p=0.1),
], p=1)
]
return albu.Compose(image_transform, additional_targets={
'image1': 'image',
'image2': 'image'
})
def get_preprocessing():
""" Preprocessing """
_transform = [
albu.Lambda(image=to_tensor, mask=to_tensor),
]
return albu.Compose(_transform)
def to_tensor(x, **kwargs):
""" Converts the image to the format: [channels, width, height] """
return x.transpose(2, 0, 1).astype('float32')
In the next and final part, we start training.
Opinions expressed by DZone contributors are their own.
Comments