IBM App Connect Enterprise 13 Installation on Azure Kubernetes Service (AKS)
This article provides a step-by step guide which shows how to install IBM App Connect Enterprise 13 in an Azure Kubernetes Service Cluster.
Join the DZone community and get the full member experience.
Join For FreeThis article describes how to install App Connect Enterprise 13 in an Azure Kubernetes Service Cluster.
Prerequisites
This document assumes you have a Kubernetes cluster in Azure Kubernetes Service running on Microsoft Azure cloud and it has access from your workstation. You should have kubectl configured to access the AKS cluster from a command line window. Verify the access to your cluster is working with the following command;
kubectl get nodes
You should get something similar to the following:
Tools
The installation and configuration steps described here are based on Windows, but it should work on Mac and Linux without issues. The required and recommended tools to install App Connect are:
- Kubectl
- Helm
- GitBash
- OpenSSL
Kubectl
Install Kubectl in your OS environment with the following links:
Helm
Install Helm with the instructions here.
GitBash
Download and install GitBash from this link.
OpenSSL
To install OpenSSL, you need to first install Chocolatey with the installation instructions here.
After Chocolatey has been installed open a PowerShell command line and execute the following command to install OpenSSL;
choco install opensslAdd the openssl path to the PATH user environment variable in your system.
App Connect Enterprise Installation
Installing Cert-Manager in Your Kubernetes Cluster
Use the following steps to install cert-manager.
1. Open a command line window.
2. Execute the following command;kubectl apply -f https://github.com/cert-manager/cert-manager/releases/download/v1.12.10/cert-manager.yaml
3. Verify the installationkubectl get pods --namespace cert-manager
4. You should get something similar to the following picture:
5. Patch the deployment.
From a GitBash command window, execute the following command to patch the cert-manager deployment.
kubectl patch deployment \

  cert-manager \

  --namespace cert-manager \

  --type='json' \

  -p='[{"op": "replace", "path": "/spec/template/spec/containers/0/args", "value": [

  "--v=2",

  "--cluster-resource-namespace=$(POD_NAMESPACE)",

  "--leader-election-namespace=kube-system",

  "--enable-certificate-owner-ref"

 ]}]'
You should get the following response:

Install IBM App Connect Operator Using Helm With the Following Steps.
1. Add the Helm Chart repository with the following command.helm repo add ibm-helm https://raw.githubusercontent.com/IBM/charts/master/repo/ibm-helm
2. Update the helm chart with the following command;helm repo update
3. Create a namespace for the operator, for example -> appconnecteekubectl create namespace appconnectee
4. Set the context to the created namespace -> appconnectee by executing the following command.kubectl config set-context --current --namespace=appconnectee
5. Create an image pull secret in the namespace where you want to deploy the Operator.
The image pull secret is used to access the container images from the IBM Entitled Registry. You need to obtain the Entitlement Key from the IBM Container Software library.
6. Create a new entitlement key or copy an existing entitlement key to create the image pull secret in the following step.
Execute the following command to create the image pull secret.kubectl create secret docker-registry ibm-entitlement-key --docker-server="cp.icr.io" --docker-username=cp --docker-password="myEntitlementKey"
7. Install the operator.
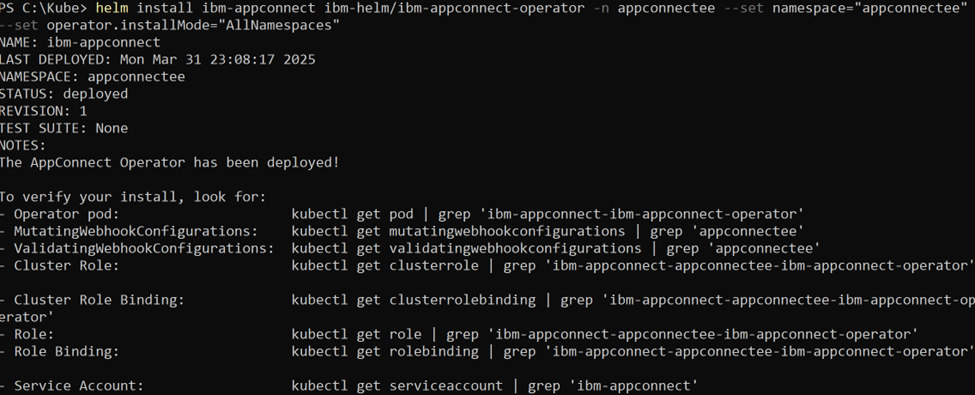
Execute the following command to install the operator. Note that we are using the namespace appconnectee in this command.helm install ibm-appconnect ibm-helm/ibm-appconnect-operator -n appconnectee --set namespace="appconnectee" --set operator.installMode="AllNamespaces"
After the command has completed you should get the following output.
To verify the installation of the operator, execute the following command.
Helm ls
You should get a response similar to the following picture.

Run the following command to verify the operator pod is running.
Kubectl get pods
You should get a response with a pod that starts with ibm-appconnect- and in running status.
Create the NGNIX Controller for External Access to the Cluster Resources
We need to create an ingress controller to allow external access to the App Connect resources. The appendix one has the awsnginxcontroller.yml file. Copy the provided text and create the awseksnginxcontroller.yml file. To create the ingress controller, execute the following steps.
1. Create the namespace for the ingress controller with the following commands.
Kubectl create namespace ingress-nginx

      kubectl config set-context --current --namespace=ingress-nginx
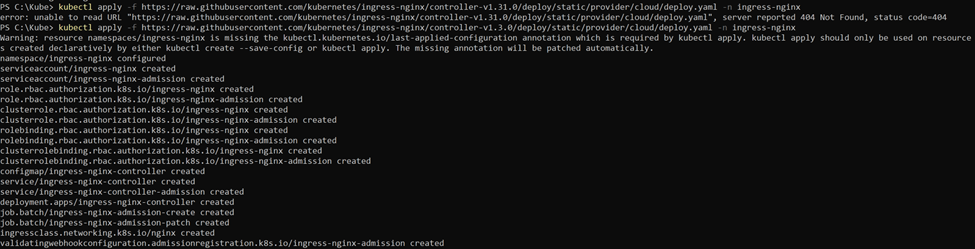
2. Create the ingress controller executing the following command.
kubectl apply -f https://raw.githubusercontent.com/kubernetes/ingress-nginx/controller-v1.3.0/deploy/static/provider/cloud/deploy.yaml -n ingress-nginx
After completing the execution of the command, you should see something like the following picture.
3. Verify the ingress controller.
We need to verify the ingress controller creation and the access to the external IP. It is important to mention that the assignment of the external IP or DNS takes a few minutes. Execute the following commands to verify your ingress controller.
Kubectl get svc -n ingress-nginx
You should get something similar to the following:

4. Take note of the External IP value of the ingress-nginx-controller service. Next, we need to verify if the external ip is accessible. We will use CURL for this. Execute the following CURL command (I am using GitBash on Windows for this).
curl -v External IP Address
You should get something similar to the following screen.
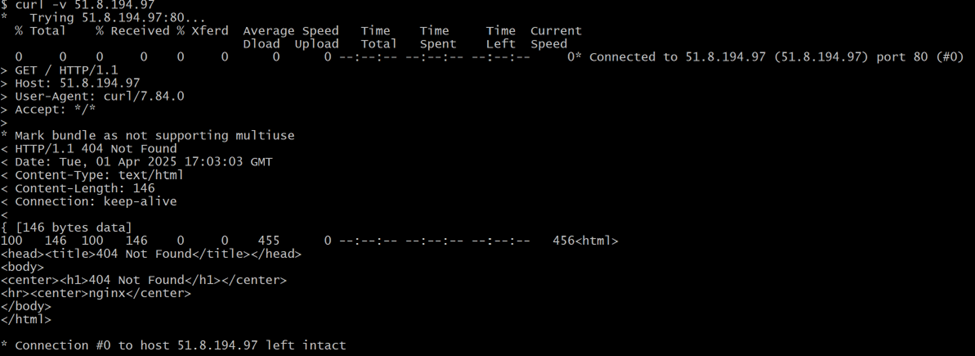
Take note of the IP Address in the response. We will use this address to provision the first App Connect resource (Dashboard). Another option to verify the external ip is accessible is to use a web browser with the external ip value. You should get the 404 Not Found Nginx html as a response.

If all is good you can proceed to the next step which is provisioning the first App Connect resource.
Creating the App Connect Dashboard
In this section we will create an App Connect Dashboard to deploy integrations in a runtime environment. Before creating the dashboard, we need to verify we have the required storage class available.
Storage requirements
The App Connect Dashboard requires a ReadWriteMany storage class.
1. Copy the following text and create the file azurepremiumstorageclass.yml.
kind: StorageClass apiVersion: storage.k8s.io/v1 metadata: name: my-azurefile-csi-premium provisioner: kubernetes.io/azure-file mountOptions: - mfsymlinks - actimeo=30 - dir_mode=0777 - file_mode=0777 - uid=1000 -cache=strict parameters: skuName: Premium_LRS reclaimPolicy: Delete volumeBindingMode: Immediate
2. Execute the following command to create the storage class
kubectl apply -f azurepremiumstorageclass.yml -n appconnectee
- Before creating the dashboard.yml file you should go to the License Reference for IBM App Connect Operator 13 page in this link.
- In this scenario we are using the
AppConnectEnterpriseNonProductionFREElicense with value -> L-KPRV-AUG9NC (See the YAML file below). - Create the following yml file – appconnectdashboard1.yml
apiVersion: appconnect.ibm.com/v1beta1
kind: Dashboard
metadata:
 name: appconnecteedashboard1
 labels:
 namespace: appconnectee
spec:
 license:
  accept: true
  license: L-KPRV-AUG9NC
  use: AppConnectEnterpriseNonProductionFREE
  pod:
   containers:
    content-server:
     resources:
      limits:
       memory: 1024Mi
     requests:
      cpu: 200m
      memory: 100Mi
    control-ui:
     resources:
      limits:
        memory: 1024Mi
      requests:
       cpu: 200m
       memory: 500Mi
authentication:
 integrationKeycloak:
  enabled: false
authorization:
 integrationKeycloak:
  enabled: false
ingress:
 domain: XX.XX.XX.XX.nip.io
api:
 enabled: true
storage:
  size: 5Gi
  type: persistent-claim
  class: my-azurefile-csi-premium
displayMode: IntegrationServers
replicas: 1
version: '13.0'
It is important to mention the following:
Name of the dashboard is appconnecteedashboard1.
License.use is the AppConnectEnterpriseNonProductionFREE.
License.value L-KPRV-AUG9NC.
Authentication and authorization are disabled (false).
The ingress domain is built with the external ip value you got from nslookup or/and the curl command + nip.io -> XX.XX.XX.XX.nip.io.
Storage.class: my-azurefile-csi-premium.
1. Create the dashboard executing the following command;
kubectl apply -f appconnectdashboard1.yml -n appconnectee
2. Verify the creation of the dashboard.
Wait for a minute and execute the following commands to obtain the dashboard and service details.
kubectl get dashboard -n appconnectee
You should get something similar to the following screen.
3. Verify the status of the dashboard is Ready. Now execute the following command.kubectl get svc -n appconnectee
You should get something similar to the following screen.
Note the name of the service. It is built with the dashboard name + -dash. In this example is appconnecteedashboard1-dash. Take note of this name. We will use it to create the ingress resource to the service that will allow to access the dashboard UI.
4. Create the ingress resource for the dashboard.
5. Copy the following text to create the azureingress1.yml file.
# Please edit the object below. Lines beginning with a '#' will be ignored,

# and an empty file will abort the edit. If an error occurs while saving this file will be

# reopened with the relevant failures.

#

apiVersion: networking.k8s.io/v1

kind: Ingress

metadata:

  annotations:

    nginx.ingress.kubernetes.io/backend-protocol: HTTPS

    nginx.ingress.kubernetes.io/proxy-buffer-size: 16k

  creationTimestamp: "2025-03-14T13:00:16Z"

  generation: 4

  labels:

    app.kubernetes.io/component: control-ui

    app.kubernetes.io/instance: appconnecteedashboard1

    app.kubernetes.io/managed-by: ibm-appconnect

    app.kubernetes.io/name: appconnecteedashboard1

    appconnect.ibm.com/kind: Dashboard

    release: appconnecteedashboard1

  name: appconnecteedashboard1-ui

  namespace: appconnectee

spec:

  ingressClassName: nginx

  rules:

  - host: appconnecteedashboard1-ui-appconnectee.XX.XX.XX.XX.nip.io

    http:

      paths:

      - backend:

          service:

            name: appconnecteedashboard1-dash

            port:

              number: 8300

        path: /

        pathType: Prefix

status:

  loadBalancer:

    ingress:

    - ip: XX.XX.XX.XX
6. Update the value of the ip address on the spec.host and status.loadBalancer.ingress.ip elements. Note the value of the host is built with dashboardname + -ui- + namespace + .externalip + .nip.io.
7. Create the ingress resource executing the following command.
kubectl apply -f azureingress1.yml -n appconnectee
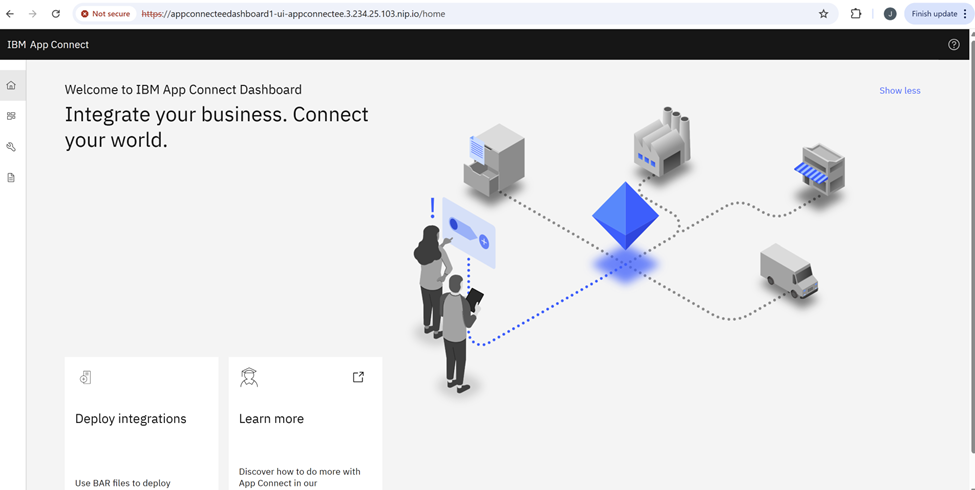
- Access the dashboard.
Open your web browser and go the following URL:
https://dashboardname + -ui- + namespace + .externalip + .nip.io. In this case is https://appconnecteedashboard1-ui-appconnectee.XX.XX.XX.XX.nip.io where XX.XX.XX.XX is your external ip address obtained with curl when the nginx-controller was created.
Accept the security warning messages and proceed to the URL. - You should see the App Connect EE dashboard UI.
![App Connect EE dashboard UI]()
Deploy an Integration To Test the App Connect Installation
In this section we will deploy a simple REST Service integration built with the App Connect Toolkit. The REST service receives two numbers as input parameters and returns the sum of the numbers. We will deploy the integration and test it with Postman.
Deploy the Integration
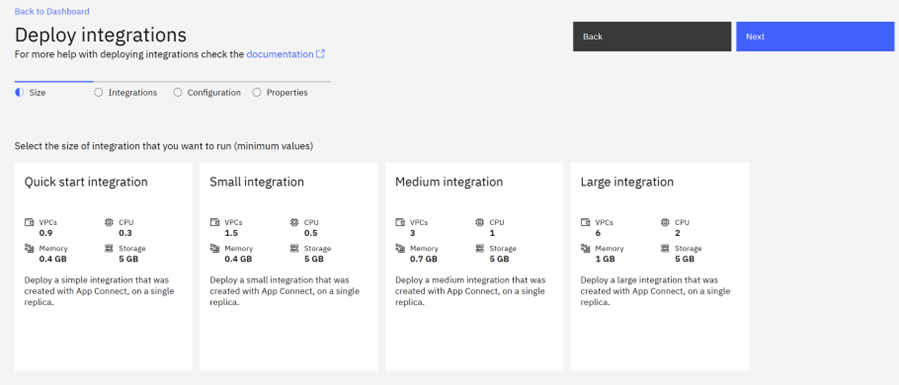
1. On the Dashboard click on Deploy integrations and on the Deploy integrations page click on Quickstartintegration and then click Next.
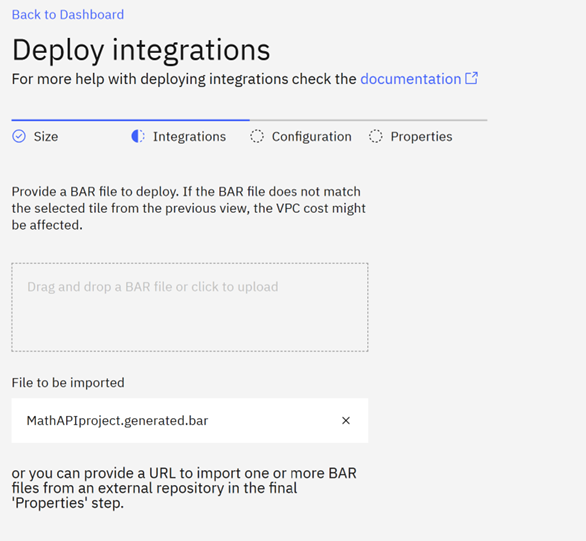
2. On the next page upload your BAR file. In this case is the MathAPIproject.generated.bar file. The BAR file is available in this GitHub repository
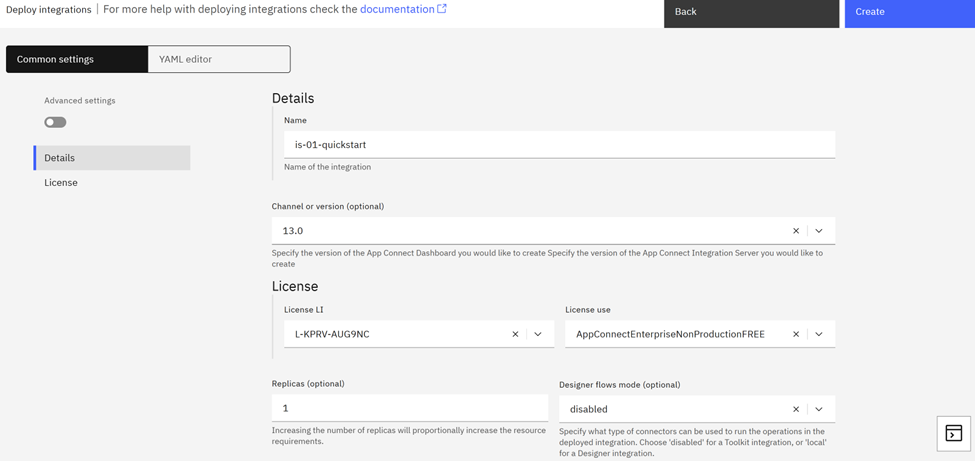
3. Click Next and on the configurations page click Next again. In the next page enter the name of the integration, the channel and the license information and the click on Create.
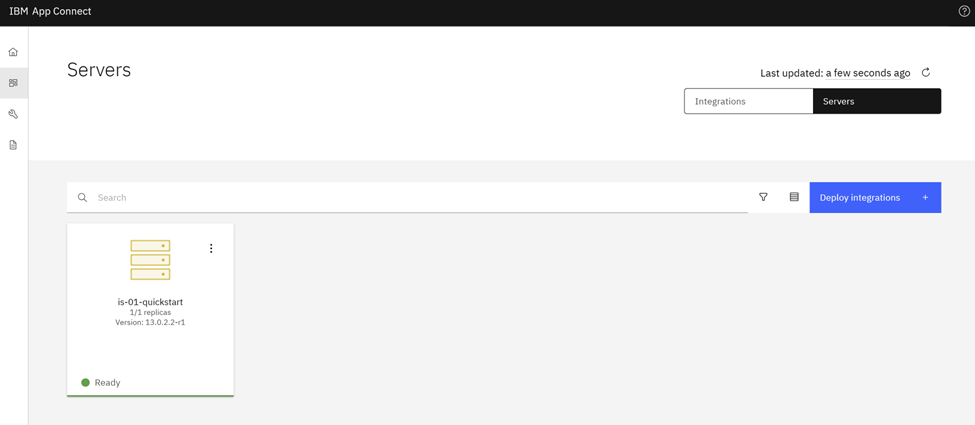
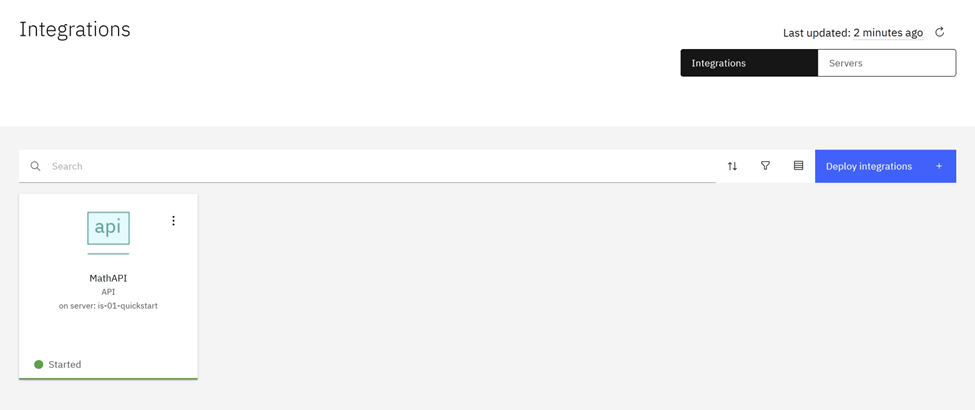
4. Wait for a couple of minutes and you should have an integration server on the servers tab with Ready status.
You should have your integration on the integrations tab.
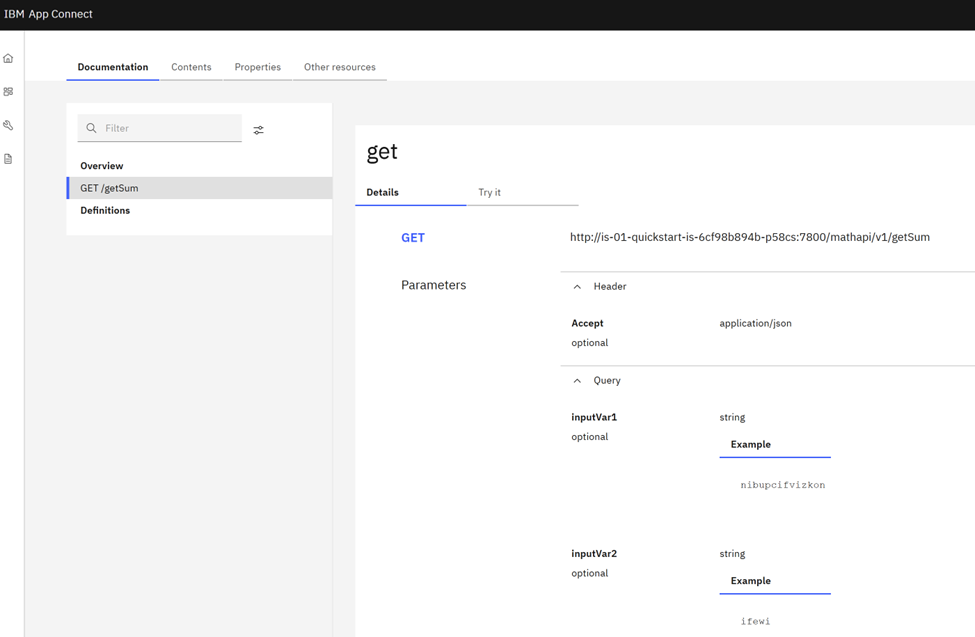
5. Click on the integration to see the details of the REST Service API – MathAPI. Click the Get /getSum operation for complete details.
6. Create the ingress resource for the deployed integration artifact.
We need to create the ingress resource for the deployed integration artifact. Copy the following text and create the mathapiingress.yml file.
apiVersion: networking.k8s.io/v1

kind: Ingress

metadata:

  name: mathapi-service-ingress

  namespace: appconnectee

  annotations:

    kubernetes.io/ingress.class: "nginx"

spec:

  rules:

  - host: is-01-quickstart-is-appconnectee.XX.XX.XX.XX.nip.io

    http:

      paths:

      - path: /

        pathType: ImplementationSpecific

        backend:

          service:

             name: is-01-quickstart-is

             port:

number: 7800apiVersion: networking.k8s.io/v1
kind: Ingress
metadata:
name: mathapi-service-ingress
namespace: appconnectee
annotations:
kubernetes.io/ingress.class: "nginx"
spec:
rules:
- host: is-01-quickstart-is-appconnectee.XX.XX.XX.XX.nip.io
http:
paths:
- path: /
pathType: ImplementationSpecific
backend:
service:
name: is-01-quickstart-is
port:
number: 7800
7. Note the name of the host is built using integrationname-namespace.externalip.nip.io. In this example integration name is is-01-quickstart-is.
8. Execute the following command to create the ingress resource for the integration.kubectl apply -f mathapiingress.yml -n appconnectee
The next step is to test the integration with Postman.
1. Test the integration.
Open PostMan and configure the test with the following parameters.
- Operation: GET
- URL: http://is-01-quickstart-is-appconnectee.XX.XX.XX.XX .nip.io/mathapi/v1/getSum (where XX.XX.XX.XX is your external ip).
- Input variables:
inputVar1inputVar2
The following screen shows the Postman configuration for the test.
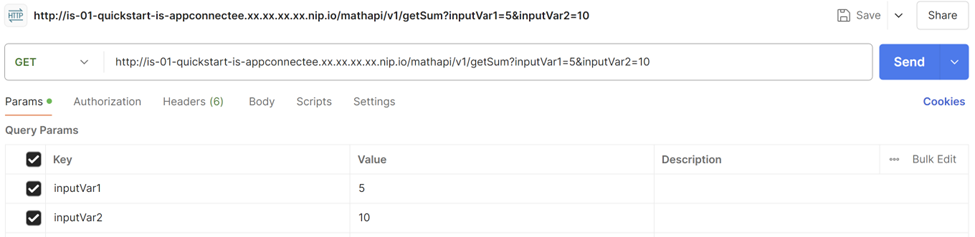
2. Execute the operation with Send. You should get the result like in the following screen.

3. You have completed the App Connect 13 installation on Azure Kubernetes Service (AKS).
Published at DZone with permission of JEAN PAUL TABJA. See the original article here.
Opinions expressed by DZone contributors are their own.
Comments