Interacting With a NEO 6M GPS Module Using Golang and a Raspberry Pi Zero W
Learn more about interacting with NEO 6M GPS Module using Golang and a Raspberry Pi Zero W.
Join the DZone community and get the full member experience.
Join For Free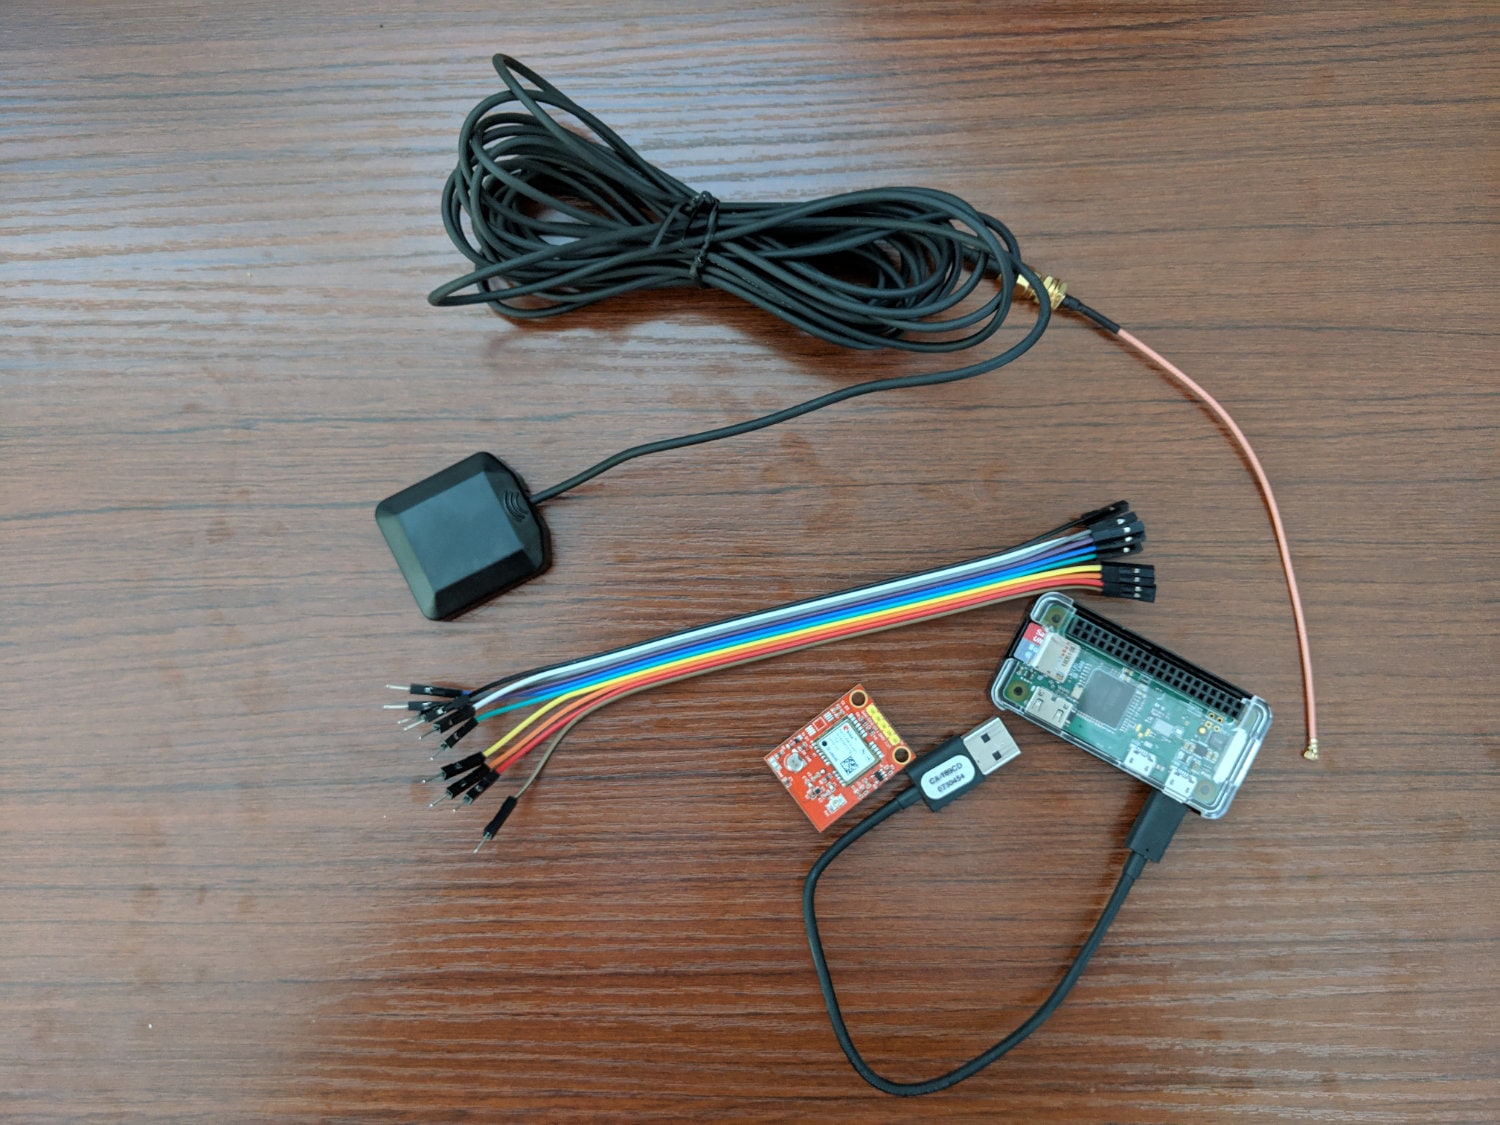
About a week ago, I wrote a tutorial on my NEO 6M GPS module and the Go programming language. In this tutorial, I demonstrated how to use Golang to interact with the serial port on my computer, consume the GPS stream, parse the NMEA formatted sentences, and then exchange the latitude and longitude positions for actual addresses with the HERE Reverse Geocoding service.
I originally got the GPS module for my Arduino and figured: Why couldn’t I do something similar with my Raspberry Pi Zero W? A while back, I had done an experiment with a Raspberry Pi and WLAN AP positioning, where I could calculate an estimate of my position from nothing more than WiFi SSID and BSSID information. That experiment worked but only gave me estimates. Now that I have a GPS module, I can get my location down to just a few meters of accuracy.
In this tutorial, we’re going to take what we learned in the previous tutorial and apply it to our trusted Internet of Things (IoT) device, the Raspberry Pi Zero W.
The Hardware and Software Requirements
Because we’re working with IoT and GPS modules, there are a few hardware requirements on top of our software development requirements. In terms of hardware, I’m using the following:
- Raspberry Pi Zero W
- NEO 6M GPS Module
- Active Antenna
- Active Antenna Adapter
- Female GPIO Header
- Male to Female Jumper Wires
If you’re using other hardware or similar hardware, this tutorial may still work. Just note that I was using the material above. I also had to solder my GPIO header. There is snap on headers, but it is up to you and your skill level.
A picture of my setup can be seen below:
In terms of software, my Raspberry Pi Zero W is running Raspbian Lite which is a flavor of Debian. There aren’t any further dependencies for the Raspberry Pi in terms of software. On my host computer, I have Golang installed. Since Go is a compiled language, it doesn’t need to be installed on the Raspberry Pi.
Configuring the Raspberry Pi Zero W for Serial Interaction
The assumption is that you’ve already installed Raspbian on your Raspberry Pi Zero W and have been able to connect to it with SSH. If you aren’t sure how to do this, I recommend you check out a previous tutorial I wrote titled, Use Your Raspberry Pi as a Headless System without a Monitor.
However, once your Raspberry Pi is ready, you’ll need to configure it to use a serial connection. After establishing an SSH connection, execute the following:
sudo raspi-configThe above command will start the configuration manager where you can change various settings. To get an idea of the things you can accomplish, take a look at the following image:
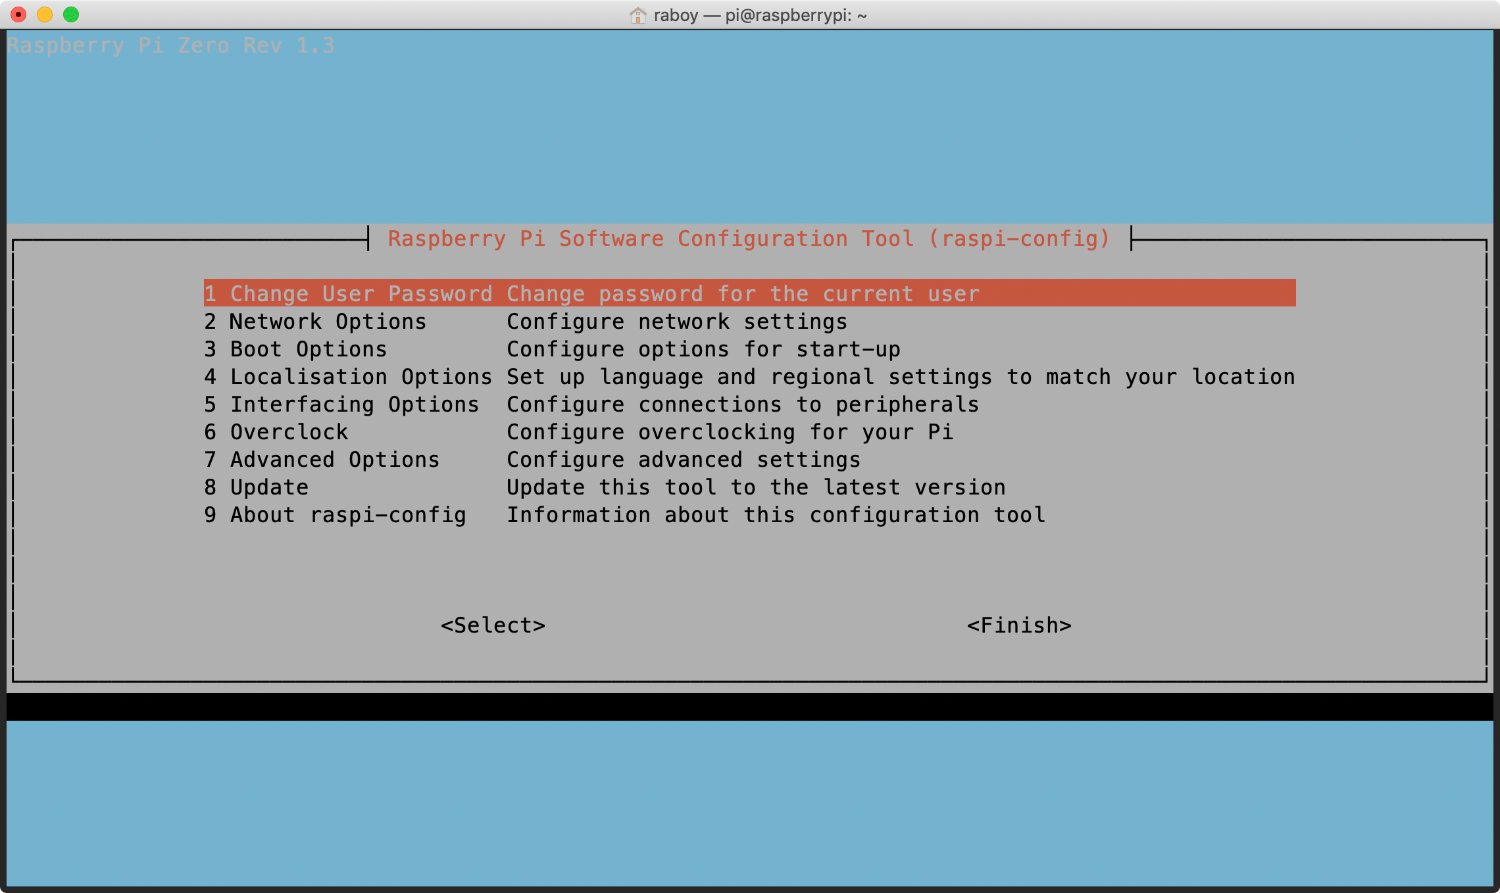
We’re going to be interested in the Interfacing Options. Select it and proceed to choosing P6 Serial from the list.
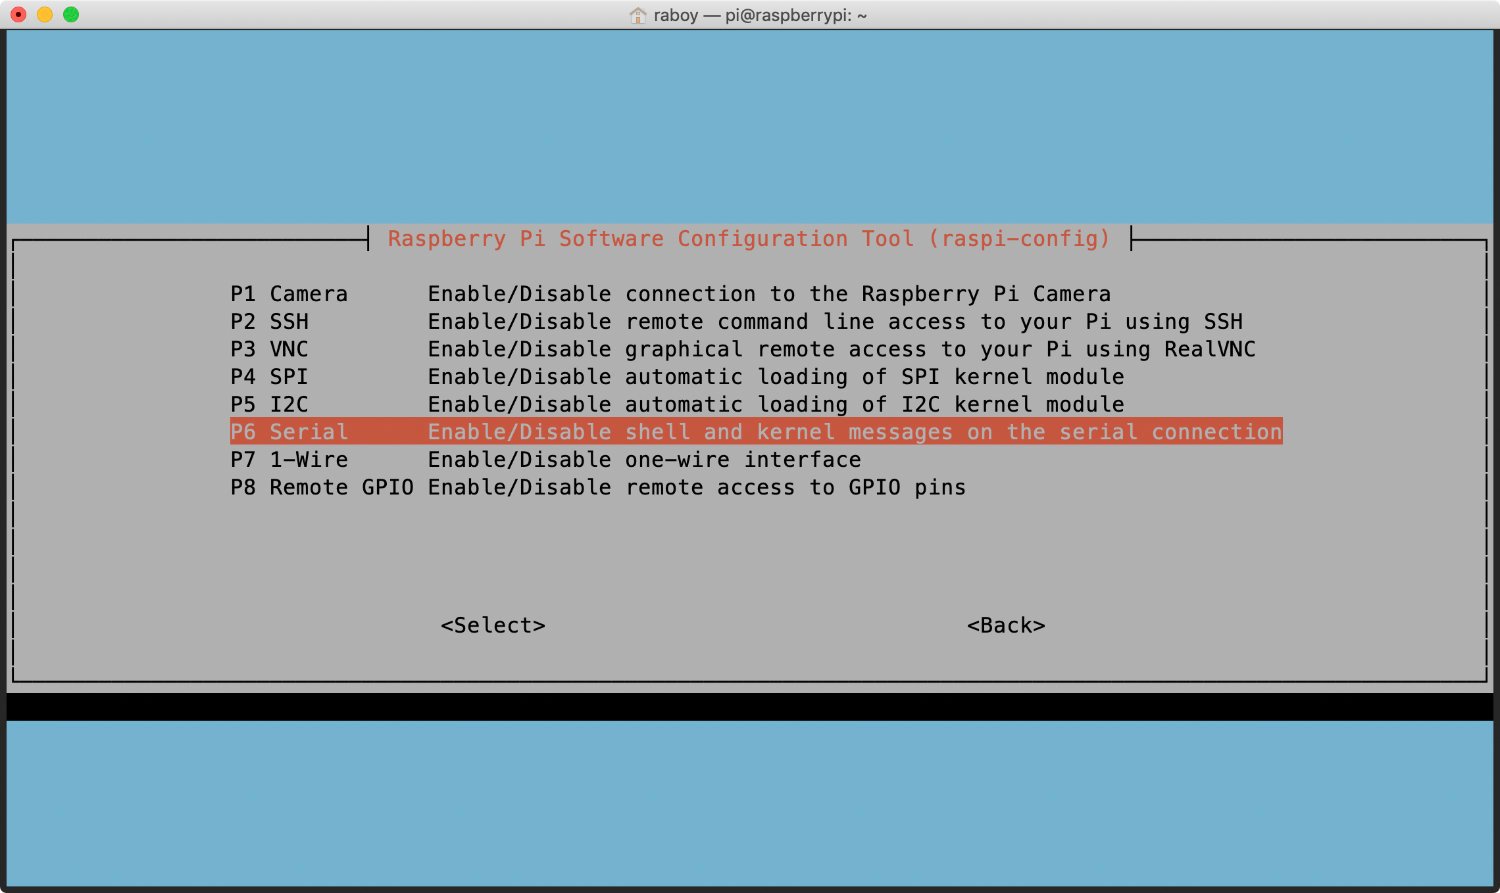
When choosing P6 Serial, you’ll be presented with two new prompts. The first prompt will ask if you want to enable logins over the serial connection:
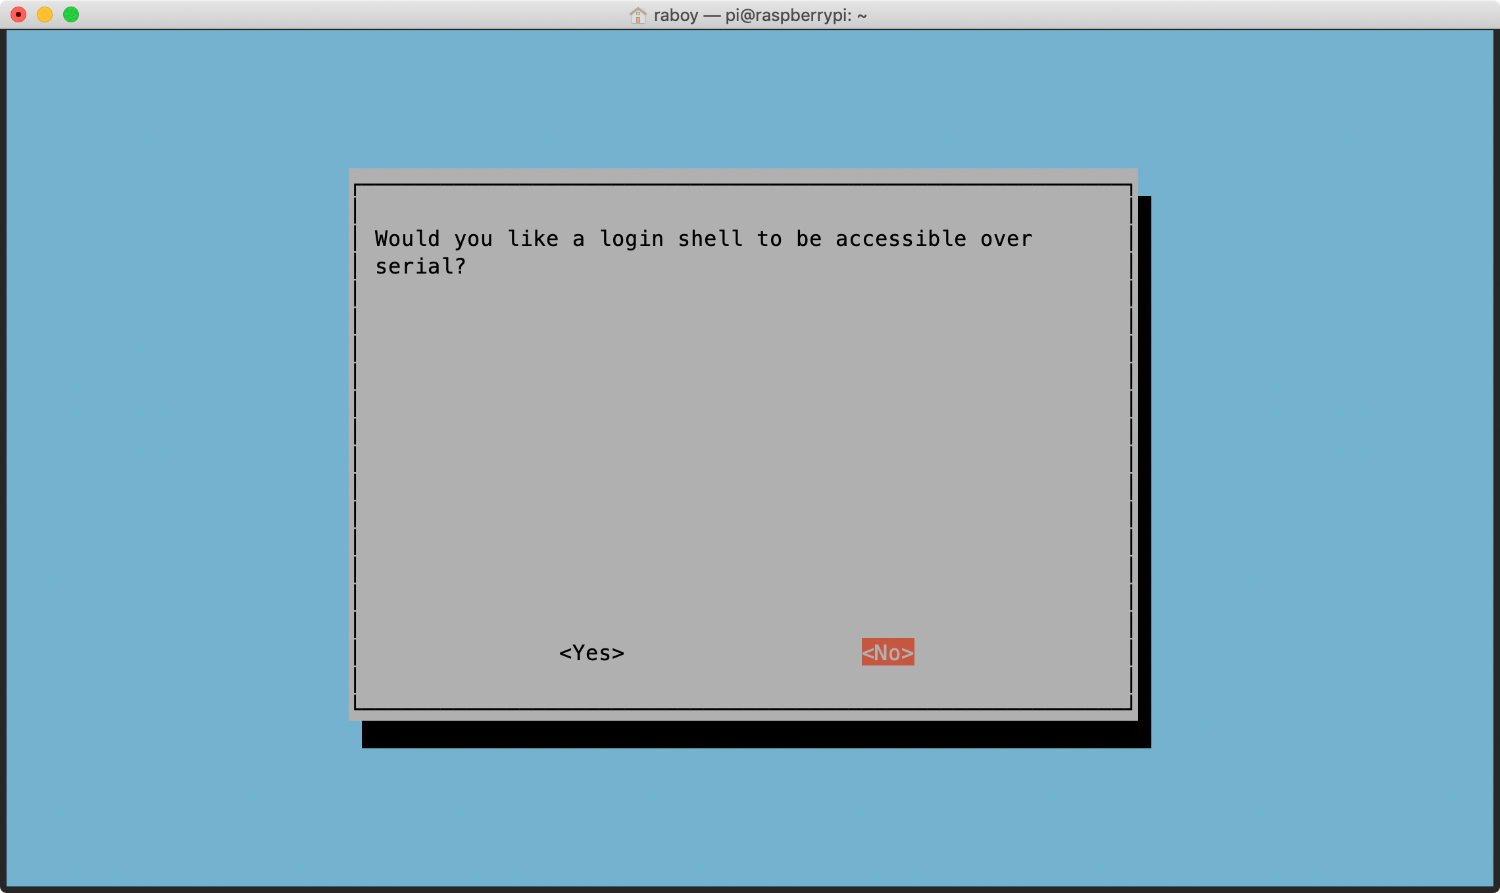
Make sure you choose No when prompted. We’re going to continue to allow logins over SSH only. The next screen will ask you if you want the serial port hardware to be enabled:
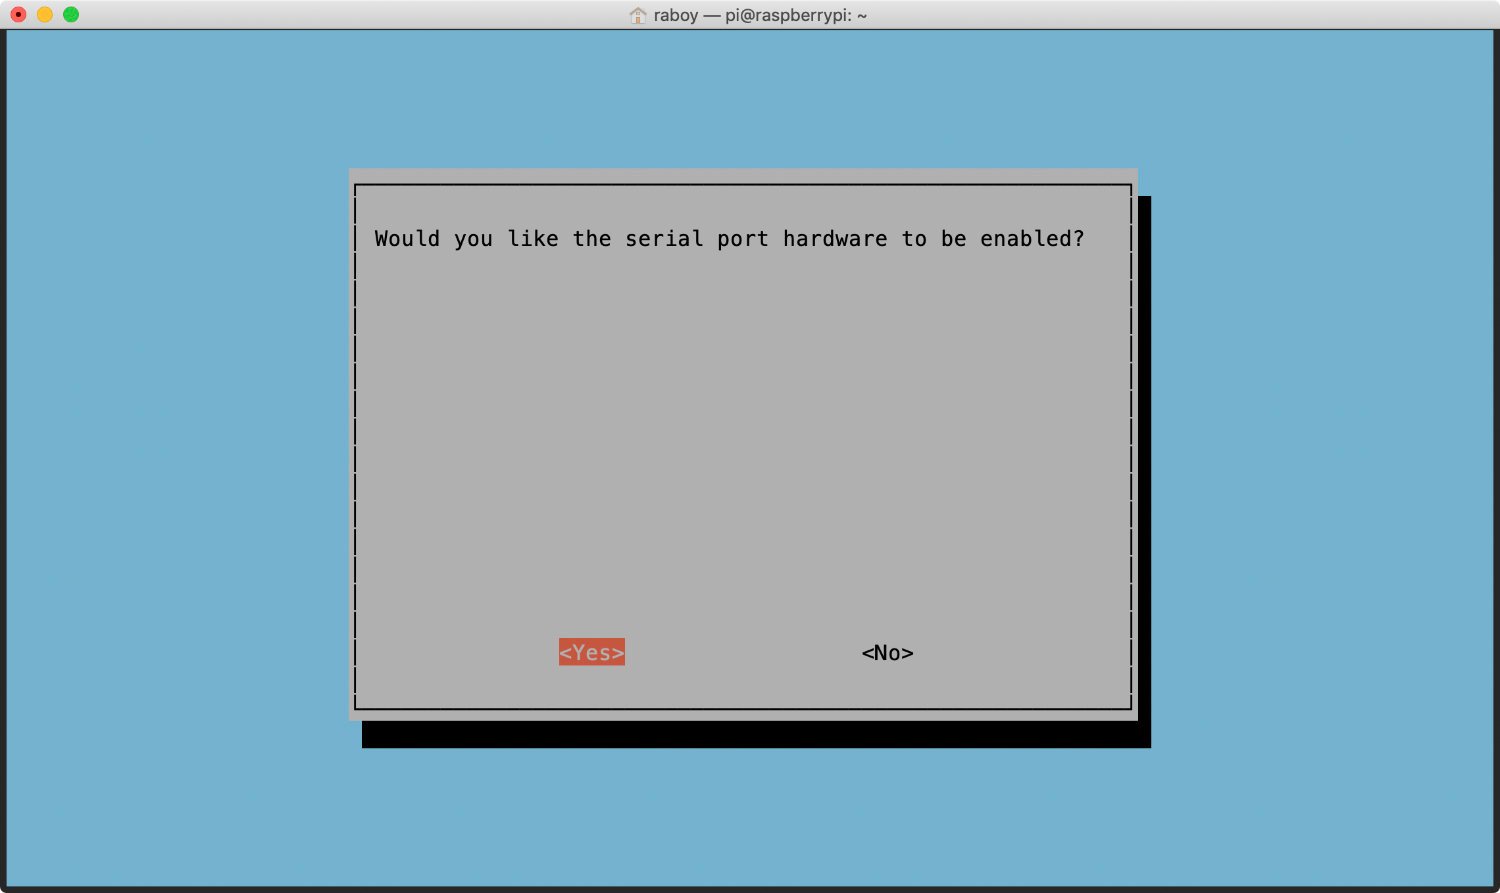
At this step, it is important that you choose the Yes option. This will allow us to access the GPS module via the Raspberry Pi’s serial port. This does not reference a serial port connection between the host computer and the Raspberry Pi.
At this point, we can connect our GPS module.
Connecting the GPS Module to the Raspberry Pi GPIO Header
Before you attempt to connect the GPS module, it is important that your Raspberry Pi is disconnected from power. You’ll also want to make sure you actually have a GPIO header on your Raspberry Pi and your NEO 6M has the appropriate pins attached as well. Rather than rigging up something fancy, we’re going to connect the two devices with a cheap set of jumper wires.
Here is a picture of my hardware configuration:
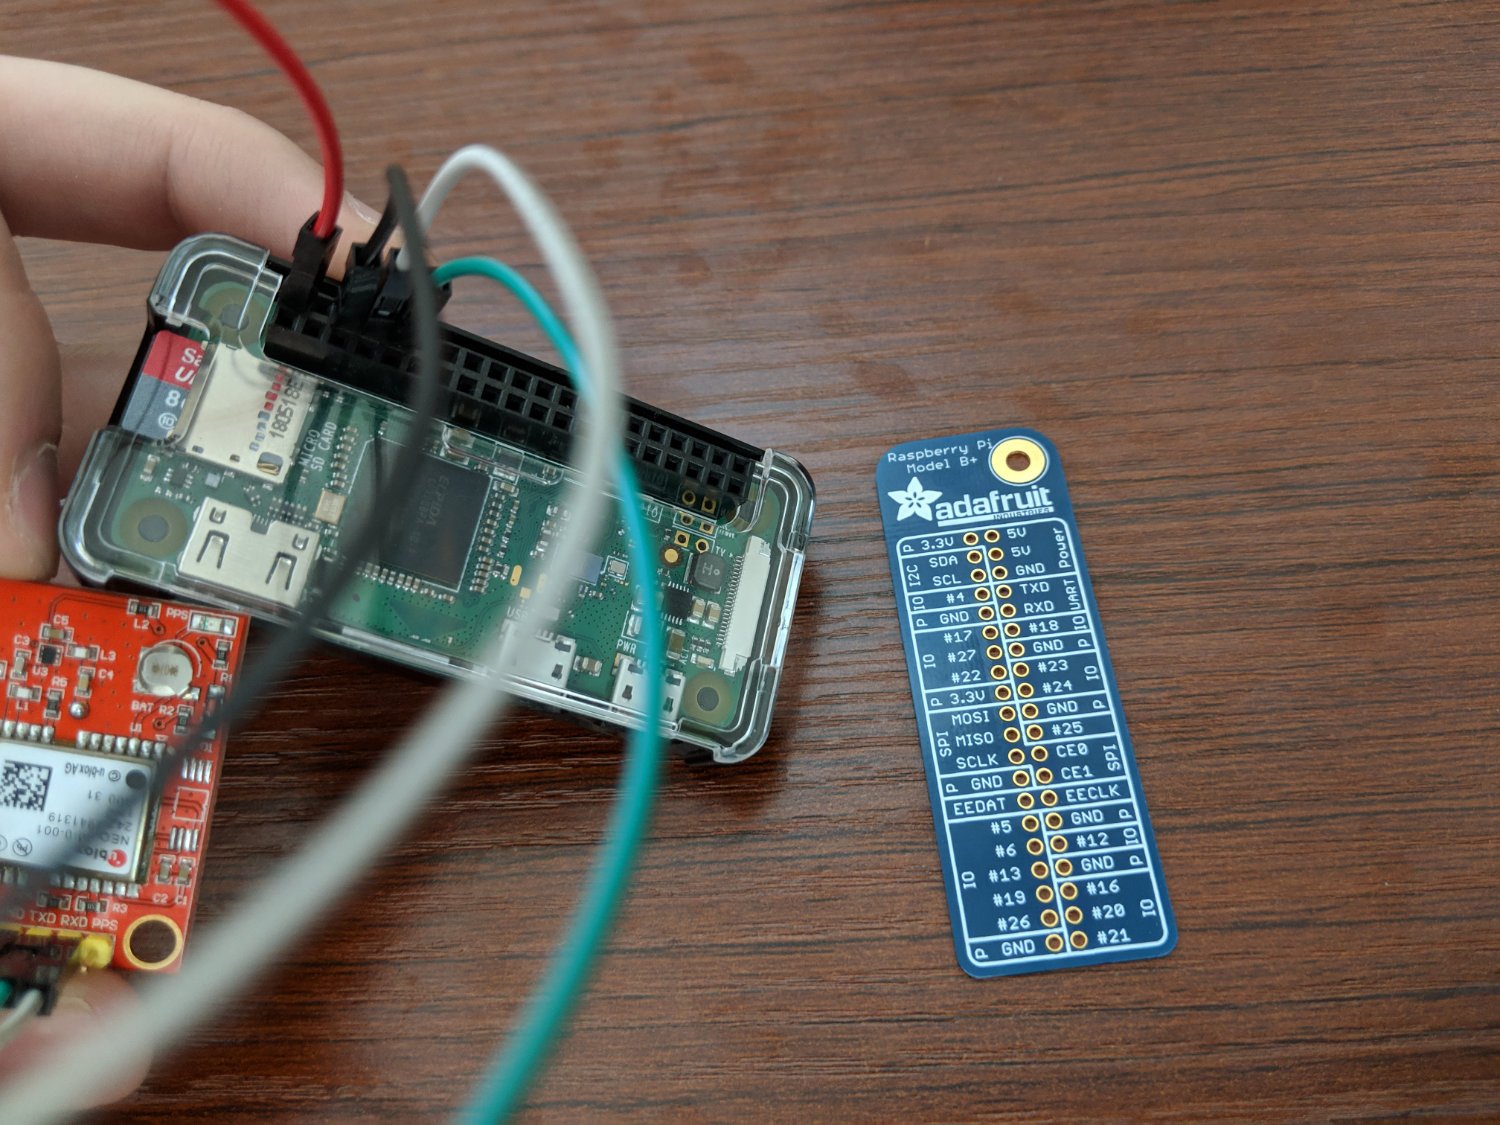
I have a nice Adafruit pin template that I cannot recommend enough since the pins are not labeled on the Raspberry Pi. My wire configuration is as follows:
- GPS VCC to Raspberry Pi 5V (Red)
- GPS GND to Raspberry Pi GND (Black)
- GPS RXD to Raspberry Pi TXD (White)
- GPS TXD to Raspberry Pi RXD (Green)
I am not using the PPS pin on my GPS module for this setup.
You can power on your Raspberry Pi and even read the stream that your serial port is receiving. In my case, the serial port I’m using on the Raspberry Pi Zero W is at /dev/ttyS0, but yours might differ.
You might not notice any useful data coming in. If this is the case, your GPS might not have gotten a satellite fix yet. When I tried without an active antenna, it took about 23 hours to get a fix, but when I hooked up an antenna, it took just a few minutes.
Collecting GPS Data, Parsing the Data, and Reverse Geocoding it With HERE
With the Raspberry Pi ready to go, pretty much all of what we need to do involves copy and paste from my previous tutorial. We won’t go too deep into the code for this tutorial, but I’m going to include it to save you some time.
Within your $GOPATH, create a new project with the following files:
main.go
nmea.go
heredev.go
Most of our driving logic will go in the main.go file while all of our HERE-related logic will go in the heredev.go file, and all of our GPS parsing will go in the nmea.go file.
Open the project’s heredev.go file and include the following:
package main

import (
    "encoding/json"
    "io/ioutil"
    "net/http"
    "net/url"
)

type GeocoderResponse struct {
    Response struct {
        MetaInfo struct {
            TimeStamp string `json:"TimeStamp"`
        } `json:"MetaInfo"`
        View []struct {
            Result []struct {
                MatchLevel string `json:"MatchLevel"`
                Location   struct {
                    Address struct {
                        Label       string `json:"Label"`
                        Country     string `json:"Country"`
                        State       string `json:"State"`
                        County      string `json:"County"`
                        City        string `json:"City"`
                        District    string `json:"District"`
                        Street      string `json:"Street"`
                        HouseNumber string `json:"HouseNumber"`
                        PostalCode  string `json:"PostalCode"`
                    } `json:"Address"`
                } `json:"Location"`
            } `json:"Result"`
        } `json:"View"`
    } `json:"Response"`
}

type Position struct {
    Latitude  string `json:"latitude"`
    Longitude string `json:"longitude"`
}

type Geocoder struct {
    AppId   string `json:"app_id"`
    AppCode string `json:"app_code"`
}

func (geocoder *Geocoder) reverse(position Position) (GeocoderResponse, error) {
    endpoint, _ := url.Parse("https://reverse.geocoder.api.here.com/6.2/reversegeocode.json")
    queryParams := endpoint.Query()
    queryParams.Set("app_id", geocoder.AppId)
    queryParams.Set("app_code", geocoder.AppCode)
    queryParams.Set("mode", "retrieveAddresses")
    queryParams.Set("prox", position.Latitude+","+position.Longitude)
    endpoint.RawQuery = queryParams.Encode()
    response, err := http.Get(endpoint.String())
    if err != nil {
        return GeocoderResponse{}, err
    } else {
        data, _ := ioutil.ReadAll(response.Body)
        var geocoderResponse GeocoderResponse
        json.Unmarshal(data, &geocoderResponse)
        return geocoderResponse, nil
    }
}
Rather than going in-depth as I did in the previous tutorial, the above code will model our API responses and make an HTTP request to the HERE Reverse Geocoding API. We’re using HERE because we’re going to take the latitude and longitude positions retrieved from the GPS and get address estimates from them.
Now, open the project’s nmea.go file and include the following:
package main

import (
    "errors"
    "fmt"
    "math"
    "strconv"
    "strings"
)

type NMEA struct {
    fixTimestamp       string
    latitude           string
    latitudeDirection  string
    longitude          string
    longitudeDirection string
    fixQuality         string
    satellites         string
    horizontalDilution string
    antennaAltitude    string
    antennaHeight      string
    updateAge          string
}

func ParseNMEALine(line string) (NMEA, error) {
    tokens := strings.Split(line, ",")
    if tokens[0] == "$GPGGA" {
        return NMEA{
            fixTimestamp:       tokens[1],
            latitude:           tokens[2],
            latitudeDirection:  tokens[3],
            longitude:          tokens[4],
            longitudeDirection: tokens[5],
            fixQuality:         tokens[6],
            satellites:         tokens[7],
        }, nil
    }
    return NMEA{}, errors.New("unsupported nmea string")
}

func ParseDegrees(value string, direction string) (string, error) {
    if value == "" || direction == "" {
        return "", errors.New("the location and / or direction value does not exist")
    }
    lat, _ := strconv.ParseFloat(value, 64)
    degrees := math.Floor(lat / 100)
    minutes := ((lat / 100) - math.Floor(lat/100)) * 100 / 60
    decimal := degrees + minutes
    if direction == "W" || direction == "S" {
        decimal *= -1
    }
    return fmt.Sprintf("%.6f", decimal), nil
}

func (nmea NMEA) GetLatitude() (string, error) {
    return ParseDegrees(nmea.latitude, nmea.latitudeDirection)
}

func (nmea NMEA) GetLongitude() (string, error) {
    return ParseDegrees(nmea.longitude, nmea.longitudeDirection)
}
The NEO 6M, like most GPS units, returns data in a specific format. My unit, for example, returns $GPGGA lines which are a form of NMEA sentence. There are a variety of line types, so your final code may differ from mine.
Essentially we have a CSV line that we need to load and parse. The point of the nmea.go file is to load the CSV data into a data structure and then parse the latitude and longitude into a format that is more human readable.
The final step is to read our serial data and make use of our nmea.go and heredev.go files. To read from our serial port, we need to install a package. There are quite a few available, but I had the most success with the go-serial package. It can be installed by executing the following from the command line:
go get github.com/jacobsa/go-serial/serialWith our package installed, open the main.go file and include the following to finish off our project:
package main

import (
    "bufio"
    "flag"
    "fmt"
    "log"
    "time"

    "github.com/jacobsa/go-serial/serial"
)

func main() {
    options := serial.OpenOptions{
        PortName:        "/dev/ttyS0",
        BaudRate:        9600,
        DataBits:        8,
        StopBits:        1,
        MinimumReadSize: 4,
    }
    serialPort, err := serial.Open(options)
    if err != nil {
        log.Fatalf("serial.Open: %v", err)
    }
    defer serialPort.Close()
    reader := bufio.NewReader(serialPort)
    scanner := bufio.NewScanner(reader)
    geocoder := Geocoder{AppId: "APP-ID-HERE", AppCode: "APP-CODE-HERE"}
    for scanner.Scan() {
        gps, err := ParseNMEALine(scanner.Text())
        if err == nil {
            if gps.fixQuality == "1" || gps.fixQuality == "2" {
                latitude, _ := gps.GetLatitude()
                longitude, _ := gps.GetLongitude()
                fmt.Println(latitude + "," + longitude)
                result, _ := geocoder.reverse(Position{Latitude: latitude, Longitude: longitude})
                if len(result.Response.View) > 0 && len(result.Response.View[0].Result) > 0 {
                    fmt.Println(result.Response.View[0].Result[0].Location.Address.Label)
                } else {
                    fmt.Println("no address estimates found for the position")
                }
            } else {
                fmt.Println("no gps fix available")
            }
            time.Sleep(2 * time.Second)
        }
    }
}
To access the GPS data, we need to specify the serial port. If yours is different than mine, make sure you update it in the configuration. You’ll also need to add your app id and app code for reverse geocoding.
The serial port will provide a stream of bytes. Each NMEA compliant sentence is separated by a new line, but our stream doesn’t come in a line at a time. Rather than trying to do our own line parsing, we can use a Scanner in Go to process it for us.
When we get a line, we are going to load it with the ParseNMEALine function. Then if no errors happened, we are going to check to see if we have a GPS fix. If we have a fix, we can get the latitude and longitude, print it out, and then use it as part of the reverse geocoding HTTP request.
Again, I’ve just kind of glossed over the Go content in this tutorial. If you want more information on what’s actually happening, check out my previous tutorial.
So we’ve got our code, now we need to get it on the Raspberry Pi Zero W. Rather than trying to compile on the device, which could take a long time, we can cross compile. Execute the following from the command line:
GOOS=linux GOARCH=arm GOARM=5 go buildThe above command will create a binary for Linux and the appropriate Raspberry Pi architecture. For more information on cross-compiling, please check out a tutorial I wrote titled, Cross-Compiling Golang Applications for Use on a Raspberry Pi.
Send the binary file to your Raspberry Pi Zero W and try to run it. If everything went smooth, you should be getting position information as well as address information.
Conclusion
You just saw how to build a Golang application that interacts with a GPS module on a Raspberry Pi Zero W and reverse geocodes the received positions into address estimates. While this isn’t a fancy example, the concepts used can be applied to much more complicated projects.
If you’re looking for more Golang with GPS or Raspberry Pi content, check out my tutorial titled, Tracking a Raspberry Pi with WLAN and Golang, then Displaying the Results with HERE XYZ or Reverse Geocoding NEO 6M GPS Positions with Golang and a Serial UART Connection.
Published at DZone with permission of Nic Raboy. See the original article here.
Opinions expressed by DZone contributors are their own.
Comments