Machine Learning Made Easy: Text Recognition Using Kotlin, MVVM, and Huawei ML Kit
Anywhere repetitive manual reading is done, we can replace it with text recognition.
Join the DZone community and get the full member experience.
Join For FreeText recognition basically takes help from the concept of OCR.
OCR (optical character recognition) basically reads an image character by character and matches the current character with its previously stored data. It behaves exactly like a human reads.
Anywhere repetitive manual reading is done, we can replace it with text recognition. This includes e-commerce, learning, logistics, and a lot more.
Now, let’s discuss the Huawei Text Recognition Service. 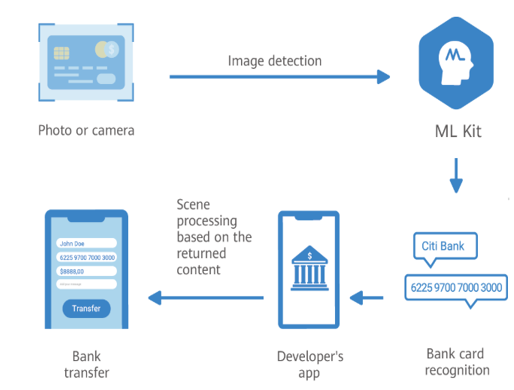
- Text is read from camera stream or static image.
- Image is sent to machine learning model.
- Model analyzes this image via OCR and sends a String response.
You can recognize text in both a static image or dynamic camera stream.
You can even call these APIs synchronously or asynchronously as per your application requirement.
You can use this service on a device, i.e. a small machine learning algorithm that can be added to your application, and it will work perfectly fine.
You can use this service on the cloud, i.e. once we fetch our image, we can transmit that image onto the cloud and can get even better accuracy and result within milliseconds.
Below is the list of languages supported by ML Kit:
On device:
- Simplified Chinese
- Japanese
- Korean
- Latin-based languages
On cloud:
- Chinese
- English
- Spanish
- Portuguese
- Italian
- German
- French
- Russian
- Japanese
- Korean
- Polish
- Finnish
- Norwegian
- Swedish
- Danish
- Turkish
- Thai
- Arabic
- Hindi
Development Process
Step 1: Create a new project in Android Studio.
Step 2: Choose a dependency as per your project requirements.
// Import the base SDK.
implementation 'com.huawei.hms:ml-computer-vision-ocr:1.0.3.300'
// Import the Latin-based language model package.
implementation 'com.huawei.hms:ml-computer-vision-ocr-latin-model:1.0.3.315'
// Import the Japanese and Korean model package.
implementation 'com.huawei.hms:ml-computer-vision-ocr-jk-model:1.0.3.300'
// Import the Chinese and English model package.
implementation 'com.huawei.hms:ml-computer-vision-ocr-cn-model:1.0.3.300'
If you want a lite version, use the below dependency:
xxxxxxxxxx
implementation 'com.huawei.hms:ml-computer-vision-ocr:1.0.3.300'
Step 3: Automatically update the machine learning model:
xxxxxxxxxx
<meta-data
android:name="com.huawei.hms.ml.DEPENDENCY"
android:value="ocr" />
Step 4: Add the below permissions in the manifest file:
xxxxxxxxxx
<uses-permission android:name="android.permission.CAMERA" />
<uses-permission android:name="android.permission.INTERNET" />
I won’t be covering the part where how we can get image form device via camera or gallery.
Let’s jump into the TextRecognitionViewModel class, where we have received a bitmap that contains the user image.
Below is the code you can use to call the text recognition API and get the String response:
xxxxxxxxxx
fun textRecognition() {
val setting = MLRemoteTextSetting.Factory()
.setTextDensityScene(MLRemoteTextSetting.OCR_LOOSE_SCENE)
.setLanguageList(object : ArrayList<String?>() {
init {
this.add("zh")
this.add("en")
this.add("hi")
this.add("fr")
this.add("de")
}
})
.setBorderType(MLRemoteTextSetting.ARC)
.create()
val analyzer = MLAnalyzerFactory.getInstance().getRemoteTextAnalyzer(setting)
val frame = MLFrame.fromBitmap(bitmap.value)
val task = analyzer.asyncAnalyseFrame(frame)
task.addOnSuccessListener {
result.value = it.stringValue
}.addOnFailureListener {
result.value = "Exception occurred"
}
}
Disscussion
- I wanted to use cloud services, so I choose
MLRemoteTextSetting(). - As per density of characters, we can set
setTextDensityScene()toOCR_LOOSE_SCENEorOCR_COMPACT_SCENE. - Once density is set, we will set text language by
setLanguageList(). - We can pass a collection object of
ArrayList<String>to it. I have added five languages to my model but you can add languages as per the need. MLRemoteTextSetting.ARC: Return the vertices of a polygon border in an arc format.- Now, our custom
MLRemoteTextSettingobject is ready and we can pass this toMLTextAnalyzerobject.
Next step is to create an MLFrame using the below code and provide your previously fetched image in bitmap format.
MLFrame frame = MLFrame.fromBitmap(bitmap);
On the analyser object, we will be calling asyncAnalyseFrame(frame) and providing MLFrame which we recently created.
This will yield you a Task<MLText> object, on this object you will get two callbacks.
- onSuccess
- onFailure
You can save the new resource from onSuccess() and stop the analyzer to release detection resources with the analyzer.stop() method.
If you want to use the on device model, only the below changes are required.
xxxxxxxxxx
MLTextAnalyzer analyzer = MLAnalyzerFactory.getInstance().getLocalTextAnalyzer();
MLLocalTextSetting setting = new MLLocalTextSetting.Factory()
.setOCRMode(MLLocalTextSetting.OCR_DETECT_MODE)
.setLanguage("en")
.create();
Final result:

Conclusion
I hope you liked this article. I would love to hear your ideas on how you use this kit in your applications.
Opinions expressed by DZone contributors are their own.
Comments