Most Practical Selenium WebDriver Tutorial With Examples
A Selenium WebDriver tutorial to help you get into the basics of Selenium WebDriver, its architecture, and automate testing with Selenium WebDriver.
Join the DZone community and get the full member experience.
Join For FreeSelenium is one of the most widely used automation frameworks for web-application testing. It automates browser testing and eases redundant test efforts for the QA Community. Most of the organizations are switching to using Selenium to automate their test suites which are often run regularly. Selenium WebDriver is a pivotal component of the Selenium suite. This is a Selenium WebDriver Tutorial to help you understand what is Selenium WebDriver and how it came into existence. We will also gaze upon the Selenium WebDriver architecture and run automation testing with Selenium WebDriver.
Before we deep dive into this Selenium WebDriver tutorial, we will need to understand what is Selenium and what are Selenium components.
What Is Selenium?
Selenium is an open-source automation testing framework, which is used to validate web-based applications. It enables us to execute tests across different browsers and platforms. Some of its utilities are:
- Selenium supports multiple programming languages like Java, Python, C#, JavaScript, Ruby, PHP, and Perl.
- Selenium is also platform-independent, which means if you write a Selenium test in say Windows OS, you can easily execute the same on Linux or macOS.
- Selenium tests can be executed across multiple browsers, like Firefox, Chrome, Internet Explorer, Safari, and Opera.
- It has a wide community that is readily available for support.
- Parallel test execution is one of the prime features of Selenium.
What Are The Components Of Selenium?
As already stated, Selenium is a framework, i.e. it is not a single software but a suite, composed of different components. Refer below the flowchart to see the evolution of Selenium components.
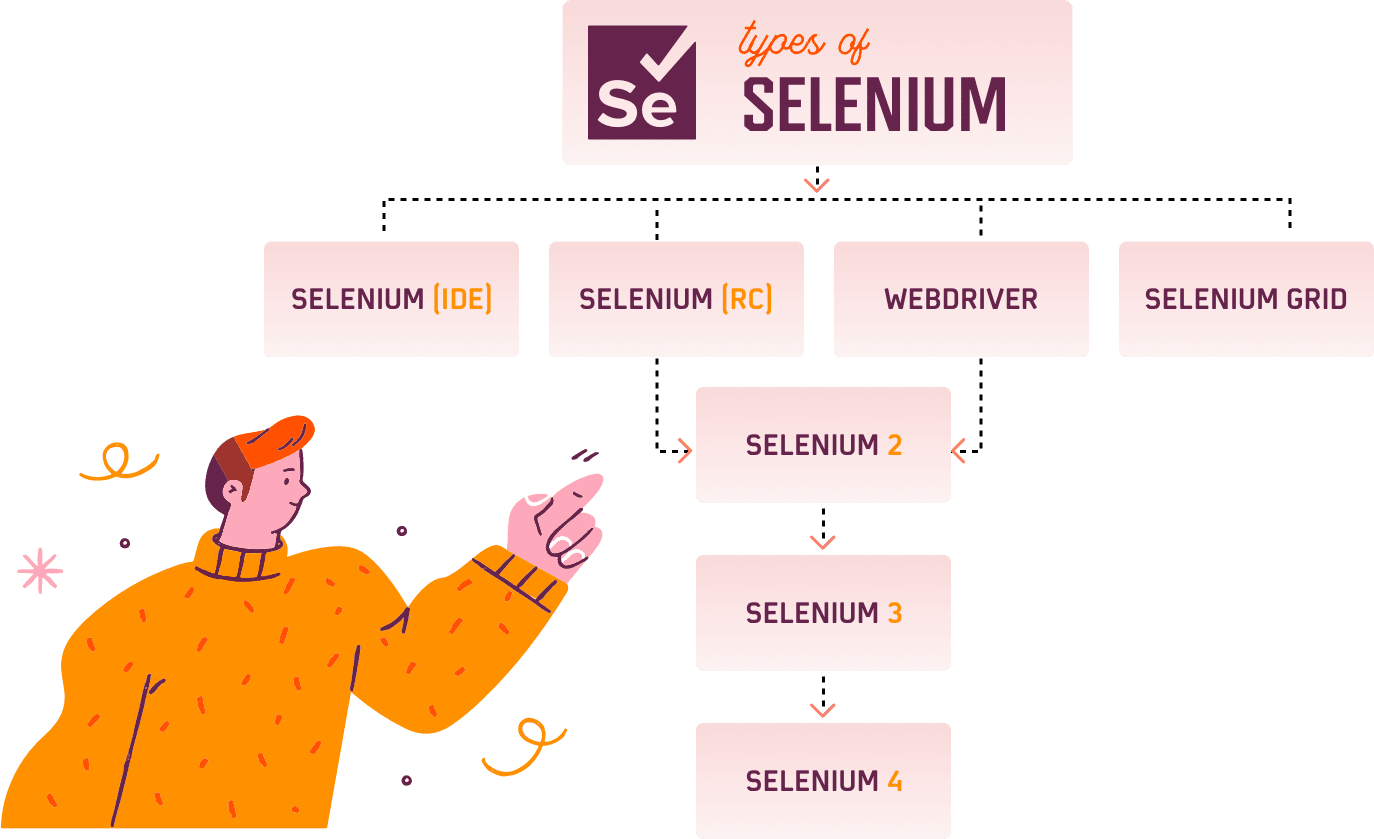
Selenium is composed of four main components-
Selenium IDE
Selenium RC
WebDriver
Selenium Grid
Let us briefly understand each of these components.
Selenium IDE
Selenium Integrated Development Environment(IDE) is the simplest framework that is easiest to learn. It is a browser plugin for Mozilla Firefox and Google Chrome. You need not have any programming language experience to work with the IDE. It allows a record-and-playback approach wherein you can record your test steps and export them into your preferred programming language. These exported tests can then be used in Selenium WebDriver. It is generally used to create test prototypes. You can download the Selenium IDE from the Official Selenium website.
Selenium RC
It is basically a server that enables users to create test scripts in any of the supported languages. Unlike the Selenium IDE, it doesn’t have a record and playback feature. It was known as Selenium 1.0. This version brought the concept of parallel and remote execution. Many limitations, like the Selenium RC server, must be running, less realistic browser interactions, inconsistent results, etc led to its deprecation and evolution of the Selenium WebDriver.
Selenium WebDriver
Selenium WebDriver overcomes the limitations of Selenium RC. Unlike Selenium RC, it does not depend on JavaScript. It controls the browser by direct communication. It has faster execution time as compared to IDE and RC. Selenium RC and WebDriver were merged into one single unit known as Selenium WebDriver 2.0. Over time Selenium WebDriver has been enhanced for more features and functionalities and we have now Selenium 4.0 in the market which is being widely used. In this article, we will focus mainly on Selenium WebDriver and use the same in creating automated test cases.
Selenium Grid
Selenium Grid enables the users to perform parallel test execution. It is used along with Selenium RC to run parallel tests across different browsers and machines. Users can run simultaneous tests in multiple environments simultaneously thereby saving a lot of time. It implements the hub-nodes concept, where each node receives commands from the centrally located hub.
How Is Selenium WebDriver Different From Selenium RC?
Before we get to a practical demonstration in this Selenium WebDriver tutorial. It is pivotal to understand the difference between Selenium WebDriver and Selenium RC or you can say the difference between Selenium 1.0 and Selenium 2.0.
Difference in Architecture
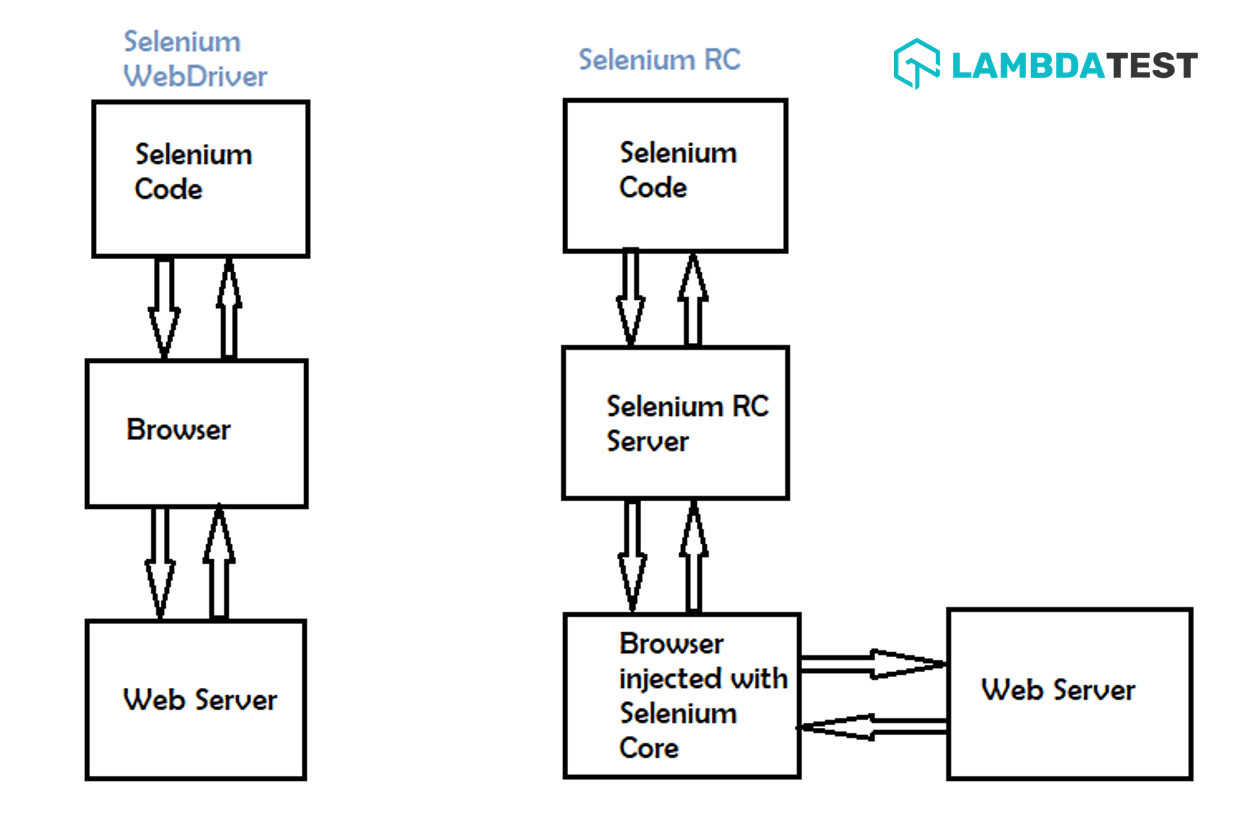
Selenium WebDriver has a simplified architecture as compared to Selenium RC. The WebDriver controls the browser from the Operating System. To work with WebDriver you just need the programming language bindings and a browser driver.
Selenium RC on the other hand requires a Selenium Remote Control Server to be running before executing tests.
Selenium RC acts as a middle layer between the Selenium code and the browser, This layer injects Selenium Core, which is a Javascript program into the browser. This core starts receiving instructions given by your program though the RC server. The Selenium Core then executes them as Javascript commands. The browser follows the Selenium Core instructions and sends back the response to the Selenium RC server. Now the RC Server receives the browser response and displays the results to end-users.
The Difference in Execution Speed
Each instruction follows this lengthy process in Selenium RC, while in Selenium WebDriver direct interaction reduces the lifecycle.
Selenium WebDriver interacts directly with the browser and uses its engine to control the same, hence the speed of execution is fast.
Selenium RC first converts the Selenium commands into Selenium Core which controls the web browser, as a result, the execution speed is slower.
Difference in Interaction
Selenium WebDriver apes real-life interactions by communicating with the web browser directly. For example, if some web-element is hidden or disabled, the WebDriver would not be able to locate it just like a normal human.
Selenium RC uses Selenium Core which is similar to JavaScript code. This core can access hidden or disabled elements. So even if some textbox is disabled on the UI, using Selenium RC, the user can input values to it.
Difference in API
Selenium RC’s API has confusing commands. For example, it becomes confusing whether to use click, mouseDown, or mouseDownAt; or use type or typeKeys.On top of it, different browsers interpret these commands differently. Hence it becomes a task to select the right command at the right place.
Selenium WebDriver’s API is simpler and easy to use.
The Difference in Browser Support
Selenium WebDriver supports the headless HTMLUnit browser. By headless, it means that there is no UI display and the commands execute with an invisible browser.
Selenium RC has no support for the headless browser.
Selenium WebDriver Architecture
The following figure gives an overview of Selenium WebDriver’s architecture.
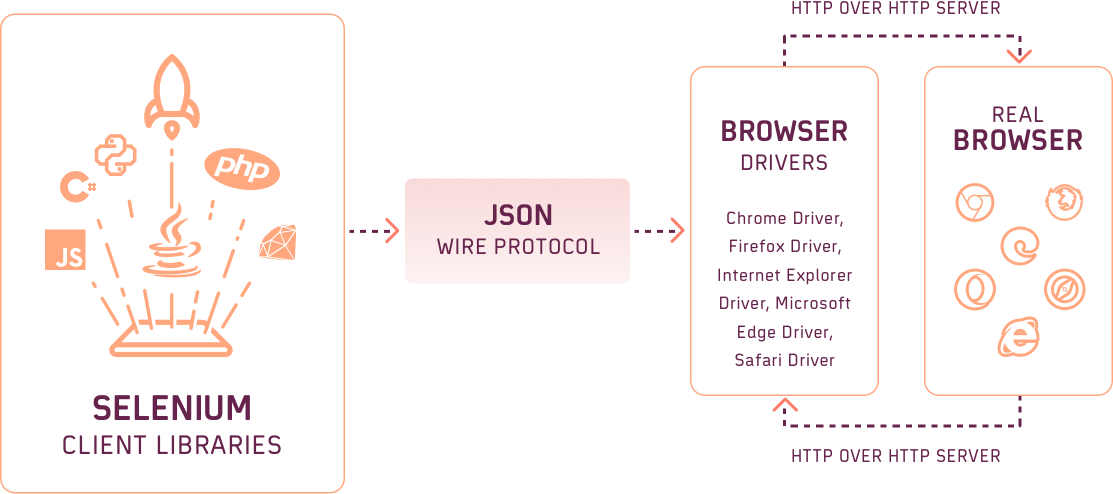
The Selenium WebDriver constitutes of four major components:
Selenium Client Libraries/ Language Bindings
JSON Wire Protocol
Browser Drivers
Real Browsers
Selenium Client Libraries/Selenium Language Bindings
In order to support multiple languages, Selenium developers have built the language bindings. If you are writing your tests in java you can use the Java bindings. These client libraries can be downloaded from the official Selenium website.
JSON Wire Protocol
JSON is an abbreviated form of JavaScript Object Notation. It transfers the data between client and server. It provides support for data structures like objects and arrays, hence making data reading and writing easier. It acts as a REST(Representational State Transfer) API to transfer information between the HTTP servers.
Browser Drivers
In order to develop a secure connection with the browser, Selenium uses Drivers. Each browser has its own driver that hides the internal logic of the browser’s functionality. In addition to it, each automation language has a corresponding browser driver. On executing scripts, the following series of operations happen —
Every Selenium command generates a corresponding HTTP request, which is sent to the browser driver.
This request is routed through the HTTP Server.
The HTTP Server now drives the instruction execution on the browser.
The browser sends back the status to the HTTP Server, which forwards it to the automation script.
Some of the browser drivers are, ChromeDriver, GeckoDriver, IEDriver, etc. These can be downloaded from GitHub repositories of the corresponding browsers.
Browsers
Browsers are the end-point of our test execution. Selenium supports all major browsers like Firefox, Chrome, Internet Explorer, Safari, etc.
Selenium WebDriver Download, Installation and Set-Up
In this Selenium WebDriver tutorial, we will demonstrate using the Windows Operating System with Java as the programming language and Eclipse as the IDE. Now we are about to get our hands dirty in this Selenium WebDriver tutorial. Starting off with the prerequisites:
Install Java
Install Eclipse IDE
Install Selenium WebDriver
Install Java
You need to follow the steps below, to download Java in your system.
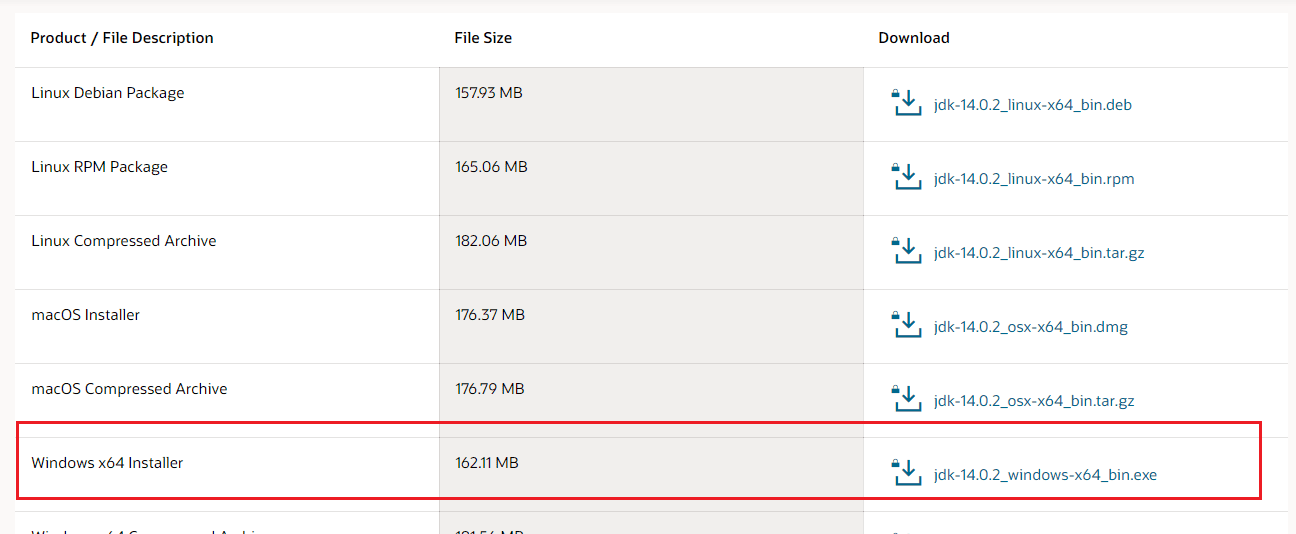
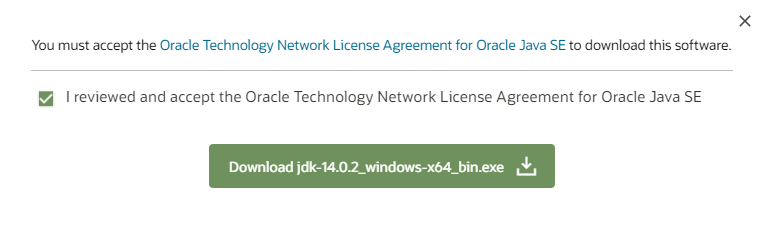
Step 1: Go to the official Java Download Website and download the JDK for Windows x64 Installer.
Step 2: Accept the license agreement in the pop-up next and click on Download.
Step 3: Once the download is done, navigate to the Downloads folder and double click the executable so that Java is installed in your system.
Set Up Environment Variables
Once the installation is complete you need to set the Environment Variables using the following steps-
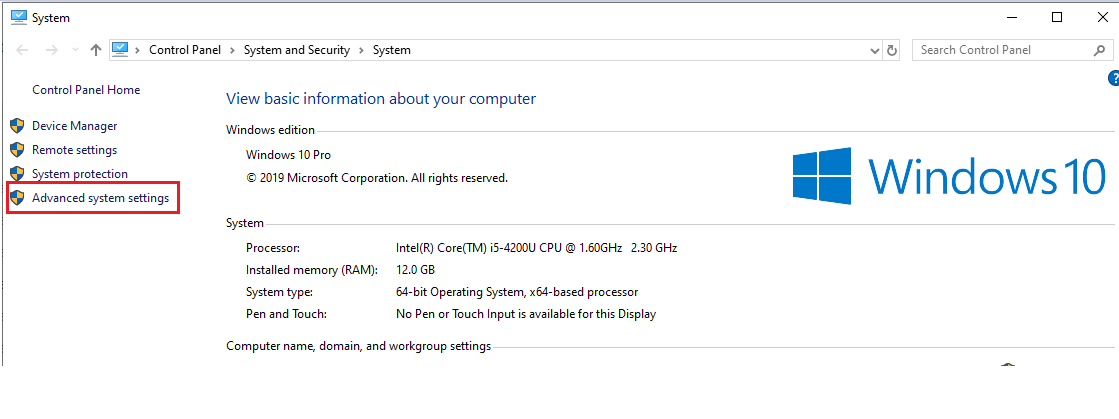
Step 1: Open your PC settings and select Advanced System Settings from the System dialog window.
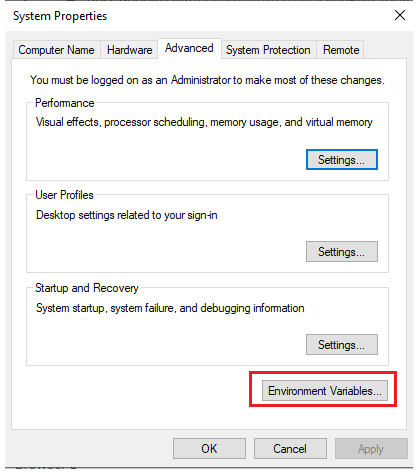
Step 2: Click on the Environment Variables button on the next window.
Step 3: Now under the System Variables double click on Path.
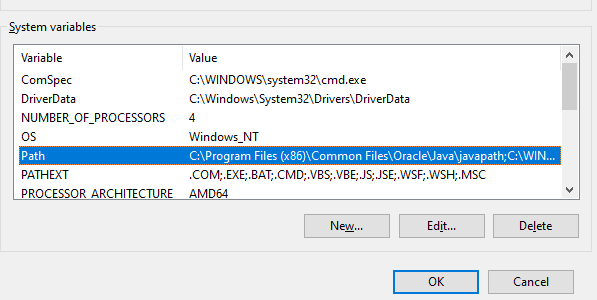
Step 4: Add the complete path of the Java installation directory as per your system location and click OK.
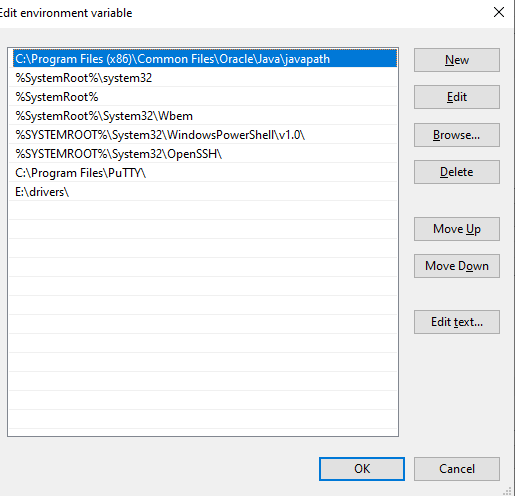
Step 5: That’s it. You can now see the topmost path in the screenshot is the java path in my system.
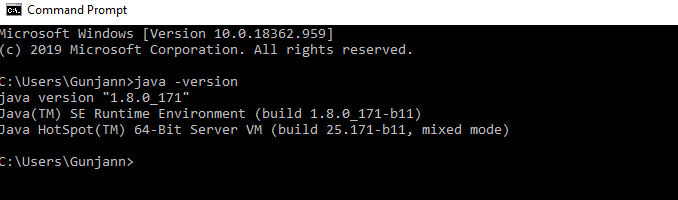
To verify that the java is installed and variables are set correctly, open Command Prompt and type: java -version. You will see the java version installed in your system.
And there you go, your first prerequisite is fulfilled. The next step is installing Eclipse.
Install Eclipse
Step 1: Download Eclipse IDE for Java Developers from the Official Eclipse website. I would suggest downloading the last stable release. Select the download based on your system architecture. I am using eclipse Mars but you can choose any of the latest versions.
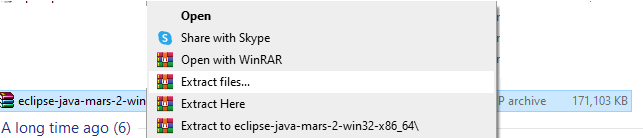
Step 2: Once the download is complete, extract the zip file at a location as per your convenience.
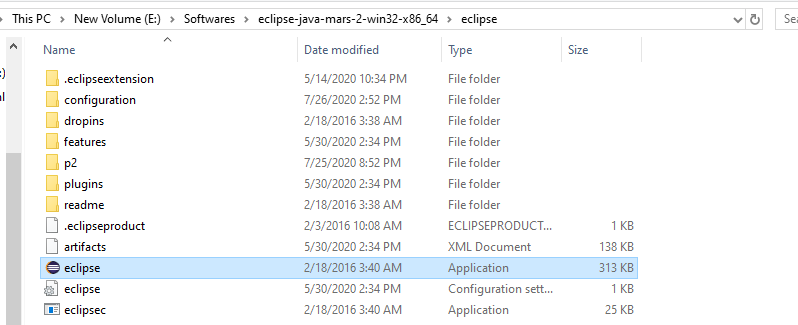
Step 3: Now open the extracted folder and double click on eclipse.exe.
The eclipse will open up and there you are done with your second prerequisite of this Selenium WebDriver tutorial.
Download Selenium WebDriver and Set-Up
The last step is to install the Selenium Standalone Server which is shown in the steps below-
Step 1: Navigate to the Official Selenium Website.
Step 2: You will see a section for Selenium Client & WebDriver Language Bindings. You can download the client libraries corresponding to your language preference. We will be working with Java Client Bindings in this article.

Step 3: Once the file is downloaded, extract it to a folder of your choice from where you can use it later.
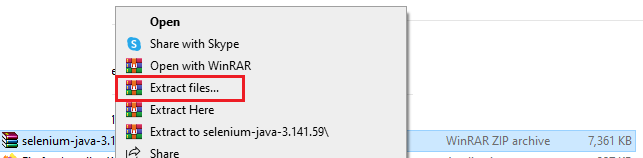
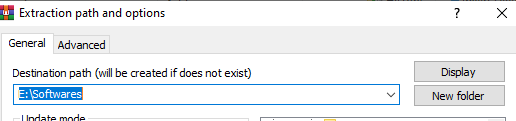
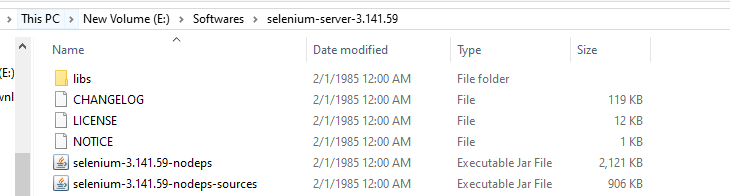
Step 4: You can now see the corresponding extracted file at the selected destination folder.

Step 5: On opening the folder, you will be able to see the jar files, a libs folder(which contains some more jar files), and a Changelog file.
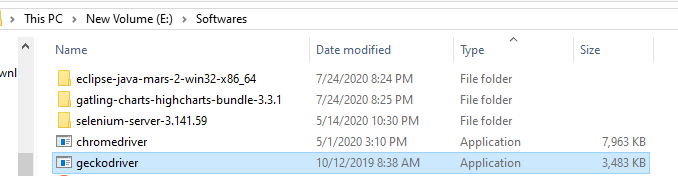
Step 6: Next, you need to download the browser drivers that will help you instantiate the browser. Below are the links to download the drivers for some major browsers:
You can refer to the Browsers section in the Selenium Website to download drivers for more browsers.
Step 7: Next, simply extract the downloaded driver and store it at a location from where you can use the same.
Now we are done with setting up the prerequisites and in the next section will see how we can configure Eclipse with Selenium Libraries that we have just installed.
Configuring Eclipse for Selenium WebDriver Tutorial
Step 1: Launch eclipse.exe that was saved in the steps to install Eclipse.
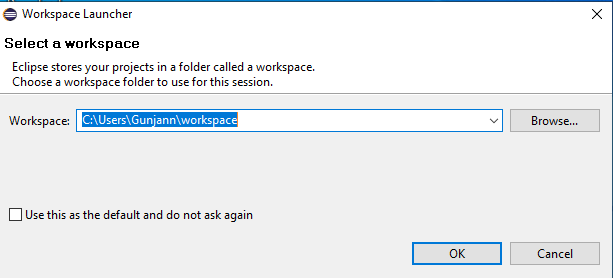
Step 2: Select your workspace manually, or let the default location be there and click on OK.
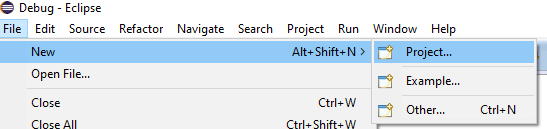
Step 3: Create a New Project by navigating to File > New > Java Project.
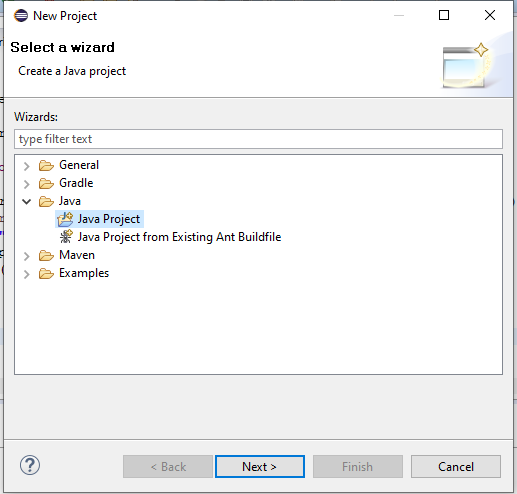
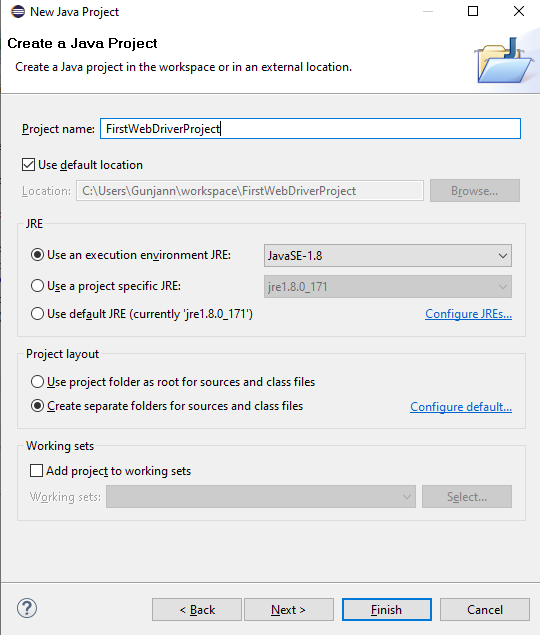
Step 4: Click on Next and give a name to the Project. Click on Finish.
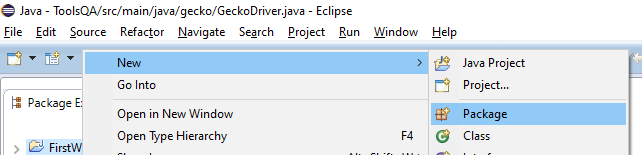
Step 5: Now that your project is created, Right-click on the project, and select New > Package.
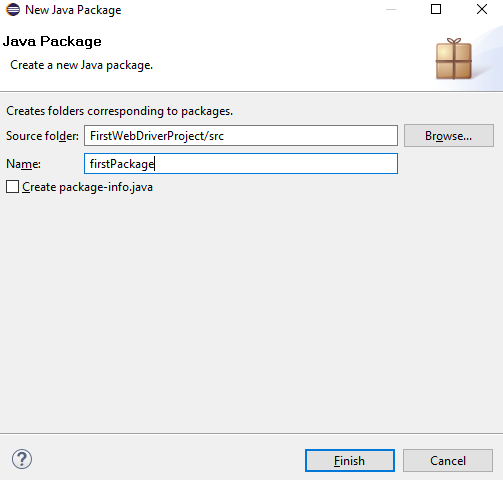
Step 6: Enter the package name in the New Java Package dialog box and click on Finish.
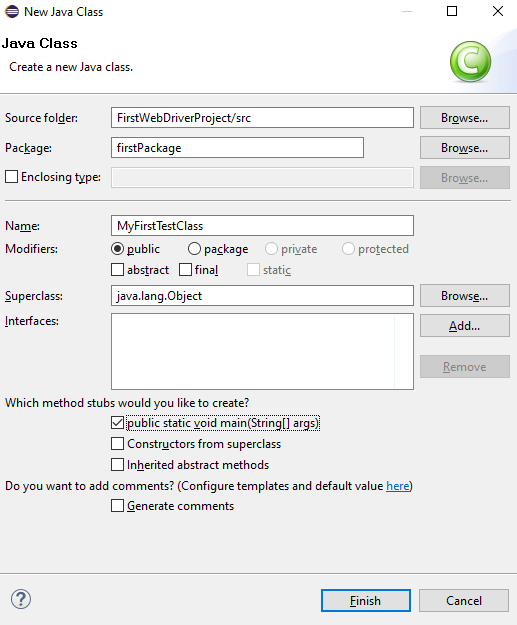
Step 7: You need to now create a class under the package. To do so, right-click on the package name, go to New > Class.

Step 8: In the New Java Class dialog box, enter a name for your class, select a method stub viz, public static void main(String[] args) and click on Finish.
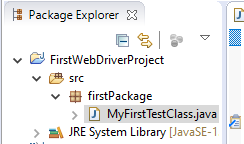
Your Explorer would look like below:
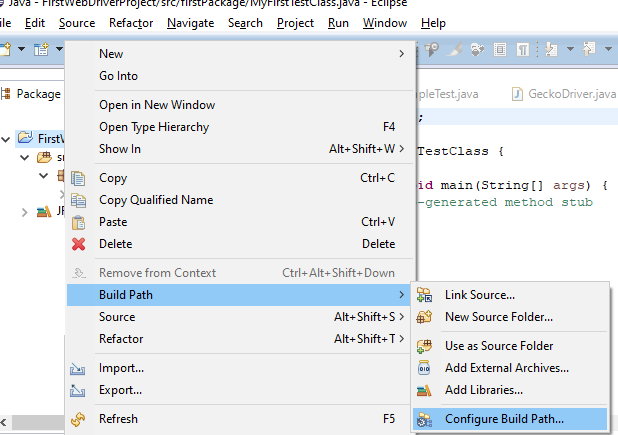
Step 9: Now that we have created an outline for our test project, we need to import the libraries that we installed for the Selenium WebDriver in the section above. To start with Right-Click on the project and go to Build Path > Configure Build Path.
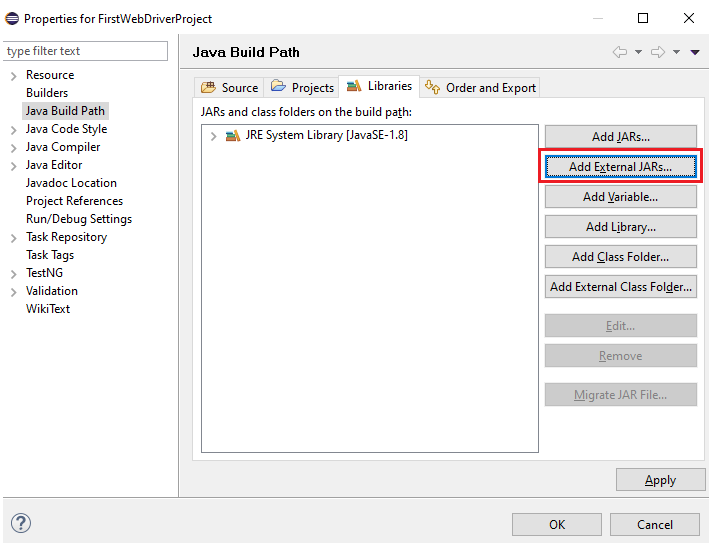
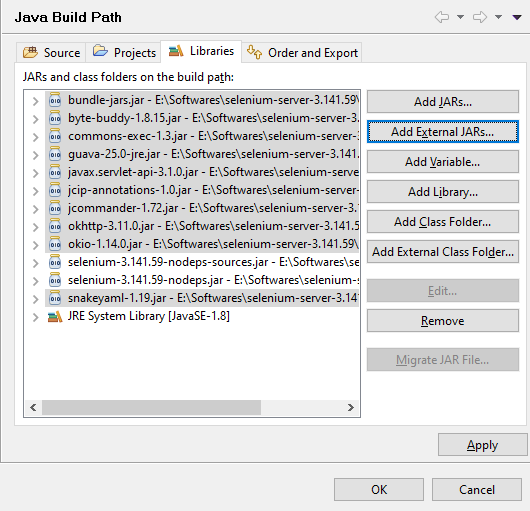
Step 10: Click on Add External JARs and navigate to the location where your downloaded JARs were saved.
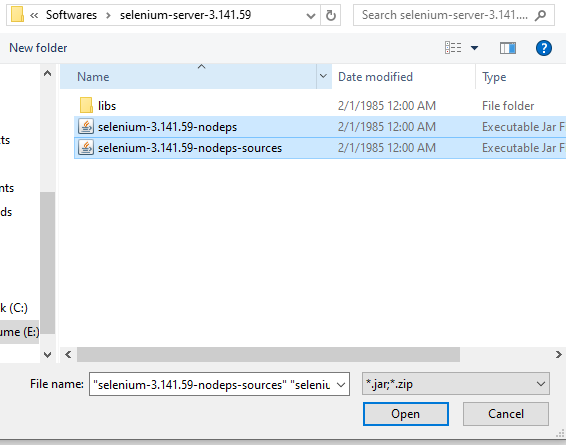
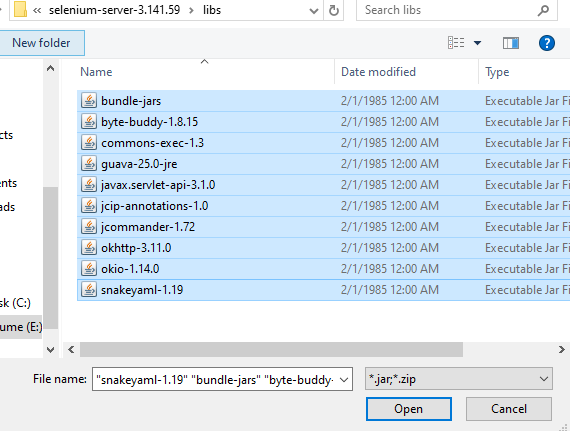
Step 11: Select the 2 jars that were installed in the Selenium Client folder as well as the jars under the libs folder.
Step 12: Once added, you will see the jar files under the Libraries:
Step 13: Click on Apply and then OK. You can now see the Referenced Libraries populated in the package explorer-
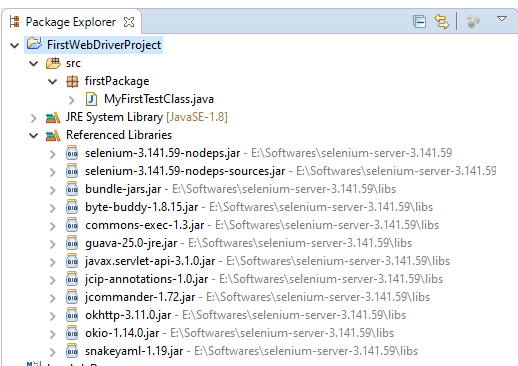
We have now configured Selenium WebDriver in our Eclipse Project and are good to write our first test script.
Executing our First Test Script Using Selenium WebDriver
Test scenario for Selenium WebDriver tutorial: We will write a simple test program that will launch Firefox Browser and open “www.google.com”, maximize the window, and then quit the browser session. The code for it would be written in the test class that we created while configuring Selenium. Here is the code.
xxxxxxxxxx
package firstPackage;
import org.openqa.selenium.WebDriver;
import org.openqa.selenium.firefox.FirefoxDriver;
public class MyFirstTestClass {
public static void main(String[] args) throws InterruptedException {
System.setProperty("webdriver.gecko.driver","E:\\Softwares\\geckodriver.exe”);
WebDriver driver = new FirefoxDriver();
driver.get("https://www.google.com/");
driver.manage().window().maximize();
Thread.sleep(5000);
driver.quit();
}
}
Code explanation:
System.setProperty(“webdriver.gecko.driver”,”E:\\Softwares\\geckodriver.exe”)
This line of code is used to set the property for the browser, ie, it sets the system property to the given value. The WebDriver code will refer to the driver stored at the location as mentioned in the second parameter and instantiate the Firefox Driver. Note that you need to give the path of your system where the driver is stored.
WebDriver driver = new FirefoxDriver()
With this, we are creating an Object of Firefox class, by referencing the WebDriver interface. In short, we are implementing the methods of WebDriver in the Firefox instance.
driver.get(“https://www.google.com/”)
The WebDriver get() method is used to open a URL. It will wait for the page to load completely.
driver.manage().window().maximize()
The maximize() method maximizes the browser window.
Thread.sleep(5000)
The sleep pauses the execution of the thread for the number of milliseconds specified in the bracket. This is used so that the instance does not timeout in case of slow internet connectivity.
driver.quit()
The quit() method is used to terminate the WebDriver session and close the active browser window(s) launched by the WebDriver.
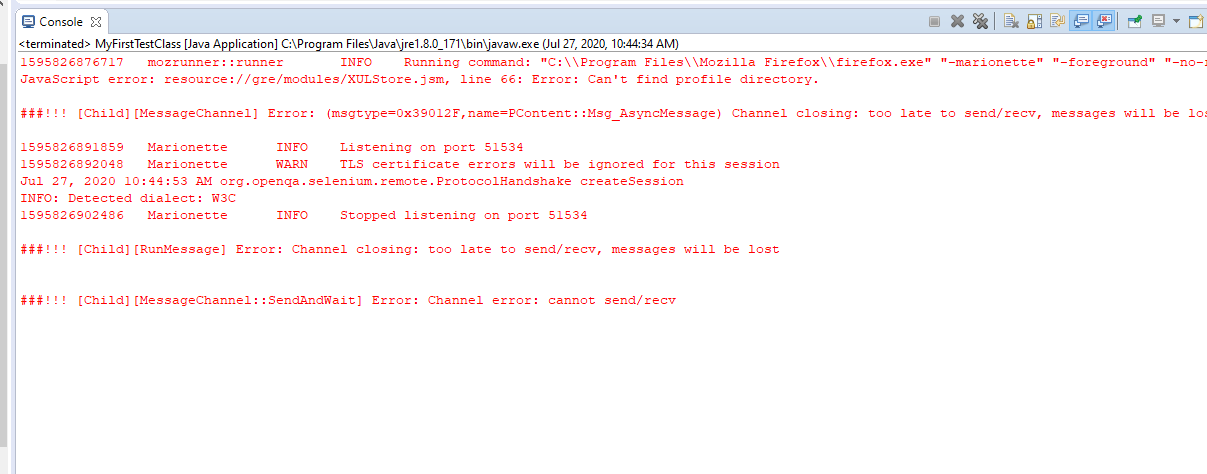
Upon executing the code shown in this Selenium WebDriver tutorial, you will see the execution logs displayed in the Eclipse Console window. When the test is executing you can also see the browser window getting launched with Google and then closing by itself.
And there you go, you have successfully executed your first Selenium WebDriver Test Script! Go ahead and try writing a test script with some other browser driver and see the results for yourself.
Limitation of Selenium WebDriver
With this, you are now well equipped with the basics of Selenium WebDriver. You now know the complete architecture and communication process of the Selenium WebDriver. You downloaded Selenium WebDriver and installed it in the system to consequently execute your first test script.
However, since this is a Selenium WebDriver tutorial, it is important for me to convey the pros and cons of using the Selenium WebDriver. We have already looked at the advantages of Selenium WebDriver, we know by far why Selenium WebDriver supersedes RC. Now, it is important to realize the challenges associated with Selenium WebDriver.
Selenium WebDriver does not support the automation of Windows-based applications.
Selenium WebDriver cannot automate image testing, captcha, or the OTP functionalities.
Selenium WebDriver does not have any in-built reporting.
Since it is open-source, you will have to rely on community forums for your technical issues.
You need to have at least one programming language knowledge prior to using selenium WebDriver automation.
There is no test tool integration for Test Management in Selenium.
Selenium WebDriver does not support parallel testing which makes it very challenging for larger and complex test suites. If you wish to perform parallel testing with Selenium then you need the next Selenium component i.e. Selenium Grid.
How Selenium Grid Helps With Automated Browser Testing
When we talk about practical automation scenarios, we come down to a point that we will have to test our automation scripts across multiple browsers, operating systems, and devices. This is where the Selenium Grid comes into the picture. Selenium Grid eases our problem of getting many local setups for the various combinations that we might want to test. Selenium Grid makes parallel execution possible by sending commands to remote web browser instances from a hub server.
Happy testing!
Published at DZone with permission of Ritesh Shetty. See the original article here.
Opinions expressed by DZone contributors are their own.
Comments