Mule Custom Connector Using XML SDK
In this blog, we will look into the implementation of Mule XML Connector which invokes a java class.
Join the DZone community and get the full member experience.
Join For FreeWhy do we need a custom connector when there is already a lot of connectors available from MuleSoft? Well, reasons can be various such as reusability, simplicity of use, compactness, etc.
Suppose you have a legacy system for which there is no connector available and it is a complex one to connect, so now you want to hide this complex logic somewhere and make sure all the API which are planning to connect to this legacy system does without knowing the complexity of it.
Other benefits being:
- You don’t need to replicate the code to access the system across multiple APIs.
- You just need to maintain logic in one place.
There are two ways of creating custom connectors in MuleSoft.
- Using Java SDK
- Using XML SDK
In this blog, we will see how to create a custom connector that invokes a Java class using XML SDK.
The XML SDK is an alternative to the more advanced Java-based Mule SDK. XML SDK is for creating custom modules, similar to the way you create a Mule app. In fact, you can use existing Mule components in the module. The framework adds few additional elements as below:
- Module
- Operation
- Properties
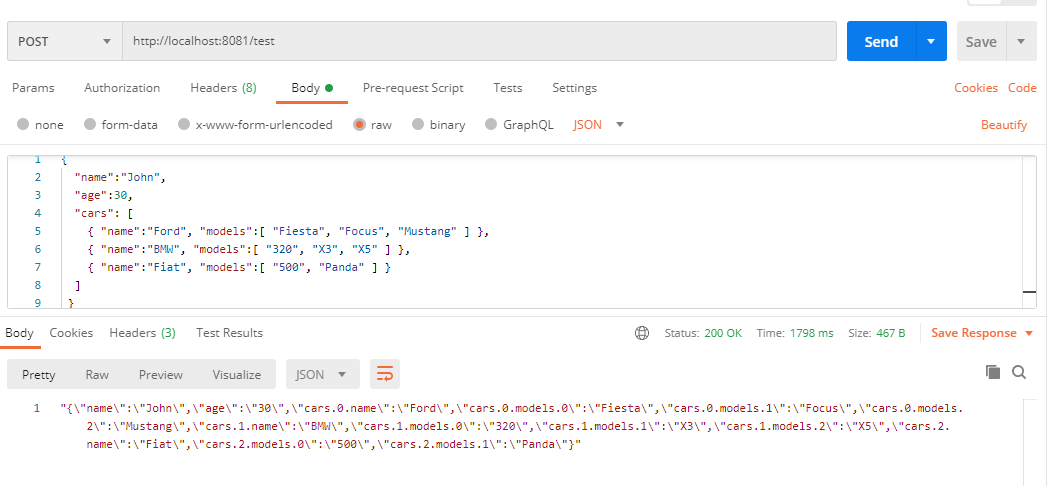
Here we are going to create a connector that will use java code to Flatten the JSON.
Example:
Input:
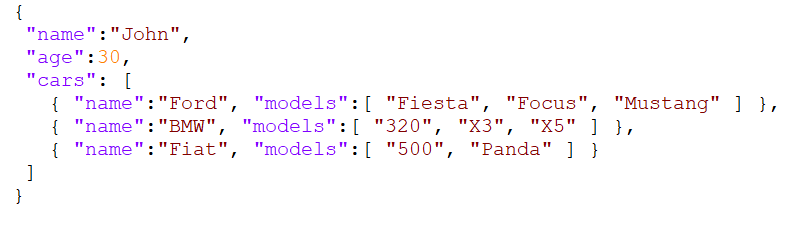
Output:
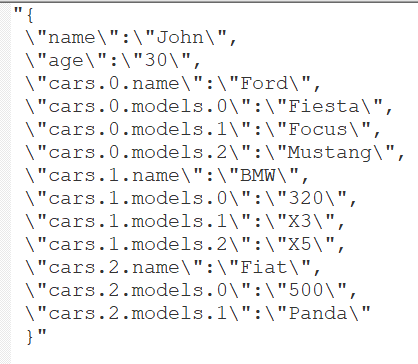
Flatten JSON will give output as a string with a key as a JSON key, along with its index if it is an array in a hierarchy. For eg: in the above output, “cars.0.models.0” signifies the first array element of the cars array and the first element of the models array is “Fiesta.”
Step1) First we will create an empty project using the maven command as below.
mvn archetype:generate -DarchetypeGroupId=org.mule.extensions -DarchetypeArtifactId=mule-extensions-xml-archetype -DarchetypeVersion=1.2.0 -DgroupId=<<groupId>> -DartifactId=flatten-json -DmuleConnectorName=flatten-json
Once the above command is successful, an archetype project will be created.
Step 2) We have to import the created project into Anypoint studio and add the plugin repositories into the project pom.xml file.
<pluginRepositories>
<pluginRepository>
<id>mulesoft-releases</id>
<name>mulesoft release repository</name>
<layout>default</layout>
<url>https://repository.mulesoft.org/releases/</url>
<snapshots>
<enabled>false</enabled>
</snapshots>
</pluginRepository>
</pluginRepositories>
Step 3) Using XML SDK for connector development, we cannot use the drag and drop functionality. We will get a module-<<extension>>.xml file under src/main/resources from the first step. We need to add an operation with the required parameters and logic to flatten JSON. The below screenshot shows the operation code.
Operation Contains:
- Parameters: The input parameters required for the operation.
- Body: Contains the logic to be performed.
- Output: Gives the single output after performing the operation.
xxxxxxxxxx
<operation name="flatten-json" doc:description="flattens json">
<parameters>
<parameter name="inputJson" type="string"/>
</parameters>
<body>
<java:invoke-static doc:name="Invoke static" doc:id="d89e1c97-f268-412e-86ca-7b3b56586db8" class="com.flatten.json.FlattenJson" method="startParsing(String)">
<java:args ><![CDATA[#[{
"arg0": vars.inputJson
}]]]></java:args>
</java:invoke-static>
<ee:transform doc:name="Transform Message" doc:id="21eabde8-3ee2-46bc-9e15-e0c5ee379b2e" >
<ee:message >
<ee:set-payload ><![CDATA[%dw 2.0
output application/json
---
payload]]></ee:set-payload>
</ee:message>
</ee:transform>
</body>
<output type="string" doc:description="Payload's output"/>
</operation>
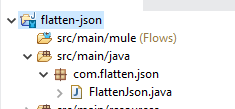
I have added the java code to flatten the JSON under package named com/flatten/json in src/main/java and it looks as shown below:
Step 4) We should add the required namespaces to the module.xml file as we used to transform the message, and invoke Java in the operation.
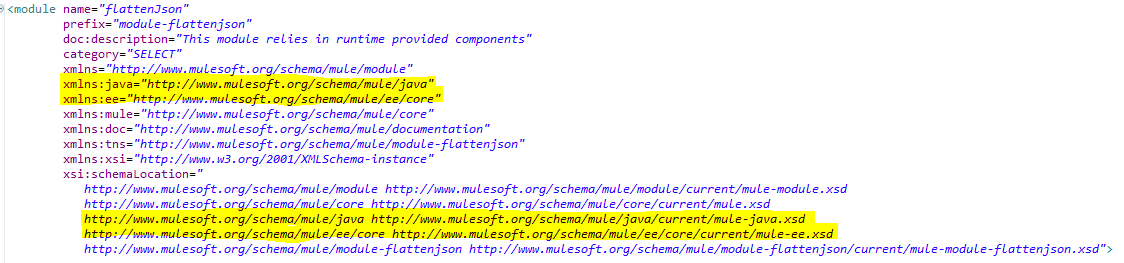
xxxxxxxxxx
<module name="flattenJson"
prefix="module-flattenjson"
doc:description="This module relies in runtime provided components"
category="SELECT"
xmlns="http://www.mulesoft.org/schema/mule/module"
xmlns:java="http://www.mulesoft.org/schema/mule/java"
xmlns:ee="http://www.mulesoft.org/schema/mule/ee/core"
xmlns:mule="http://www.mulesoft.org/schema/mule/core"
xmlns:doc="http://www.mulesoft.org/schema/mule/documentation"
xmlns:tns="http://www.mulesoft.org/schema/mule/module-flattenjson"
xmlns:xsi="http://www.w3.org/2001/XMLSchema-instance"
xsi:schemaLocation="
http://www.mulesoft.org/schema/mule/module http://www.mulesoft.org/schema/mule/module/current/mule-module.xsd
http://www.mulesoft.org/schema/mule/core http://www.mulesoft.org/schema/mule/core/current/mule.xsd
http://www.mulesoft.org/schema/mule/java http://www.mulesoft.org/schema/mule/java/current/mule-java.xsd
http://www.mulesoft.org/schema/mule/ee/core http://www.mulesoft.org/schema/mule/ee/core/current/mule-ee.xsd
http://www.mulesoft.org/schema/mule/module-flattenjson http://www.mulesoft.org/schema/mule/module-flattenjson/current/mule-module-flattenjson.xsd">
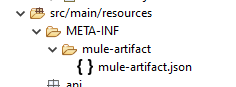
Step 5) This step is required in case you want to change the default packaging of the application .jar. Here in this blog, we are trying to include the Java class into the .jar which in turn will be used by our MuleSoft application.
For this, we should create a “META-INF/mule-artifact/mule-artifact.json” file with an exported package containing the created java package(com.flatten.json). By doing this, the runtime will find the java class FlattenJson.java in the imported project.
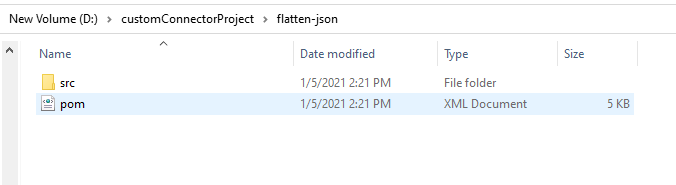
The Folder structure:
mule-artifact.json:
xxxxxxxxxx
{
"extensionModelLoaderDescriptor": {
"id": "xml-based",
"attributes": {
"validate-xml": true,
"resources-paths": [],
"resource-xml": "flatten/json/module-flattenJson.xml"
}
},
"name": "flattenJson Smart Connector",
"requiredProduct": "MULE_EE",
"classLoaderModelLoaderDescriptor": {
"id": "mule",
"attributes": {
"exportedResources": [],
"exportedPackages":[
"com.flatten.json"
]
}
},
"bundleDescriptorLoader": {
"id": "mule",
"attributes": {}
},
"minMuleVersion": "4.1.1"
}
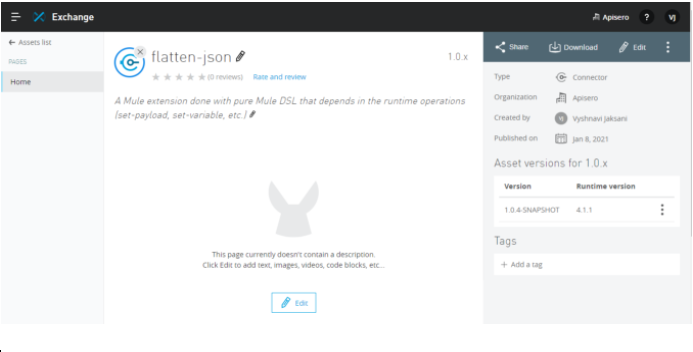
Step 6) We should deploy the connector to exchange. We should make few changes to the pom.xml and settings.xml files.
Settings.xml file:
x
<settings>
<profiles>
<profile>
<id>Mule</id>
<activation>
<activationByDefault>true</activationByDefault>
</activation>
<repositories>
<repository>
<id>mulesoft-releases</id>
<name>Mulesoft Repository</name>
<url>http://repository.mulesoft.org/releases</url>
<layout>default</layout>
</repository>
</repositories>
</profile>
</profiles>
<servers>
<server>
<id>Repository</id>
<username>anypoint-username</username>
<password>anypoint-pwd</password>
</server>
</servers>
</settings>
Pom.xml:
We have to add a distributionManagement tag to deploy to exchange.
xxxxxxxxxx
<distributionManagement>
<snapshotRepository>
<id>Repository</id>
<name>Exchange Repository</name>
<url>https://maven.anypoint.mulesoft.com/api/v1/organizations/b4f0eff7-65da-4416-a387-ce2ca54fbb20/maven</url>
<layout>default</layout>
</snapshotRepository>
<repository>
<id>Repository</id>
<name>Exchange Repository</name>
<url>https://maven.anypoint.mulesoft.com/api/v1/organizations/b4f0eff7-65da-4416-a387-ce2ca54fbb20/maven</url>
<layout>default</layout>
</repository>
</distributionManagement>
- Replace <<orgId>> with the organizationId of the Anypoint account.
- Executing the below command from the root of the project deploys the connector to Exchange: "mvn deploy"
- Once deployed to Exchange, the connector will get listed in the Exchange:
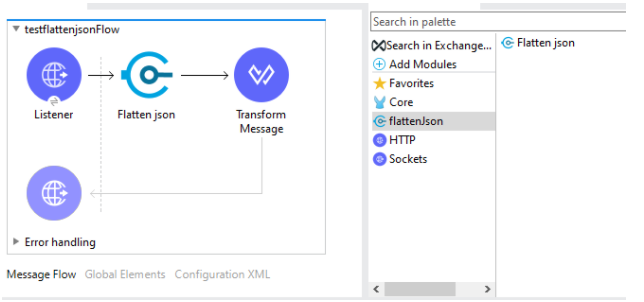
Step 7) We are ready to use the connector. In the Mule project, we can add the created connector dependency and we can find the connector and its methods as shown below. Dependency details will be found in Exchange:
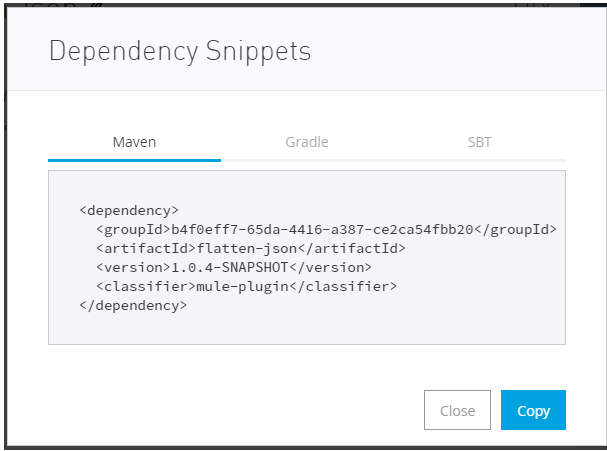
We should add the above dependency details in the project’s pom.xml, then the connector will get imported and we can use it.
Call the endpoint to see the flatten result.
Conclusion
So we have seen how we can XML SDK to create a custom connector and then how we can call a Java class from the custom connector.
Thank you for reading.
Opinions expressed by DZone contributors are their own.
Comments