OAuth Dances With Mule External Provider
Learn about the OAuth 2 framework and the grant types it uses to interact with Mule by creating and testing an API that uses Mule External Provider.
Join the DZone community and get the full member experience.
Join For FreePart I – OAuth2 in a Nutshell
OAuth2 is a framework, defined here. It’s not a protocol, because the RFC doesn’t contain enough implementation specifics. I say this with the understanding that the line between protocol and framework is a blurry one...
The RFC first defines four roles:
- Resource owner – the person who owns the resource.
- Resource server – the server where the resource (such as an API service) resides.
- Client – an application requesting access to the resource (as you will see later in the post, a client will have a client-id).
- Authorization server – issues the access token if authenticated. In many cases, this server may reside on the same physical server as the resource server.
The OAuth2 framework (RFC) then defines four grant types (and an extension, see note further below):
- Authorization Code
- Implicit
- Username & password
- Client Credential
This is how I would summarize OAuth2:
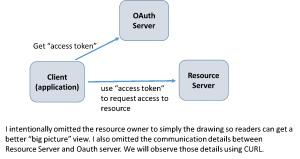
- When a client accesses a protected resource, it needs to provide an access token to the resource server.
- The client obtains the access token from OAuth server using one of the four ways (grant types, flows, dances, whatever you want to call it)
- Once the client (application) gets the access token, the client will supply the token to the resource server and gain access to the resources (Web services, web pages API’s and what not).
- All grant types can get the access token in a single step, except “Authorization Code” which requires 3 steps and involves the interactive login from the resource owner as well.
Interesting...!
Part II – Tools and Mule OAuth2 External Provider Installation
I assume you have installed CURL and the latest Anypoint Studio, you have access to Anypoint Platform (you can create a 30-day trial account here), and you know the basics of Mule applications.
Follow these steps to set up the Mule OAuth2 external provider:
Step 1 – Download the OAuth provider project and import into the Studio.
Go here and follow the link to download the Mule OAuth external project.
Import the project into the Studio. If you want to understand more about the Mule OAuth provider, you can also read the README.adoc in the project folder.
Step 2 – In your mule-app.properties, put in your organization client-id.
When you log in to your Anypoint account online, under Access Management, you will see your account organization. Clicking on the organization, you will see the Client-ID/secret for the organization. Copy the client-id/secret and place them in mule-app.properties:
# Org ID from Anypoint cloud account
anypoint.platform.client_id=f3***e4ae
anypoint.platform.client_secret=f******8812
Please note that the organization client ID is a concept unique to Mule. It is not part of the OAuth spec!
Step 3 – Update the grant type configuration.
The project came with only one grant type; we are adding in all four. Update config.properties under the src/main/resources folder, as shown below:
#oauth.supported.grant.types=RESOURCE_OWNER_PASSWORD_CREDENTIALS
oauth.supported.grant.types=AUTHORIZATION_CODE RESOURCE_OWNER_PASSWORD_CREDENTIALS CLIENT_CREDENTIALS IMPLICIT
Once you start the project, the OAuth2 provider is ready. It should be running on localhost SSL port 8082, or in CloudHub running on port 443, depending on where you deployed your project.
Client-IDs
In the OAuth2 and API world, there are client-IDs everywhere. In step 2 of the previous section, we saw the organization client-id/secret.
Since OAuth2 policy is used to secure the API here, we need to create/register a “client application” (RFC’s terminology) and assign the client-id/secret to it.
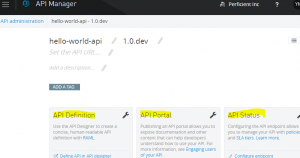
If you don’t already have an API, go ahead create one from the API manager console. The API manager main page has three areas:
- Left area: API definition; this is where you create an API.
- Middle area: API portal; this is where you manage the API portal.
- Right Area: API status; this is where you deploy and monitor the API/Proxy.
After you create the API, make sure the API is configured with an endpoint (use the right-side area). If the API endpoint is not configured, your next step will not work!
If you have a functional API running, that’s great. If you don’t, you can just put “foo-api.cloudhub.io” as the endpoint. You can still trace each grant type and see how they get the access tokens, you just can’t call the actual API in the last step. But that’s the last step- we don’t care about that as much in this post.
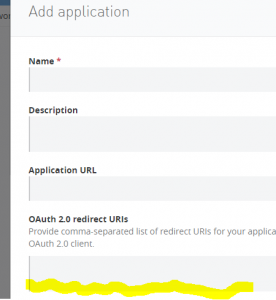
Now let’s get back to the web page. In the middle area, click on “view live portal,” on the top right of the page, click on “Request API Access.” You can either create a new client or use an existing one for testing purposes. Leave “redirect URI” blank (more explanation later).
Copy and save the client ID and secret from the above step.
Just to make the concept clear, this is the “client application,” or simply “application client-id and secret.” This is different from your organization client-id we mentioned earlier.
Part III – Let’s Dance
Oh, one last thing: in all examples, we use a blank “scope.” Although it’s a relatively easier OAuth2 concept, the “OAuth scope” is outside the scope of this post.
Whew, that's a ton of baloney to go through before we get here…
Assuming your OAuth2 provider is running locally or in CloudHub, now let’s do the dance!
We’ll do the simple ones first. Please note that even if you are running the Mule external provider locally, it still needs to access the anypoint.mulesoft.com website, so you do need an internet connection for any tests to work!
Grant Type #4: Client Credentials
As you can see, there is not a whole lot of dancing here. It’s a single step to supply your client-id/secret to the OAuth provider and you get the access token back right away.
curl - i - X POST - H "Content-Type: application/x-www-form-urlencoded" - H "Authorization: Basic OTQ2OTk1MDllZWFxxxxxxxxxxxxxxxx3ODlGRERENDZDMTM5MjI2NTA=" - d "grant_type=client_credentials&scope="
"https://localhost:8082/external/access_token" - k
HTTP / 1.1 200
Content - Length: 145
MULE_ENCODING: windows - 1252
Content - Type: application / json;
charset = windows - 1252
Date: Wed, 15 Mar 2017 19: 25: 55 GMT {
 "access_token": "pNzdKwgqvzeKbWlmUTTIAmtCzgGeoayRi83mB4D7zhlfHU9seUu48hlFBqkBMgZhAf2wM7KiqBFMmzs-bHLmBg",
 "token_type": "bearer",
 "expires_in": 1799
}
Grant Type #3: Username and Password
Again, it’s a one-step to obtain the access token. As you can see, “curl” (emulating the client) is actually in possession of the username and password. This is where I have a hard time swallowing the universal claim that OAuth2 is the valet key of the internet. In this case, somebody else (the client) is holding the real car key (username and password)- so much for the valet key claim!
curl - i - X POST - H "Content-Type: application/x-www-form-urlencoded" - H "Authorization: Basic OTQ2OTk1MDllZWFhNDViM2xxxxxxxjk3NDM3ODlGRERENDZDMTM5MjI2NTA=" - d "grant_type=password&username=max&password=mule"
"https://localhost:8082/external/access_token" - k
HTTP / 1.1 200
Content - Length: 250
MULE_ENCODING: windows - 1252
Content - Type: application / json;
charset = windows - 1252
Date: Wed, 15 Mar 2017 19: 28: 27 GMT {
 "access_token": "F1HN9sK5xW48tPVsaLTuQbNJL4QiWGzgbZsz3tIRbw2rNNMKLLDYvDRdknyfCV4moF2IKcPYomIrQwAO-cgQPg",
 "refresh_token": "GjuT5__5Yt5x1qe1NZX4QCDLV62PRjo0wAH29Pn69eiNSeZoKSD7Ry9yHx3QsnXGp-AxAso0pjKObCqJfCy-Vw",
 "token_type": "bearer",
 "expires_in": 1800
}
Grant Type #2: Implicit
This is an implied or implicit Authorization Code grant type. The client doesn’t need the authorization code and will get the access token in one shot. You may notice, unlike the previous two cases, it doesn’t even bother to specify “grant_type” in the request. It simply says, I want the access token (reponse_type=token). Hmm, as far as dancing is concerned, this is kind of rude! No wonder the RFC comes with plenty of warning on this grant type. Also, you can see the token is returned as part of URI, not the JSON you see in other grant types.
You may have noticed that we provided a “redirect_uri” that points to nowhere. We don’t have anything running on that endpoint. In the real world, you are supposed to have a service running on the endpoint ready to accept the return code. You can see the HTTP return code 302. That’s telling the HTTP session to forward to the redirect_uri to get the token. Since we are running CURL, we will just collect the code manually.
I found that there is a “feature” with the Mule OAuth2 provider: remember when you were generating the application client id, I reminded you not to fill in redirect_uri? Here is what happens, based on my observation: if you never set the URI on the server side, then the CURL request will work no matter what value you put in the redirect_uri. However, if you put a URI on the server, then the server will verify that your supplied redirect_uri matches that value.
curl - i - X POST - H "Content-Type: application/x-www-form-urlencoded" - d "username=max&password=mule&client_id=94699509eexxxxxxx0f1a49249a&response_type=token&redirect_uri=http://localhost:8080/oauth/handler&scope="
"https://localhost:8082/external/authorize" - k
HTTP / 1.1 302
Content - Length: 0
MULE_ENCODING: windows - 1252
Content - Type: application / x - www - form - urlencoded
Location: http: //localhost:8080/oauth/handler#access_token=T3C556SaIB4TdrkdNF5lfWOmiqKA854JN0Kahqxs7R9kpPsf2kbCB66MbmXfnR7bbMa7LaEdMGbqXTyDt7J_fg&token_type=bearer&expires_in=1800
 Date: Wed, 15 Mar 2017 19: 31: 03 GMT
Grant Type #1: Authorization Code
We have saved the best for last. The Authorization Code grant type is the only one that involves three dancing steps before the access token is given out! It involves all four parties (roles) as well. This is the only grant type that wins the OAuth dance accolade in my book!
Let’s look at this grant type closely. There are quite some subtleties here:
- In step (1) below, CURL is emulating the client trying to access a protected resource, which will result in an interactive login page.
- In step (2) below, CURL is emulating you, the resource owner, to interactively fill in the username and password. In no time the client (application) can see the username and password of the resource owner! The OAuth server will produce an Authorization Code, not the access-token in this step. The authorization code will be forwarded to the
redirect_urithat’s supplied in step (1) (see earlier discussion on redirect_uri). - In step (3) – after step (1), the client will listen/wait on the redirect_uri endpoint, when the Authorization code arrives, it collects this code and uses it to go beg the OAuth server for the access token.
As you can see with this grant type, the client (application) is never in possession of the owner’s username and password!
Conclusion
- To access the protected resource by OAuth2, the client (application) needs to supply an “access token.”
- The client obtains the access token by using one of the four grant types (dances).
- Only “Authorization code” grant type can fit the bill of “valet key for the internet.” However, this grant type requires interactive user login. It works perfectly for some online resource sharing apps. But it may not work in place of the “service account” in the traditional system integration scenario. When APIs are used in the integration scenario where interactive user login is not an option, “client-credential” grant type is the most used choice.
Keep learning and growing the MuleSoft community.
Opinions expressed by DZone contributors are their own.


Comments