OpenShift Container Platform 3.11 Cost Optimization on Public Cloud Platforms
A developer gives a tutorial on optimizing the performance of OpenShift containers using some shell scripts. Read on to learn more!
Join the DZone community and get the full member experience.
Join For FreeI was part of cloud migration projects for one of our clients (a UK utility company), where we installed OpenShift clusters across different environments on top of the AWS cloud to deploy the code and run the DevOps pipelines.
We had five different OpenShift clusters viz; Development, Test, Pre-production, Production, and Automation. Each cluster would have different numbers of nodes, of which the master and infra nodes were constant across all environments (three nodes each) and a different number of worker nodes based on the workload on each cluster. So, the AWS cost was significantly high considering the number of nodes (AWS ec2-instances) we were working with across different clusters.
We produced a solution to shut down the cluster gracefully during non-business hours without impacting any development activity. This graceful shutdown included all application pods which were running on the worker nodes and all OpenShift system-related pods which were running on infra nodes.
But there was a challenge!
When we used OpenShift drain commands to drain the nodes, some pods were not fully deleted because of the session timeouts or because some pods were taking too long to delete. Though we were excluding OpenShift system-related Daemonset pods while draining, deleting all application pods within the grace period without the session timing out was a challenge. We had to implement a looping logic in the shell script to overcome this issue.
The implementation involved a series of shell scripts which were called one after the other in the below order.
Shutdown:
- Un-schedule Nodes
- Application pod scale down
- Drain Nodes
- Stop ec2-instance.
Startup:
- Start ec2-instances
- Schedule-back nodes
- Application scale UP
- Sanity check
This implementation helped our client to save enormously on their AWS infrastructure cost. We will take a look at the implementation in the subsequent sections below.
In the above sequence, the application pod scale down (application scale down) is optional as it is purely project specific.
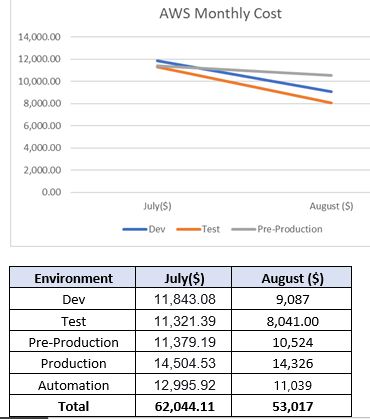
The above table depicts the difference between the initial implementation (July) and the implementation after our tweaks to the shell code (August).
Disclaimer:
Our implementation is for RedHat OpenShift v3.11, and the same implementation works for the original version of OpenShift (OKD), also. If anyone would like to implement this in a client's project, it is always recommended to seek the vendor's suggestion on how to/whether it is allowed to restart the nodes. Some vendors will not support the restart of underlying nodes once they are set up. Also, it is not recommended to shut down master nodes as they host many system-related pods and API components.
Below is the snippet of logic we used in the entire implementation.
Environment Shutdown
Step 1: Unschedule Nodes
oc adm manage-node <node-ip> --schedulable=false
(Repeat the step for all nodes in the cluster)
Step 2: Drain all Nodes on the Cluster
The below logic will make sure that the session doesn’t timeout and all pods are deleted from the node.
xxxxxxxxxx
TIMEOUT=180
#Make sure that CHECKLOOPDELAY is a multiple TIMEOUT
CHECK_LOOP_DELAY=10
#Get the number of loops...
NUMBER_OF_LOOPS=$((TIMEOUT / CHECK_LOOP_DELAY))
##################################################################
echo "Starting to evict pods on Worker Node-1 with oc-adm command and timeout of ${TIMEOUT} seconds..."
(
echo "Executing oc-adm....on <node-ip>"
oc adm drain <node-ip> --ignore-daemonsets --force --grace-period=30 --delete-local-data)&
# Capture the SUBSHELL PID....
SUBPID=$!
echo "oc-adm command sub-shell PID: ${SUBPID}"
(
# We will wait for TIMEOUT using CHECK_LOOP_DELAY and NUMBER_OF_LOOPS combination
x=0
while [ $x -le ${NUMBER_OF_LOOPS}]
do
sleep ${CHECK_LOOP_DELAY}
If !ps -p ${SUBPID} > /dev/null
then
echo "oc-adm completed...."
break
else
echo -n "."
fi
x=$(($x + 1 ))
done
if ps -p ${SUBPID} > /dev/null
then
echo "Going to kill the subshell: ${SUBPID}"
kill -9 ${SUBPID}
echo "Killed sub-shell"
fi
)&
# wait for the two subshells either to complete successfully or get killed
Wait
Step 3: Shutdown Nodes
Once the pods on the nodes are completely drained, it is time to shut down the ec2-instances.
Environment Startup
Startup:
- Start ec2-instances
- Schedule-back nodes
- Application scale UP
- Sanity check
Step 1:Depending on the cloud provider, you'll need to include the scripts in the beginning to start the environment.
Step 2: Schedule the nodes which were unscheduled before.
oc adm manage-node <nodeIP> --schedulable=true
Step 3: Once the nodes are ready and the scheduling is enabled, the pods will automatically schedule on these nodes.
If the implementation has an application scale-UP script, that needs to be scaled up additionally once the cluster nodes are up and running.
Opinions expressed by DZone contributors are their own.
Comments