DZone
Thanks for visiting DZone today,
Edit Profile
  • Manage Email Subscriptions
  • How to Post to DZone
  • Article Submission Guidelines
Sign Out View Profile
  • Post an Article
  • Manage My Drafts
Over 2 million developers have joined DZone.
Log In / Join
Please enter at least three characters to search
Refcards Trend Reports
Events Video Library
Refcards
Trend Reports

Events

View Events Video Library

Zones

Culture and Methodologies Agile Career Development Methodologies Team Management
Data Engineering AI/ML Big Data Data Databases IoT
Software Design and Architecture Cloud Architecture Containers Integration Microservices Performance Security
Coding Frameworks Java JavaScript Languages Tools
Testing, Deployment, and Maintenance Deployment DevOps and CI/CD Maintenance Monitoring and Observability Testing, Tools, and Frameworks
Culture and Methodologies
Agile Career Development Methodologies Team Management
Data Engineering
AI/ML Big Data Data Databases IoT
Software Design and Architecture
Cloud Architecture Containers Integration Microservices Performance Security
Coding
Frameworks Java JavaScript Languages Tools
Testing, Deployment, and Maintenance
Deployment DevOps and CI/CD Maintenance Monitoring and Observability Testing, Tools, and Frameworks

The software you build is only as secure as the code that powers it. Learn how malicious code creeps into your software supply chain.

Apache Cassandra combines the benefits of major NoSQL databases to support data management needs not covered by traditional RDBMS vendors.

Generative AI has transformed nearly every industry. How can you leverage GenAI to improve your productivity and efficiency?

Modernize your data layer. Learn how to design cloud-native database architectures to meet the evolving demands of AI and GenAI workloads.

Related

  • Code Reviews: Building an AI-Powered GitHub Integration
  • Next Evolution in Integration: Architecting With Intent Using Model Context Protocol
  • Integrating Google BigQuery With Amazon SageMaker
  • Optimizing Integration Workflows With Spark Structured Streaming and Cloud Services

Trending

  • Code Reviews: Building an AI-Powered GitHub Integration
  • Unlocking Data with Language: Real-World Applications of Text-to-SQL Interfaces
  • Building Custom Tools With Model Context Protocol
  • The Human Side of Logs: What Unstructured Data Is Trying to Tell You
  1. DZone
  2. Testing, Deployment, and Maintenance
  3. Deployment
  4. Razorpay Payment Gateway Integration In iOS Swift

Razorpay Payment Gateway Integration In iOS Swift

In this article, we are going to focus on Razor Pay integration with iOS Swift 4 using Xcode 10.1. and learn how to integrate Razorpay with an iOS app.

By 
Chander Bhushan user avatar
Chander Bhushan
·
Apr. 10, 19 · Tutorial
Likes (1)
Comment
Save
Tweet
Share
18.5K Views

Join the DZone community and get the full member experience.

Join For Free

Introduction

Razorpay is one of the fastest growing payment solutions. It is robust and provides a developer-friendly API and SDK for Android, iOS, etc. It provides different modes of payments like credit cards, debit cards, net banking, UPI, and other popular wallets.

In this article, we are going to focus on Razor Pay integration with iOS Swift 4 using Xcode 10.1. and learn how to integrate Razorpay with an iOS app. We will create a demo app to integrate Razorpay and pay some amount by using the Razorpay payment gateway.Image title

Prerequisites

  1. xcode 10.1
  2. Swift 4
  3. A Razorpay account (you can signup from here https://dashboard.Razorpay.com/#/access/signup)
  4. your Razorpay key id (you can get from here https://dashboard.Razorpay.com/#/app/keys)

Development

Step 1: Install pod for Razorpay

  • Add pod 'Razorpay-pod' in the pod file.
  • Run ‘pod install’ from the terminal.
  • Now open the xcworkspace

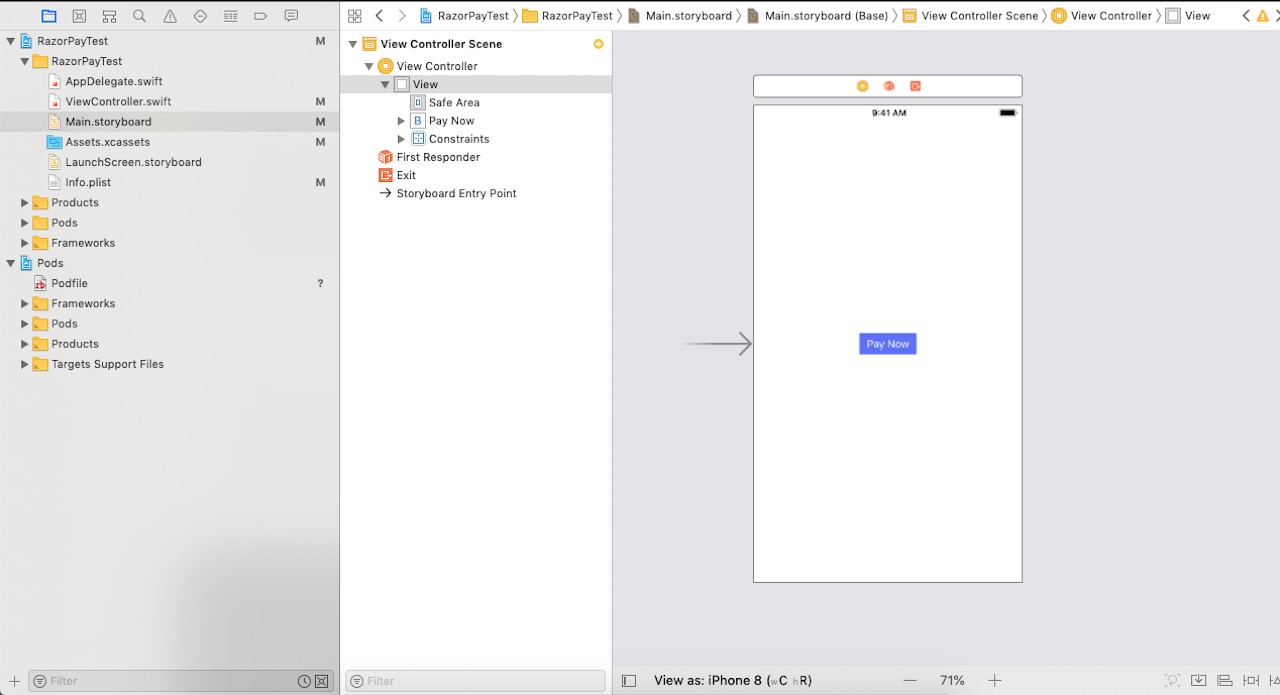
Step 2: Develop a basic UI as shown below.

Step 3: Import Razorpay to your view Controller.

importRazorpay

Step 4:

  1. Create an action outlet of the pay now button in your view controller.
 @IBAction func payNowClicked(_ sender: Any) {
         }

2. Create an instance reference variable of type Razorpay.

private var razorpay:Razorpay?

3. Initialize that reference variable in the viewDidLoad method of the view controller by calling the init method with the public key and delegate.

override func viewDidLoad() {
      super.viewDidLoad()
       razorpay = Razorpay.initWithKey("rzp_test_FYCQAsmKTFF8FR", andDelegate: self)
    }

4. Create an extension of view controller and confirm RazorpayPaymentCompletionProtocol as shown below:

a) onPaymentSuccess(_ payment_id: String)

b) onPaymentError(_ code: Int32, description str: String)

 extension ViewController: RazorpayPaymentCompletionProtocol {
    func onPaymentSuccess(_ payment_id: String) {
        let alert = UIAlertController(title: "Paid", message: "Payment Success", preferredStyle: .alert)
        let action = UIAlertAction(title: "OK", style: .cancel, handler: nil)
        alert.addAction(action)
        self.present(alert, animated: true, completion: nil)
    }

    func onPaymentError(_ code: Int32, description str: String) {
        let alert = UIAlertController(title: "Error", message: "\(code)\n\(str)", preferredStyle: .alert)
        let action = UIAlertAction(title: "OK", style: .cancel, handler: nil)
        alert.addAction(action)
        self.present(alert, animated: true, completion: nil)
    }
}

As you can see in the above code, we have two methods onPaymentSuccess, and onPaymentError, the success method will be called if payment transaction is completed successfully where the onPaymentError will be called if the transaction is not completed successfully. It provides some error codes as given below:

Possible values for a failure code are:

  • 0: Network error
  • 1: Initialization failure/Unexpected behavior
  • 2: Payment canceled by the user

Now inside the action outlet of the pay button, create a parameter for razor pay like:

  let options: [String:Any] = [
"amount" : "100" //mandatory in paise like:- 1000 paise ==  10 rs 
            "description": "purchase description"
            "image": "https://url-to-image.png",
            "name": "business or product name"
            "prefill": [
                "contact": "9797979797",
                "email": "foo@bar.com"
                ],
                "theme": [
                    "color": "#F37254"
              ]
        ]

Progress Bar:

To support the theme color in the progress bar, pass HEX color values only.

After setting all the parameters, call the open method of Razorpay:

razorpay?.open(options)

Complete the Demo Project that you can download here.

Integration Swift (programming language)

Published at DZone with permission of Chander Bhushan. See the original article here.

Opinions expressed by DZone contributors are their own.

Related

  • Code Reviews: Building an AI-Powered GitHub Integration
  • Next Evolution in Integration: Architecting With Intent Using Model Context Protocol
  • Integrating Google BigQuery With Amazon SageMaker
  • Optimizing Integration Workflows With Spark Structured Streaming and Cloud Services

Partner Resources

×

Comments
Oops! Something Went Wrong

The likes didn't load as expected. Please refresh the page and try again.

ABOUT US

  • About DZone
  • Support and feedback
  • Community research
  • Sitemap

ADVERTISE

  • Advertise with DZone

CONTRIBUTE ON DZONE

  • Article Submission Guidelines
  • Become a Contributor
  • Core Program
  • Visit the Writers' Zone

LEGAL

  • Terms of Service
  • Privacy Policy

CONTACT US

  • 3343 Perimeter Hill Drive
  • Suite 100
  • Nashville, TN 37211
  • support@dzone.com

Let's be friends:

Likes
There are no likes...yet! 👀
Be the first to like this post!
It looks like you're not logged in.
Sign in to see who liked this post!