Real-Time Data Replication Between Ignite Clusters Through Kafka
In this article, we are going to look at how to set up and configure the Ignite Source connector to perform data replication between Ignite clusters.
Join the DZone community and get the full member experience.
Join For FreeApache Ignite, from version 1.6 provides a new way to do data processing based on Kafka Connect. Kafka Connect, a new feature introduced in Apache Kafka 0.9, enables scalable and reliable streaming data between Apache Kafka and other data systems. It made it easy to add new systems to your scalable and secure stream data pipelines in-memory. In this article, we are going to look at how to set up and configure the Ignite Source connector to perform data replication between Ignite clusters.
Apache Ignite, out-of-the-box, provides the Ignite-Kafka module with three different solutions (API) to achieve a robust data processing pipeline for streaming data from/to Kafka topics into Apache Ignite.

In a nutshell, Apache IgniteSourceConnector is used to subscribe to Ignite cache events and stream them to Kafka topics. In other words, it can be used to export data (changed datasets) from an Ignite cache and write the contents into a Kafka topic using only a configuration file. Ignite source connector listens to registered Ignite grid events, such as PUT, and forwards them to a Kafka topic. This enables data that has been saved into the Ignite cache to be easily turned into an event stream. Each event stream contains a key and two values: old and new.

Portions of this article were taken from the book The Apache Ignite book. If it got you interested, check out the rest of the book for more helpful information.
The IgniteSourceConnector can be useful to support the following use cases:
- To automatically notify any clients when a cache event occurs, for example, whenever there is a new entry into the cache.
- To use an asynchronous event streaming from an Ignite cache to 1-N destinations. The destination can be any database or another Ignite cluster. These enable you to do data replication between two Ignite clusters through Kafka.
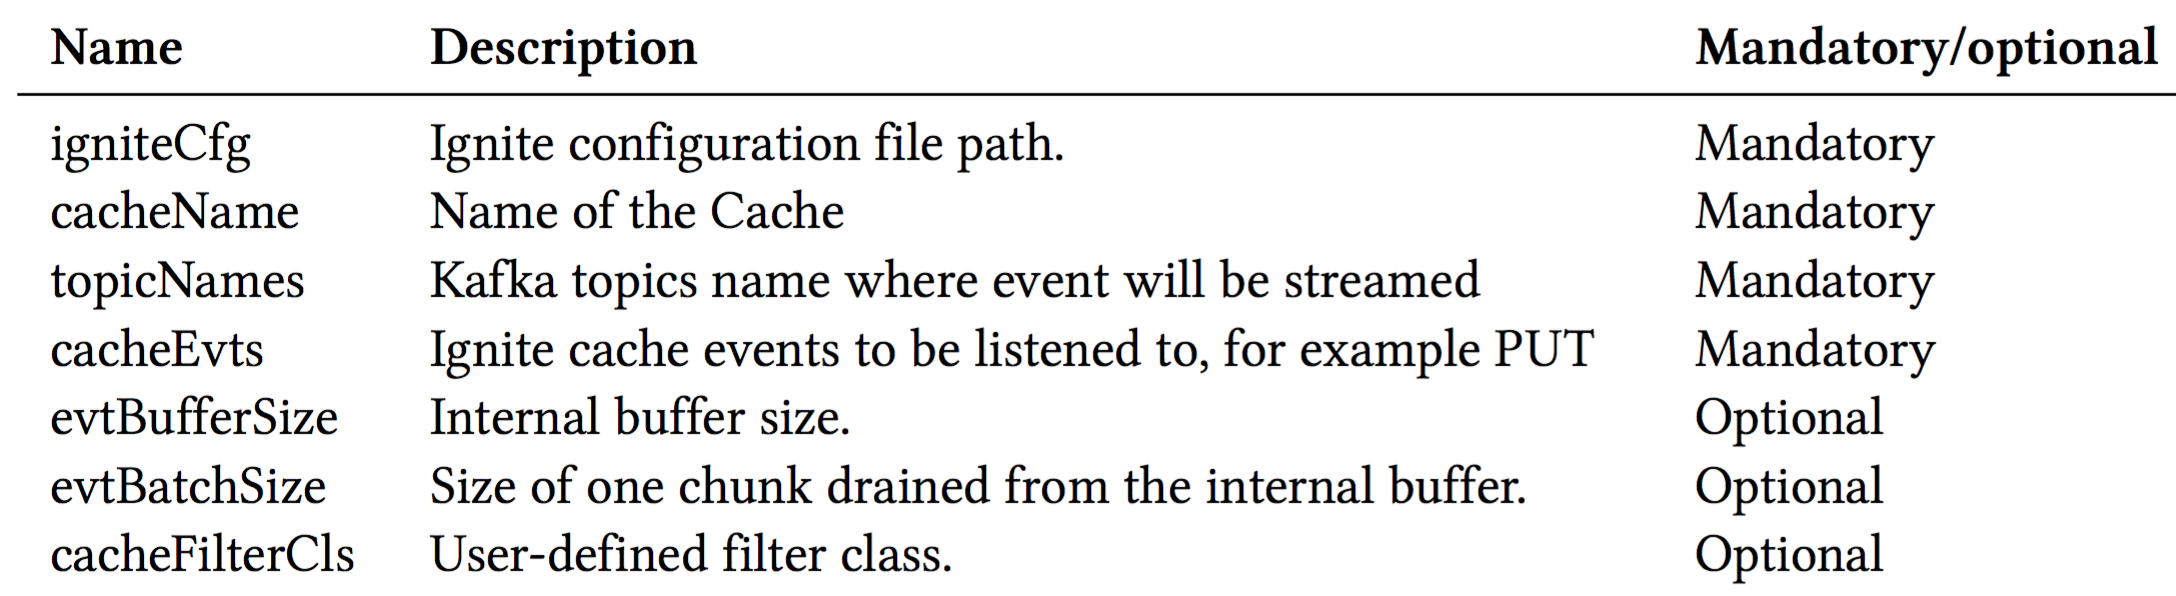
The Apache IgniteSourceConnector ships together with the IgniteSinkConnector and is available in the ignite-kafka-x.x.x.jar distribution. IgniteSourceConnector requires the following configuration parameters:
A high-level architecture of the IgniteSinkConnector is shown below in figure 1.

In this article, we are going to use both IgniteSourceConnector and IgniteSinkConnector for streaming events from one Ignite cluster to another. IgniteSourceConnector will stream the event from one Ignite cluster (source cluster) to a Kafka topic, and the IgniteSinkConnector will stream the changes from the topic to the another Ignite cluster (target cluster). We will demonstrate the step-by-step instructions to configure and run both the Source and Sink connectors. To accomplish the data replication between Ignite clusters, we are going do the following:
Execute two isolated Ignite cluster in a single machine.
Develop a Stream extractor to parse the incoming data before sending to the Ignite target cluster.
Configure and start Ignite Source and Sink connectors in different standalone Kafka workers.
Add or modify some data into the Ignite source cluster.
After completing all the configurations, you should have a typical pipeline that is streaming data from one Ignite cluster to another, as shown below in figure 2.

Let’s start from the Ignite cluster configuration.
Step 1. We are going to start two isolated clusters on a single machine. To accomplish this, we have to use a different set of TcpDiscoverySpi and TcpConfigurationSpi to separate the two clusters on a single host. So, for the nodes from the first cluster we go to use the following TcpDiscoverySpi and TcpConfigurationSpi configurations:
<?xml version="1.0" encoding="UTF-8"?>
<beans xmlns="http://www.springframework.org/schema/beans"
       xmlns:xsi="http://www.w3.org/2001/XMLSchema-instance"
       xmlns:util="http://www.springframework.org/schema/util"
       xsi:schemaLocation="
        http://www.springframework.org/schema/beans
        http://www.springframework.org/schema/beans/spring-beans.xsd
        http://www.springframework.org/schema/util
        http://www.springframework.org/schema/util/spring-util.xsd">
<bean id="ignite.cfg" class="org.apache.ignite.configuration.IgniteConfiguration">
        <property name="peerClassLoadingEnabled" value="true"/>
        <property name="cacheConfiguration">
            <list>
                <!-- Partitioned cache example configuration (Atomic mode). -->
                <bean class="org.apache.ignite.configuration.CacheConfiguration">
                    <property name="name" value="myCacheSource"/>
                    <property name="atomicityMode" value="ATOMIC"/>
                    <property name="backups" value="1"/>
                </bean>
            </list>
        </property>
        <!-- Enable cache events. -->
        <property name="includeEventTypes">
            <list>
                <!-- Cache events. -->
                <util:constant static-field="org.apache.ignite.events.EventType.EVT_CACHE_OBJECT_PUT"/>
            </list>
        </property>
<property name="discoverySpi">
            <bean class="org.apache.ignite.spi.discovery.tcp.TcpDiscoverySpi">
                <!-- Initial local port to listen to. -->
                <property name="localPort" value="48500"/>
<!-- Changing local port range. This is an optional action. -->
                <property name="localPortRange" value="20"/>
<!-- Setting up IP finder for this cluster -->
                <property name="ipFinder">
                    <bean class="org.apache.ignite.spi.discovery.tcp.ipfinder.vm.TcpDiscoveryVmIpFinder">
                        <property name="addresses">
                            <list>
                                <value>127.0.0.1:48500..48520</value>
                            </list>
                        </property>
                    </bean>
                </property>
            </bean>
        </property>
<!--
        Explicitly configure TCP communication SPI changing local
        port number for the nodes from the first cluster.
        -->
        <property name="communicationSpi">
            <bean class="org.apache.ignite.spi.communication.tcp.TcpCommunicationSpi">
                <property name="localPort" value="48100"/>
            </bean>
        </property>
    </bean>
</beans>
We have specified the local port 48500 to listen to and use the static IP finder for discovering nodes. In addition, we have also explicitly configured the TCP communication port to 48100. Each Ignite node that starts with this above configuration will only join to this cluster and will not be visible to another cluster on the same host. Note that we also enable the EVT_CACHE_OBJECT_PUT event for getting PUT event notifications for each entry into the cache. As a data source, we are going to use the myCacheSource replicated cache. Save the file with name isolated-cluster-1-kafka-source.xml in the $IGNITE_HOME/examples/config folder.
For the nodes from the second cluster, we have to use another set of ports. The configuration will look like this:
<?xml version="1.0" encoding="UTF-8"?>
<beans xmlns="http://www.springframework.org/schema/beans"
       xmlns:xsi="http://www.w3.org/2001/XMLSchema-instance"
       xsi:schemaLocation="
        http://www.springframework.org/schema/beans
        http://www.springframework.org/schema/beans/spring-beans.xsd">
<bean id="ignite.cfg" class="org.apache.ignite.configuration.IgniteConfiguration">
        <property name="peerClassLoadingEnabled" value="true"/>
        <property name="cacheConfiguration">
            <list>
                <!-- Partitioned cache example configuration (Atomic mode). -->
                <bean class="org.apache.ignite.configuration.CacheConfiguration">
                    <property name="name" value="myCacheTarget"/>
                    <property name="atomicityMode" value="ATOMIC"/>
                    <property name="backups" value="1"/>
                </bean>
            </list>
        </property>
        <property name="discoverySpi">
            <bean class="org.apache.ignite.spi.discovery.tcp.TcpDiscoverySpi">
                <!-- Initial local port to listen to. -->
                <property name="localPort" value="49500"/>
<!-- Changing local port range. This is an optional action. -->
                <property name="localPortRange" value="20"/>
<!-- Setting up IP finder for this cluster -->
                <property name="ipFinder">
                    <bean class="org.apache.ignite.spi.discovery.tcp.ipfinder.vm.TcpDiscoveryVmIpFinder">
                        <property name="addresses">
                            <list>
                                <value>127.0.0.1:49500..49520</value>
                            </list>
                        </property>
                    </bean>
                </property>
            </bean>
        </property>
        <!--
        Explicitly configure TCP communication SPI changing local port number
        for the nodes from the second cluster.
        -->
        <property name="communicationSpi">
            <bean class="org.apache.ignite.spi.communication.tcp.TcpCommunicationSpi">
                <property name="localPort" value="49100"/>
            </bean>
        </property>
    </bean>
</beans>
For the nodes from the second cluster, we defined the discovery port to 49500 and the communication port to 49100. The difference between the two configurations is insignificant — only port numbers for SPIs and IP finders vary. Save this configuration as a file with name isolated-cluster-1.xmland place the file into the folder $IGNITE_HOME/examples/config.
Let’s test the configuration. Start two Ignite nodes in separate consoles with the different configuration file. Here is an example of how you would run the Ignite node.
ignite.sh $IGNITE_HOME/examples/config/isolated-cluster-1-kafka-source.xml
ignite.sh $IGNITE_HOME/examples/config/isolated-cluster-2.xml
The next screenshot shows the result from the above command. As expected, two separate Ignite nodes are up and running in the different cluster.

Note that all the listings and the configuration files are available on the GitHub repository.
Step 2. Next, you need to define the stream extractor for converting the data to Key-value tuple. Create a Maven project and add the following dependency into the pom.xml.
<dependency>
  <groupId>org.apache.ignite</groupId>
  <artifactId>ignite-kafka</artifactId>
  <version>2.6.0</version>
</dependency>
We use ignite-kafka module as our dependency. Add the following Java class with name CsvStreamExtractor into the com.blu.imdg package which will implement the StreamSingleTupleExtractor interface as follows:
public class CsvStreamExtractor implements StreamSingleTupleExtractor<SinkRecord, String, String> {
  public Map.Entry<String, String> extract(SinkRecord sinkRecord) {
          System.out.println("SinkRecord:"+ sinkRecord.value().toString());
    String[] parts = sinkRecord.value().toString().split(",");
          String key = ((String[])parts[2].split("="))[1];
          String val= ((String[])parts[7].split("="))[1];
          return new AbstractMap.SimpleEntry<String, String>(key, val);
      }
}
The method extract is the workhorse of the class CsvStreamExtractor. Here the code is straightforward: it retrieves the key and value from every tuple of an event, where each tuple is exposed as a SinkRecord in the stream. The extract method returns the key-value pair, which will be sent to the Ignite cluster (target) for further storage in the cache.
Compile and build the project with the Maven command: mvn clean install. After successfully compiling the project, a new library named kafka-1.0.jarshould be created in the project target directory. Copy the library to the folder $KAFKA_HOME/libs.
Step 3. Now that our Stream extractor is ready to use, let’s configure the Ignite source and sink connector and get them started with replicating data. Let’s create a file with name ignite-connector- source.properties into the $KAFKA_HOME/myconfig directory. Add the following properties and save the file.
# connector
name=my-ignite-source-connector
connector.class=org.apache.ignite.stream.kafka.connect.IgniteSourceConnector
tasks.max=2
topicNames=test2
# cache
cacheName=myCacheSource
cacheAllowOverwrite=true
cacheEvts=put
igniteCfg=PATH_TO_THE_FILE/isolated-cluster-1-kafka-source.xml
In the preceding connector configuration, we have defined the org.apache.ignite.stream.kafka.connect.IgniteSourceConnector as a connector class. We also specified test2 as a topic name, where the stream event will be stored. Next, for cache configuration, we have defined the PUT event as grid remote event. In our case, we are using the myCacheSource as a source cache. Here, another critical property is igniteCfg, where we explicitly specified one of the isolated cluster configurations. Cluster 1 will be our source of events.
Next, let’s configure the Ignite sink connector. Create another file with the name ignite- connector-sink.properties into the $KAFKA_HOME/myconfigdirectory. Add the following properties from the following listing.
# connector
name=my-ignite-sink-connector
connector.class=org.apache.ignite.stream.kafka.connect.IgniteSinkConnector
tasks.max=2
topics=test2
# cache
cacheName=myCacheTarget
cacheAllowOverwrite=true
igniteCfg=PATH_TO_THE_FILE/isolated-cluster-2.xml
singleTupleExtractorCls=com.blu.imdg.CsvStreamExtractor
The configuration is the same as the configuration we used in the previous section. The main difference is the singleTupleExtractorCls property where we have specified the stream extractor that we developed in Step 2.
Step 4. Start the Zookeeper and the Kafka broker (server) as described in the Kafka documentation.
Step 5. As you can guess, we have to create a new Kafka topic with the name test2. Let’s create the topic by using the following command.
$KAFKA_HOME/bin/kafka-topics.sh --create --zookeeper localhost:2181 --replication-factor \ 1 --partitions 1 --topic test2Step 6. Let’s start the source and sink connector in a separate console. First, start the source connector, using the following command.
bin/connect-standalone.sh myconfig/connect-standalone.properties myconfig/ignite-connecto\ r-source.propertiesThis will use the default connector standalone properties to start the source connector. Note that this connector will also start an Ignite server node which we will join to our Ignite cluster 1.
The final piece of the puzzle is the sink connector. We are now ready to start the sink connector. However, before starting another Kafka connector in standalone mode, we have to change the REST port and the storage file name for the connector. Create a file with the name connect-standalone-sink.properties into the $KAFKA_HOME/myconfig folder. Add the following properties to it.
bootstrap.servers=localhost:9092
key.converter=org.apache.kafka.connect.storage.StringConverter
value.converter=org.apache.kafka.connect.storage.StringConverter
key.converter.schemas.enable=false
value.converter.schemas.enable=false
internal.key.converter=org.apache.kafka.connect.storage.StringConverter
internal.value.converter=org.apache.kafka.connect.storage.StringConverter
internal.key.converter.schemas.enable=false
internal.value.converter.schemas.enable=false
offset.storage.file.filename=/tmp/connect-1.offsets
rest.port=8888
offset.flush.interval.ms=10000
Most of the configurations are the same as before, only the rest.port and offset.storage.file.filename is differing. We have explicitly defined a new port 8888 for this connector, also specified another file storage. Start the connector with this configuration from the $KAFKA_HOME directory.
bin/connect-standalone.sh myconfig/connect-standalone-sink.properties myconfig/ignite-con\ nector-sink.propertiesThe above command will start a sink connector on another console. The next figure shows a screenshot of the two connectors up and running on the separate console.

Step 7. Now that we have set up our connectors, it’s time to test the stream pipeline. At this point, if we put some entries into the myCacheSource cache created on cluster 1, the entries should be replicated to the myCacheTargetcache on cluster 2. We have several ways to load some entries into the cache, myCacheSource, by using the Ignite REST API or Java client. Let’s use the Ignite Java client IsolatedCluster from chapter 2 of the book from which this article is drawn.
$ java -jar ./target/IsolatedCLient-runnable.jarThis Java client loads 22 entries into the cache myCacheSource. Let’s observe what happens on Ignite clusters. Use two Ignite Visor tools to connect to the clusters, one for each cluster. Execute the cache -scan command to scan the cache, and you should get a very similar screenshot to that shown below in figure 5.

As shown in figure 5, each cache in different clusters contains the same sets of entries. If you carefully look at the Ignite sink connector logs on the console, you should find logs similar to those that follow:
CacheEvent [cacheName=myCacheSource, part=64, key=Key:150, xid=null, lockId=GridCacheVersion [topVer=150300733, order=1538826349084, nodeOrder=4], newVal=Hello World!!: 150, oldVal=null, hasOldVal=false, hasNewVal=true, near=false, subjId=572ac224-f48b-4a0c-a844-496f4d609b6a, cloClsName=null, taskName=null, nodeId8=fb6ae4b6, evtNodeId8=572ac224, msg=Cache event., type=CACHE_OBJECT_PUT, tstamp=1538829094472]
Key:150
Val:Hello World!!:
Ignite source connector streams the cache PUT event into the topic test2 as a tuple, which contains the metadata along with Key and Values: old and new values. Ignite sink connector uses the CsvStreamExtractor extractor to retrieve the value from the tuple and stores the Key-Value pair into the cache, myCacheTarget.
In the above example, we have configured only one direction real-time data replication between Ignite clusters. However, Apache Ignite Kafka connectors pack a lot of power into a small module. By taking advantage of its versatility and ease of use, you can develop powerful bi-directional data replication pipelines or notify any client application whenever any cache event occurs in the grid. Also, you can use any Kafka JDBC sink connector along with Ignite source connector to push data into any RDBMS. However, Ignite source connector also has some limitations that you should take into account before using it in a production environment:
- Ignite source connector does not work in parallel. It cannot split work, and one task instance handles the stream.
- It does not handle multiple caches. In order to handle multiple caches, you have to define multiple connectors configured and running in Kafka.
- Ignite source connector needs a server node to be started in the embedded mode to get a notified event.
- It does not support dynamic reconfiguration.
Opinions expressed by DZone contributors are their own.
Comments