Running SOAP WS-Security Load Tests in JMeter
In this article, we look at how to use his security feature of the popular open source testing tool. Read on to learn how to get started!
Join the DZone community and get the full member experience.
Join For FreeIn this article, we will discuss how to run load tests for WS-Security, one of the SOAP extensions, in Apache JMeter™.
What Is SOAP?
SOAP (Simple Object Access Protocol) is a protocol for message exchange between clients and servers. All SOAP messages are XML documents, in which data is conveniently structured and easily readable. SOAP describes how to structure the XML document, and defines a set of standard data types and commands for accessing the functionalities of other programs.
For instance, let's say we want to call the GetStockQuote function, which returns the Stock Quote for a company. The function accepts a string as a parameter. So, by using SOAP, the message looks as follows:
<SOAP-ENV:Envelope xmlns:SOAP-ENV="http://schemas.xmlsoap.org/soap/envelope/"
       xmlns:xsi="http://www.w3.org/1999/XMLSchema-instance"
       xmlns:xsd="http://www.w3.org/1999/XMLSchema">
<SOAP-ENV:Body>
<ns1:GetStockQuote xmlns:ns1="urn:xmethods-quotes">
<SOAP-ENV:encodingStyle="http://schemas.xmlsoap.org/soap/encoding/">
<symbol xsi:type="xsd:string">IBM</symbol>
</ns1:GetStockQuote>
</SOAP-ENV:Body>
</SOAP-ENV:Envelope>
This message is used to access the functionalities of the server. Now, that we know what SOAP messages look like, we can proceed to WS-Security.
SOAP WS Security Extension
There are also various SOAP extensions. Some of them are WS-* standards, like WS-Policy or WS-Discovery. One of the most common ones is WS-Security. WS-Security specifies how to add authentication, encryption, and digital signatures to the messages.
The WS-Security extension uses the header of the SOAP message to transmit the information about the certificates and the credentials. Here is an example of a security header in which the login-password is sent for authentication:
<soap:Header>
  <wsse:Security xmlns:wsse="http://schemas.xmlsoap.org/ws/2003/06/secext">
   <wsse:UsernameToken wsu:Id="sample"
       xmlns:wsu="http://schemas.xmlsoap.org/ws/2003/06/utility">
    <wsse:Username>sample</wsse:Username>
    <wsse:Password Type="wsse:PasswordText">oracle</wsse:Password>
    <wsu:Created>2004-05-19T08:44:51Z</wsu:Created>
   </wsse:UsernameToken>
  </wsse:Security>
  </soap:Header>
Load Testing the SAO WS-Security Extension
JMeter has two solutions for performance testing the SOAP protocol with a WS-Security extension: BeanShell and the WS-Security for SOAP plugin.
We will get acquainted with the simplest of them: the WS-Security for SOAP plugin. You can install it by using the JMeter Plugins Manager. As a test environment, we will use this WS-security example, which gives us endpoints with signature verification, encryption, and authentication. From our side, we will only need to send requests to JMeter and wait for the answer. You can find all the SOAP requests that we will use in the examples here.
The WS Security plugin provides three pre-processors and one post-processor:
1. SOAP Message UsernameToken.
2. SOAP Message Signer.
3 and 4. SOAP Message Encrypter/Decrypter.
Each of these preprocessors adds a part to the header of the SOAP request. We will examine each of them.
But first, you should know that this plugin works only with the HTTP Request Sampler, JMS Point-to-Point, and JMS Publisher. We will demonstrate its work with the HTTP Request Sampler.
1. To add it, add a thread group, then:
Right click on Thread Group-> Add-> Samplers-> HTTP Request Sampler
1. SOAP Message UsernameToken PreProcessor
The SOAP Message UsernameToken preprocessor adds the part of the header that is required for authentication.
2. To add it:
Right Click on HTTP Request-> Add-> Pre Processors-> SOAP Message UsernameToken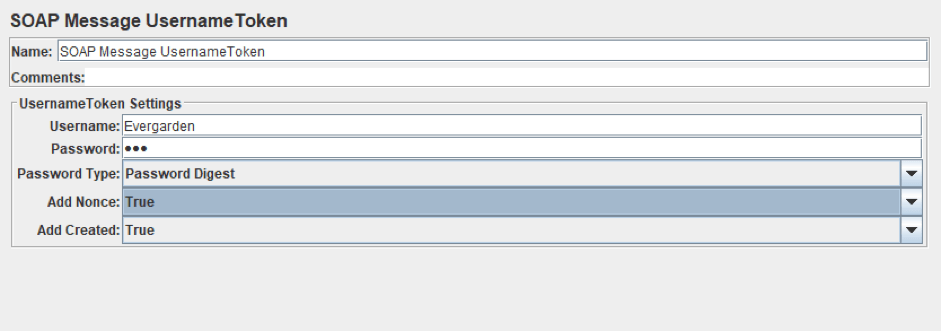
- The Username and Password are the credentials to authenticate the identity of the SOAP message receiver.
- Password Type specifies how the password should be encrypted. This field contains 3 options:
- Password Digest means encrypting the password using the "#PasswordDigest" algorithm.
- Password Text means sending a plain text password.
- Edit means setting your own password type.
- Add Nonce is needed to set the Nonce value. This field contains 3 options, too:
- True - JMeter figures out your own Nonce and passes it to the header.
- False - the header will not contain a Nonce parameter.
- Edit - set your own Nonce value.
- Add Created is needed to set the creation time of SOAP request. The options are the same as those of the Add Nonce field.
Now let's use it.
Our example has several Endpoints. For instance, /services/unsecure is an endpoint without security and /services/username/ is an endpoint with a TokenUsername Authentication.
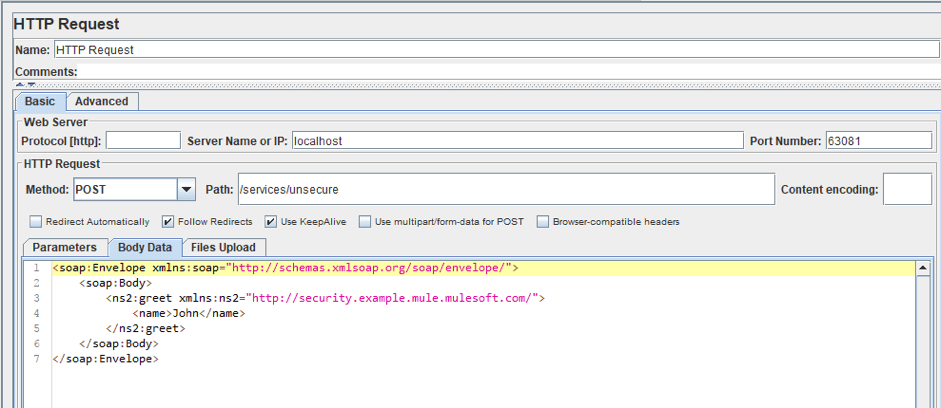
3. To demonstrate testing Authentication, configure the HTTP Request Sampler we added earlier for the unprotected endpoint. Here you can add the XML you are testing, which you can get from the documentation of your tested program.
<soap:Envelope xmlns:soap="http://schemas.xmlsoap.org/soap/envelope/">
    <soap:Body>
        <ns2:greet xmlns:ns2="http://security.example.mule.mulesoft.com/">
            <name>John</name>
        </ns2:greet>
    </soap:Body>
</soap:Envelope>
For SOAP requests, the POST Method is used. The address of our service is localhost: 63081/services/unsecure. Then Server Name is localhost, Port Number is 63081, and Path is /service/unsecure. We specify the request body in the Body Data tab.
4. We also need to set 'text/xml; charset=utf-8' Content-Type using the HTTP Header Manager, otherwise the request will not be correctly processed. To add it:
Right click on Thread Group-> Add-> Config-> HTTP Header Manager
5. Now add a listener and run the test.
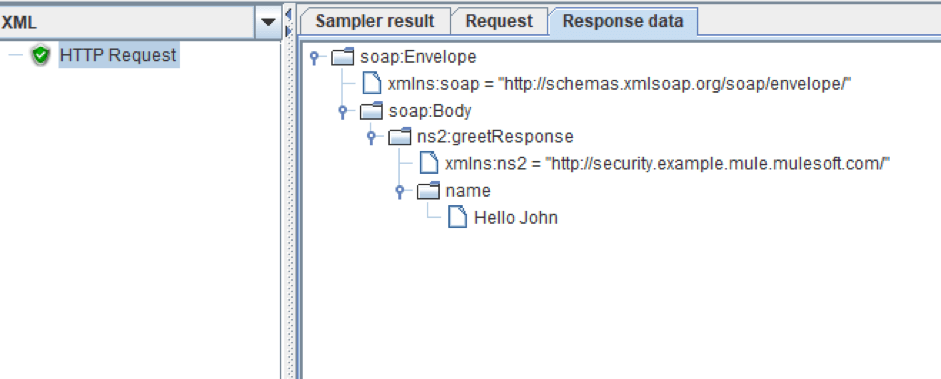
The service should return the 'Hello + string from the request.' As we see in the screenshot above, the request was processed successfully, because we don't need authentication preprocessors for normal request processing.
6. Now let's change this endpoint to an endpoint with UsernameToken authentication (/service/username) and run the test.
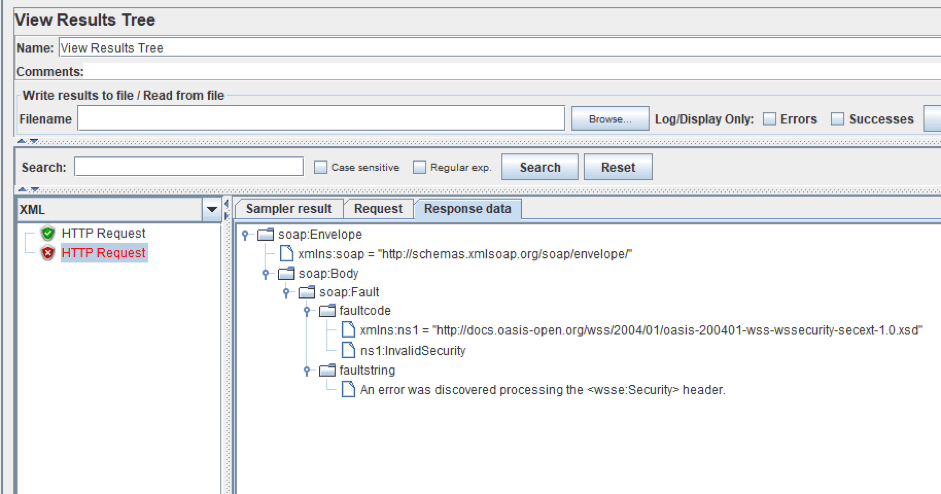
And as you can see, we got an error message, because we have no Security header in the SOAP message.
7. Now, let's configure the preprocessor we added earlier.
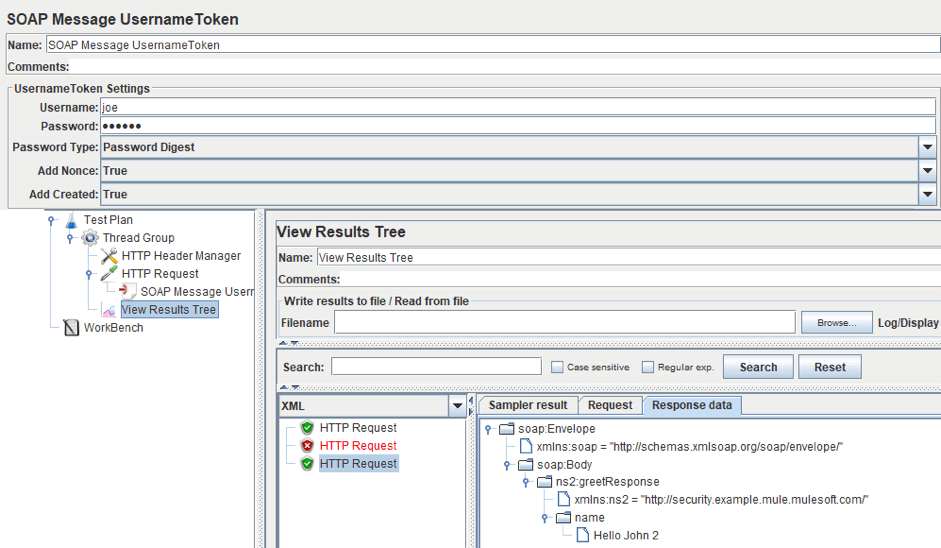
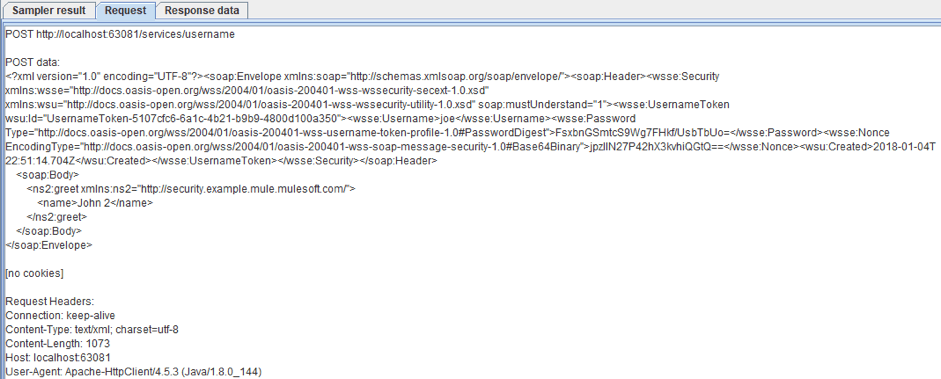
Our username/password is joe/secret and the password is encrypted using Password Digest. And as you can see, the request on the secured endpoint has been processed successfully again. And if we go to the Request tab, we will see the new part of the request that adds the UsernameToken Authentication.
2. SOAP Message Signer PreProcessor
Signature and encryption/decryption are performed with digital certificates. By using this preprocessor you can sign your message or part of it.
8. To add it:
Right Click on HTTP Request-> Add-> Pre Processors-> SOAP Message Signer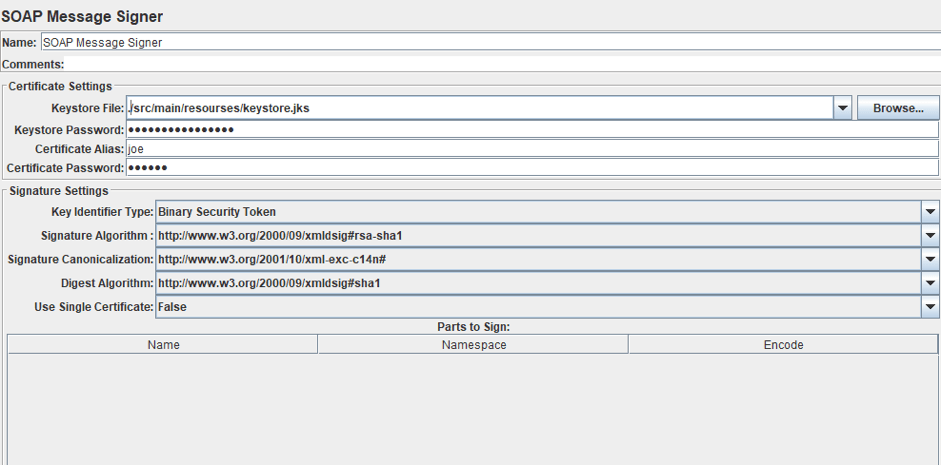
The signer and encrypter/decrypter processors have two parts: the first part is intended to set the digital certificate settings:
- Keystore File - the path to the keystore file. This file is used to store keys and certificates that are used to identify the owner of the key (client or server). The access to the keystore is password protected.
- Certificate Alias - the keystore allows you to store multiple key pairs and certificates. An alias is used to identify each pair or a separate certificate. The access to each alias is limited by the password too.
- Keystore/Certificate Password - the password for the keystore/alias.
The second part of the preprocessor is the Signature Settings. It has the following fields:
- Key Identifier Type - this lets the recipient know which certificate/public key to use to verify the signature. In this field and the following ones, you can choose a value from the list or specify your own. You can see the list and examples for this field here.
- Signature Algorithm/Signature Canonicalization/Digest Algorithm - the algorithms to use to create the signature. Each value is a reference to a description of an XML signature structure for the selected algorithm. The link directs to the complete structure. If you are not sure which to choose, leave this as default.
- Use Single Certificate - if "True," a single certificate will be used. This is used for X509v3 Token Type. You can also choose the "Edit" option and use JMeter variables in the field.
- Parts to sign - By using this table, you are able to sign only certain parts of the outgoing message. If this is not filled out, the whole message will be signed.
9. The endpoint for a signed request is /service/signed. Let's configure the Signer preprocessor. Our keystore file is located in the /src/main/resources directory and has 'keyStorePassword' password, 'joe' alias and 'secret' password of alias. The other settings remain unchanged.
10. Run the script.
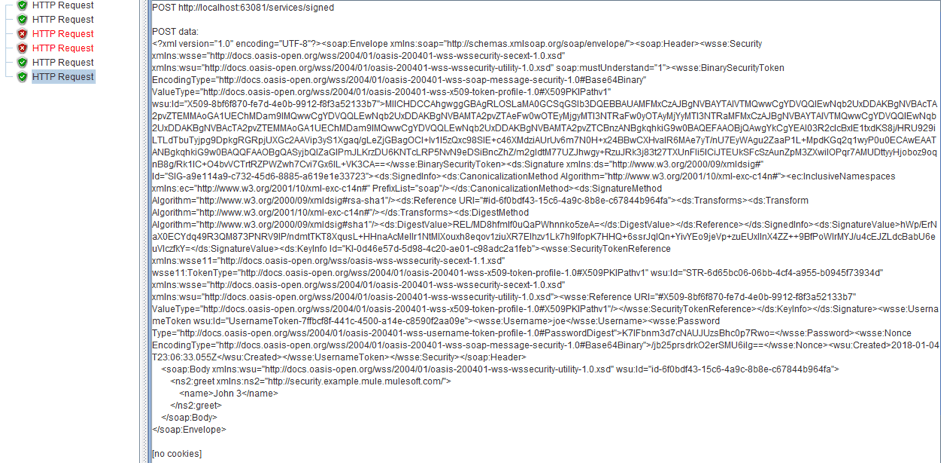
The request was successfully processed again. If you go to the Request tab, you will notice that the header has become significantly larger.
3+4. SOAP Message Encrypter/Decrypter PreProcessor and PostProcessor
The pre-processor and post-processor encrypt the request and decrypt the response.
11. To add the SOAP Message Encrypter:
Right Click on HTTP Request sampler-> Add-> Pre Processors-> SOAP Message Encrypter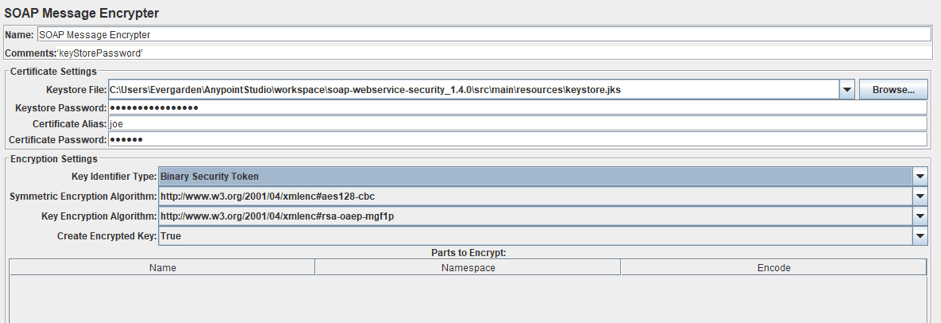
The first part of the pre-processor is similar to the part of the previous preprocessor, so let's move on to the second part. The second part is very similar too. The Key Identifier Type, Symmetric Encryption Algorithm, Key Encryption Algorithm, and Parts to Encrypt table are similar to the fields of the previous preprocessor.
In fact, there is only one new field: Create Encrypted Key. If 'True,' this preprocessor will encrypt the symmetric key into an EncryptedKey tag. The EncryptedKey element provides information that enables the recipient to determine the key to use to decrypt the message.
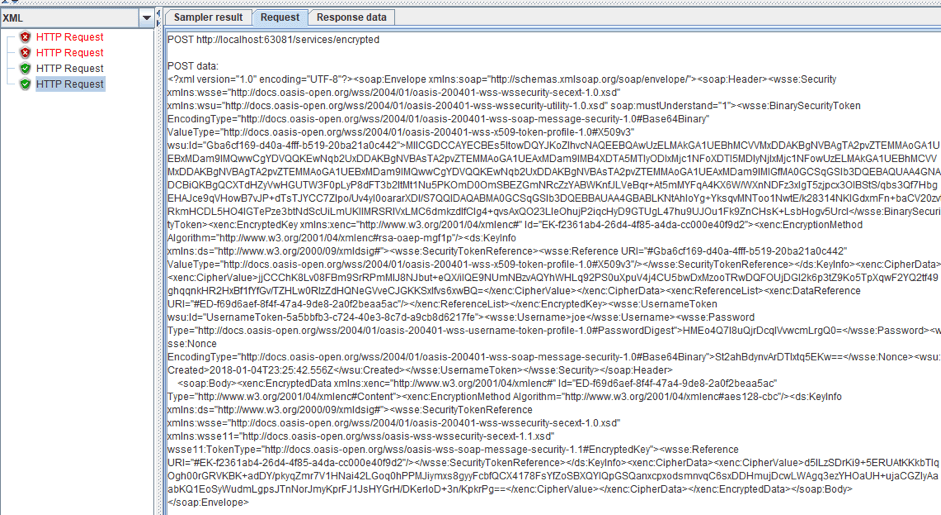
12. Now let's try encrypting the request. The endpoint for an encrypted request is /service/encrypted. The Certificate Settings are the same as SOAP Message Signer preprocessor settings. Therefore, we transfer them and leave the other settings as default. After that, we just run the script again. The request is successful and the header has changed again.
13. The interface of the post processor includes only the Certificate Settings section and looks like this:

Here, you need to specify the path to keystore, the keystore password, and the Key for Decryption of the incoming message.
SOAP Timestamps
Very often (almost always) SOAP messages have to contain a timestamp. This is necessary to check the relevance of the message, because if it is obsolete, then it does not need to be processed. In our examples, its checking was disabled, because these preprocessors do not add a timestamp to the header. Now you know how these elements work and we can modify their work - by adding timestamps to the request.
What happens if the server wants to see a timestamp in the request, but the header does not contain it? Let's change the server configuration so that it expects a timestamp, and send our request to the /username endpoint.
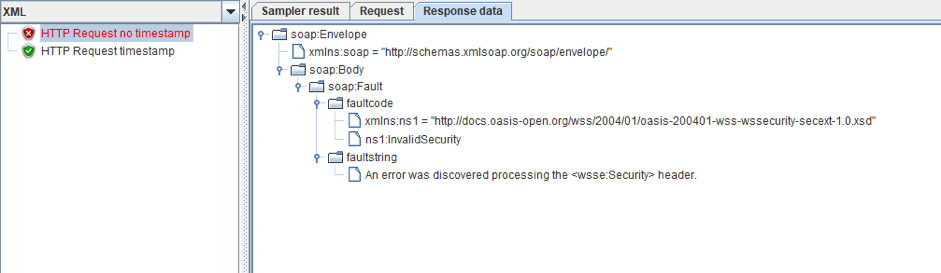
As you can see in the screenshot above, we got a header processing error, because we don't have a timestamp in the request.
14. So, we need to add it to the request. It has the following structure:
  <wsu:Timestamp>
                <wsu:Created>2018-01-05T00:55:23.417Z</wsu:Created>
                <wsu:Expires>2018-01-05T01:00:23.417Z</wsu:Expires>
 </wsu:Timestamp>
That is, we need to calculate and add two dates to our headline. I chose to use Groovy right in the body of the sampler, and now the body of the request looks like:
<soap:Envelope xmlns:soap="http://schemas.xmlsoap.org/soap/envelope/">
<soap:Header>
        <wsse:Security xmlns:wsse="http://docs.oasis-open.org/wss/2004/01/oasis-200401-wss-wssecurity-secext-1.0.xsd"          xmlns:wsu="http://docs.oasis-open.org/wss/2004/01/oasis-200401-wss-wssecurity-utility-1.0.xsd" soap:mustUnderstand="1">
            <wsu:Timestamp>
                <wsu:Created>${__groovy(use(groovy.time.TimeCategory) { (new Date()).format("yyyy-MM-dd'T'HH:mm:ss.SSS'Z'") })}</wsu:Created>
                <wsu:Expires>${__groovy(use(groovy.time.TimeCategory) { (new Date() + 5.minutes).format("yyyy-MM-dd'T'HH:mm:ss.SSS'Z'") })}</wsu:Expires>
            </wsu:Timestamp>
        </wsse:Security>
    </soap:Header>
    <soap:Body>
        <ns2:greet xmlns:ns2="http://security.example.mule.mulesoft.com/">
            <name>John 2</name>
        </ns2:greet>
    </soap:Body>
</soap:Envelope>
The 'Expires' code calculates the current time, increments 5 minutes, and prints that time to the request. 'The Created' code does the same thing, but without time incrementing.
${__groovy(use(groovy.time.TimeCategory) { (new Date() + 5.minutes).format("yyyy-MM-dd'T'HH:mm:ss.SSS'Z'") })}You can also read this blog post to learn how to add a timestamp by using the JSR223 preprocessor.
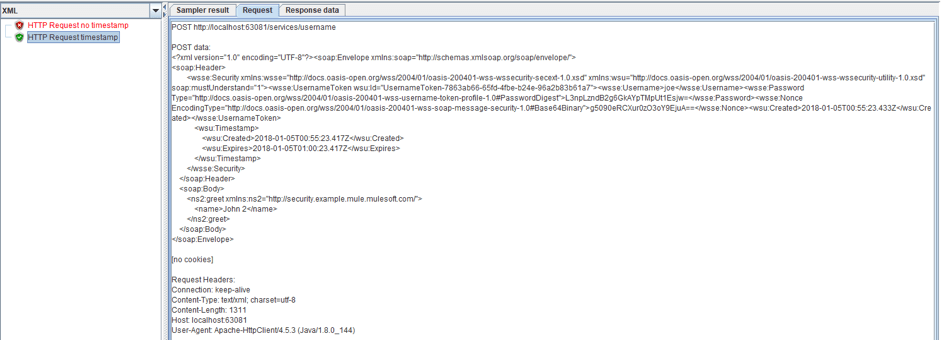
15. If you look at the results of the request with the timestamp, you will see that it was executed successfully and the processor successfully complements the header.
Samplers that are not part of the standard JMeter functionality, such as JMeter Plugins, can also be used if they provide a getter/setter pair to access a String property that contains the information that needs to be encrypted or signed.
In that case, the JMeter property jmeter.wssecurity.samplerPayloadAccessors can be used to specify the class and member name, which the preprocessor will access during runtime.
Suppose a sampler looks like this:
package some.package;
public class SomeSampler extends AbstractSampler {
public String getPayload()
           {// ...}
public void setPayload(String content)
{// ...}
}
Then the JMeter property should be set as follows:
jmeter.wssecurity.samplerPayloadAccessors=some.package.SomeSampler.payloadConclusion
In this article, we have covered a fairly simple way to work with WS-Security in JMeter. We recommend this way over the BeanShell preprocessor, because writing the script does not require an understanding of encryption algorithms, or a clear understanding of the structure of SOAP message headers, nor does it require writing a lot of code to create a request.
Published at DZone with permission of . See the original article here.
Opinions expressed by DZone contributors are their own.
Comments