Running SpringBoot Application On OpenShift
In this article, I will try to demonstrate how to install and deploy a simple spring-boot application in OpenShift (Minishift).
Join the DZone community and get the full member experience.
Join For FreeIn this article, I will try to demonstrate how to deploy a simple spring-boot application on OpenShift (Minishift).
But wait what the hell is Openshift after all?.
OpenShift is RedHat’s cloud development Platform as a Service (PaaS). It is built on top of Docker containers and the Kubernetes container cluster orchestrator.
What is Paas?.
As per Wikipedia.
Platform as a service (PaaS) or application platform as a service (aPaaS) or platform-based service is a category of cloud computing services that provides a platform allowing customers to develop, run, and manage applications without the complexity of building and maintaining the infrastructure typically associated with developing and launching an app.
What Is Minishift?
Minishift is a tool that helps you run OpenShift locally by running a single-node OpenShift cluster inside a VM. You can try out OpenShift or develop with it, day-to-day, on your localhost.
Let’s get started then. I will be installing it on my mac but there are plenty of blogs/ resources available explaining how to install it on other popular OS like Windows, Linux, etc. You can go through the official installation instructions or follow the steps mentioned below.
Installation
These are basically the steps you need to follow to run minishift locally on macOS.
- Prerequisites
- Set up your virtualization environment
- Download Minishift software for your operating system from the Minishift Releases page manually.
- Install Minishift using Homebreq on macOS.
- Start Minishift
- Configure Minishift so you can use it efficiently.
As explained in point 5 you can start minishift with the below command
minishift start
Once you run the above command minishift performs some system checks like this.
xxxxxxxxxx
>Starting profile ‘minishift’
>Check if deprecated options are used … OK
>Checking if https://github.com is reachable … OK
>Checking if requested OpenShift version ‘v3.11.0’ is valid … OK
>Checking if requested OpenShift version ‘v3.11.0’ is supported … OK
>Checking if requested hypervisor ‘xhyve’ is supported on this platform ..OK
>Checking if xhyve driver is installed …
If everything is OK then you would see message like this at then end of your terminal.
>OpenShift server started.
>The server is accessible via web console at:
>https://192.168.64.3:8443/console
Accessing Web Console
Now you are good to go and browse the minishift web console. Since there is no authentication/authorization enabled by default you can create your own username and password when logging in for the first time.

Creating Project
First, you need to create a project. You have the option to create projects etc. via the command line and via the web console. We will be using the command line option. First login using below command as an admin user.
xxxxxxxxxx
oc login -u system:admin
Then by default, we can use the default project which is myproject for this demo. Alternatively, you can create a new project using oc new-project command.
xxxxxxxxxx
oc new-project <project_name> \
--description="<description>" --display-name="<display_name>"
Creating Application
Now you need to select a base image for the application that you are going to create. Since this is a spring-boot application we will be using openjdk8 base image for our application. Use the below command line command to create an application with openjdk8 base image. Source code is available here.
xxxxxxxxxx
oc new-app registry.access.redhat.com/redhat-openjdk-18/openjdk18-openshift~https://github.com/userac/springboot-kubernetes.git — name=springboot-demo-openshift
Output of Above Command
xxxxxxxxxx
→ Found Docker image 6c975f1 (2 weeks old) from registry.access.redhat.com for “registry.access.redhat.com/redhat-openjdk-18/openjdk18-openshift”
Java Applications
— — — — — — — — -
Platform for building and running plain Java applications (fat-jar and flat classpath)
Tags: builder, java
* An image stream tag will be created as “openjdk18-openshift:latest” that will track the source image
* A source build using source code from https://github.com/userac/springboot-kubernetes.git will be created
* The resulting image will be pushed to image stream tag “springboot-demo-openshift:latest”
* Every time “openjdk18-openshift:latest” changes a new build will be triggered
* This image will be deployed in deployment config “springboot-demo-openshift”
* Ports 8080/tcp, 8443/tcp, 8778/tcp will be load balanced by service “springboot-demo-openshift”
* Other containers can access this service through the hostname “springboot-demo-openshift”
→ Creating resources …
imagestream.image.openshift.io “openjdk18-openshift” created
imagestream.image.openshift.io “springboot-demo-openshift” created
buildconfig.build.openshift.io “springboot-demo-openshift” created
deploymentconfig.apps.openshift.io “springboot-demo-openshift” created
service “springboot-demo-openshift” created
Build Status
Once the application is created the build will be automatically scheduled using S2I. You can view the logs using below command to check the status of the build.
oc logs -f bc/springboot-demo-openshift
Output of above command
Cloning “https://github.com/userac/springboot-kubernetes.git" …
Commit: bdf1e3a36a7c16b69567de1b5343ff9c51114536 (changing message)
Author: ashishchoudhary
Date: Sun Mar 22 00:22:23 2020 +0530
Using registry.access.redhat.com/redhat-openjdk-18/openjdk18-openshift@sha256:fa5f725ba5d0ed29f680a21d49e87d88ef0bad3db83158496eda33533cca10f8 as the s2i builder image
INFO Performing Maven build in /tmp/src
INFO Using MAVEN_OPTS -XX:+UseParallelOldGC -XX:MinHeapFreeRatio=10 -XX:MaxHeapFreeRatio=20 -XX:GCTimeRatio=4 -XX:AdaptiveSizePolicyWeight=90 -XX:MaxMetaspaceSize=100m -XX:+ExitOnOutOfMemoryError
INFO Using Apache Maven 3.6.1 (Red Hat 3.6.1–6.3)
Maven home: /opt/rh/rh-maven36/root/usr/share/maven
Java version: 1.8.0_272, vendor: Red Hat, Inc., runtime: /usr/lib/jvm/java-1.8.0-openjdk-1.8.0.272.b10–1.el7_9.x86_64/jre
Default locale: en_US, platform encoding: ANSI_X3.4–1968
OS name: “linux”, version: “3.10.0–1127.19.1.el7.x86_64”, arch: “amd64”, family: “unix”
INFO Running ‘mvn -e -Popenshift -DskipTests -Dcom.redhat.xpaas.repo.redhatga -Dfabric8.skip=true — batch-mode -Djava.net.preferIPv4Stack=true -s /tmp/artifacts/configuration/settings.xml -Dmaven.repo.local=/tmp/artifacts/m2 package’
[INFO] Error stacktraces are turned on.
[INFO] Scanning for projects…
[INFO] Downloading from central: https://repo1.maven.org/maven2/org/springframework/boot/spring-boot-starter-parent/2.2.4.RELEASE/spring-boot-starter-parent-2.2.4.RELEASE.pom
[INFO] Downloaded from central: https://repo1.maven.org/maven2/org/springframework/boot/spring-boot-starter-parent/2.2.4.RELEASE/spring-boot-starter-parent-2.2.4.RELEASE.pom (8.1 kB at 1.7 kB/s)…….
INFO] BUILD SUCCESS
[INFO] — — — — — — — — — — — — — — — — — — — — — — — — — — — — — — — — — — — —
[INFO] Total time: 02:44 min
[INFO] Finished at: 2020–11–11T05:07:46Z
[INFO] — — — — — — — — — — — — — — — — — — — — — — — — — — — — — — — — — — — —
[WARNING] The requested profile “openshift” could not be activated because it does not exist.
INFO Copying deployments from target to /deployments…
‘/tmp/src/target/springboot-kubernetes-0.0.1-SNAPSHOT.jar’ -> ‘/deployments/springboot-kubernetes-0.0.1-SNAPSHOT.jar’
Pushing image 172.30.1.1:5000/myproject/springboot-demo-openshift:latest …
Pushed 0/4 layers, 1% complete
Pushed 1/4 layers, 29% complete
Pushed 2/4 layers, 70% complete
Pushed 3/4 layers, 95% complete
Pushed 4/4 layers, 100% complete
Push successful
You’ve just built, pushed, and run a new runnable container image from source code in a git repository, no Dockerfile necessary.
As per Openshift documentation.
Using new-app results in a build configuration, which creates a new application image from your source code. It also constructs a deployment configuration to deploy the new image, and service to provide load-balanced access to the deployment running your image.
OpenShift Enterprise automatically detects whether the docker or source build strategy is being used, and in the case of source builds, detects an appropriate language builder image.
In our case with the new-app command, we have overridden the image the builder uses for a particular source repository by specifying the openjdk8 image stream and the repository, with a - as a separator.
Now let’s understand what an S2I is actually?
S2I
As per Openshift documentation.
Openshift’s Source-to-Image (S2I) is a toolkit and workflow for building reproducible container images from source code. S2I produces ready-to-run images by injecting source code into a container image and letting the container prepare that source code for execution. By creating self-assembling builder images, you can version and control your build environments exactly like you use container images to version your runtime environments.
Status
Run ‘oc status’ to view your application status.
xxxxxxxxxx
oc status
Output of Above Command
xxxxxxxxxx
In project My Project (myproject) on server https://192.168.64.4:8443
svc/springboot-demo-openshift — 172.30.105.115 ports 8080, 8443, 8778
dc/springboot-demo-openshift deploys istag/springboot-demo-openshift:latest <-
bc/springboot-demo-openshift source builds https://github.com/userac/springboot-kubernetes.git on istag/openjdk18-openshift:latest
deployment #1 deployed 20 minutes ago — 1 pod
As you can see that there is 1 pod running. You can view the same status on the web console also. You would see something like below. If you carefully observe we have not exposed the application to the outside world yet because we have not created a route. Let’s do that now and see if we can access the application.
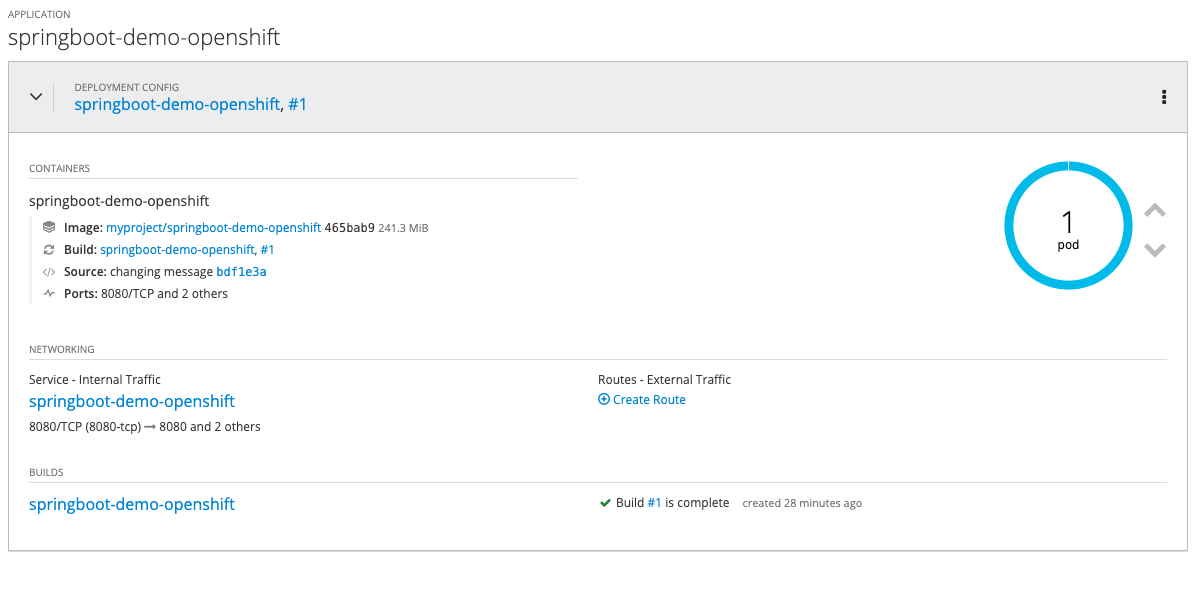
Pod running
Route
In Openshift's term to expose our application to the outside world, we need to create routes. It can be created by executing the command given below:
xxxxxxxxxx
oc expose svc/springboot-demo-openshift
Output of Above Command
route.route.openshift.io/springboot-demo-openshift exposed
Similarly, if you goto web console applications>routes. You can see that route is created. Now our application is exposed to the outside world. Cool.

Let’s hit the URL and access our spring boot demo application.

We have successfully deployed our first spring-boot demo application to Openshift locally.
In the next article, we will cover how we can trigger builds if we make any changes to our Github repository.
Opinions expressed by DZone contributors are their own.
Comments