How to Run Selenium Tests on Selenium Grid 4 With Jenkins and Docker Compose
A step-by-step guide to set up an automated pipeline to run Selenium WebDriver tests on Selenium Grid 4 with Jenkins and Docker Compose.
Join the DZone community and get the full member experience.
Join For FreeSelenium WebDriver, Selenium Grid 4, Jenkins, and Docker Compose are popular and well-known tools. When combined, these tools are a powerful combination for web automation testing. The combination of these tools can help us set up an on-demand local infrastructure, enabling us to spin up the environment as needed for running our web automation tests at scale.
Consider a scenario where we need to run multiple web automation tests on different browsers to verify the functionality and stability of the web application. Combining Selenium Grid 4 with Docker Compose can help set up browsers with a single command, allowing us to perform the required test execution smoothly with Jenkins Jobs.
Prerequisites
The following applications should be installed on the local machine:
- Docker
- Jenkins
Docker can be easily installed by downloading the application and following the instructions provided on its official website.
The Jenkins, Selenium Grid 4, and the OWASP Juice Shop website (application under test) will be set up using Docker Compose.
Docker Container networking is required so the containers can connect and communicate with each other. For this, we will be using the Docker Network, so the containers running Jenkins, Selenium Grid 4, and the OWASP Juice Shop website can communicate seamlessly.
Next, we will install and set up Jenkins using Docker Compose. After installing Jenkins, we will set up a Jenkins Agent with Docker Compose.
Docker Network
Container networking refers to the capability of containers to connect and communicate with one another, as well as with non-Docker workloads. By default, networking is enabled for containers, allowing them to initiate outgoing connections.
Let’s create a custom Docker network by running the following command in the terminal:
docker network create selenium-jenkins-networkDecoding the Command
docker network create– This command tells Docker to create a new custom network.selenium-jenkins-network– This is the name we have assigned to the custom network. (Any name can be assigned here.)

docker network ls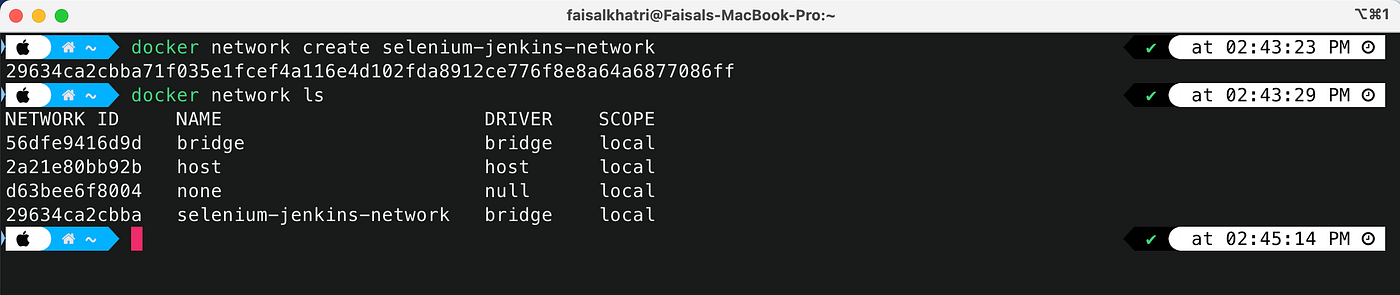
With the output, it can be confirmed that the custom network selenium-jenkins-network is created successfully.
Setting Up Jenkins With Docker Compose
We will need a complete Jenkins setup before proceeding to create a Jenkins job to run the Selenium tests. The following is the Docker Compose file that has the setup for Jenkins and a Jenkins Agent:
  # docker-compose.yaml
  version: '3.8'
  services:
    jenkins:
      image: jenkins/jenkins:lts
      privileged: true
      user: root
      ports:
       - 8080:8080
       - 50000:50000
      container_name: jenkins
      volumes:
      - /Users/faisalkhatri/jenkins_compose/jenkins_configuration:/var/jenkins_home
      - /var/run/docker.sock:/var/run/docker.sock
      networks:
        - selenium-jenkins-network

    agent:
      image: jenkins/ssh-agent:latest-jdk21
      privileged: true
      user: root
      container_name: agent
      expose:
        - 22
      environment:
      - JENKINS_AGENT_SSH_PUBKEY=ssh-ed25519 AAAAC3NzaC1lZDI1NTE5AAAAIEhDGcRRY470bLQLigEKzTMvDL7zICF5CI1MAAc6PC5v [email protected]
      networks:
        - selenium-jenkins-network

  networks:
    selenium-jenkins-network:
      external: true
Let us focus on the network part in this file, as it is important in the context of this blog. Details about other fields and values in the Docker Compose can be learnt by going through the previous blogs on Jenkins and Jenkins Agent setup.
networks:
    selenium-jenkins-network:
      external: true
The networks key defines the network that the services in this Docker Compose file will use. selenium-jenkins-network is the name of the network that will be referenced.
The external true tells Docker not to create this network, and connect to an existing custom network named selenium-jenkins-network. (We already created this custom network in the earlier step.)
Another update in the Docker Compose file regarding the network is to add a networks key with the custom network name for the services.
services:
    jenkins:
      //..
      networks:
        - selenium-jenkins-network
    agent:
      //..
      networks:
        - selenium-jenkins-network
This network mapping is also important, as Jenkins and Agent will be in separate containers, so they should know which network to connect.
Starting Jenkins
Jenkins and its agent can be started by navigating to the folder where docker-compose.yaml file is available, and running the following command in the terminal:
docker compose up -d
Next, open a browser and navigate to “https://localhost:8080” to confirm that Jenkins is up and running.
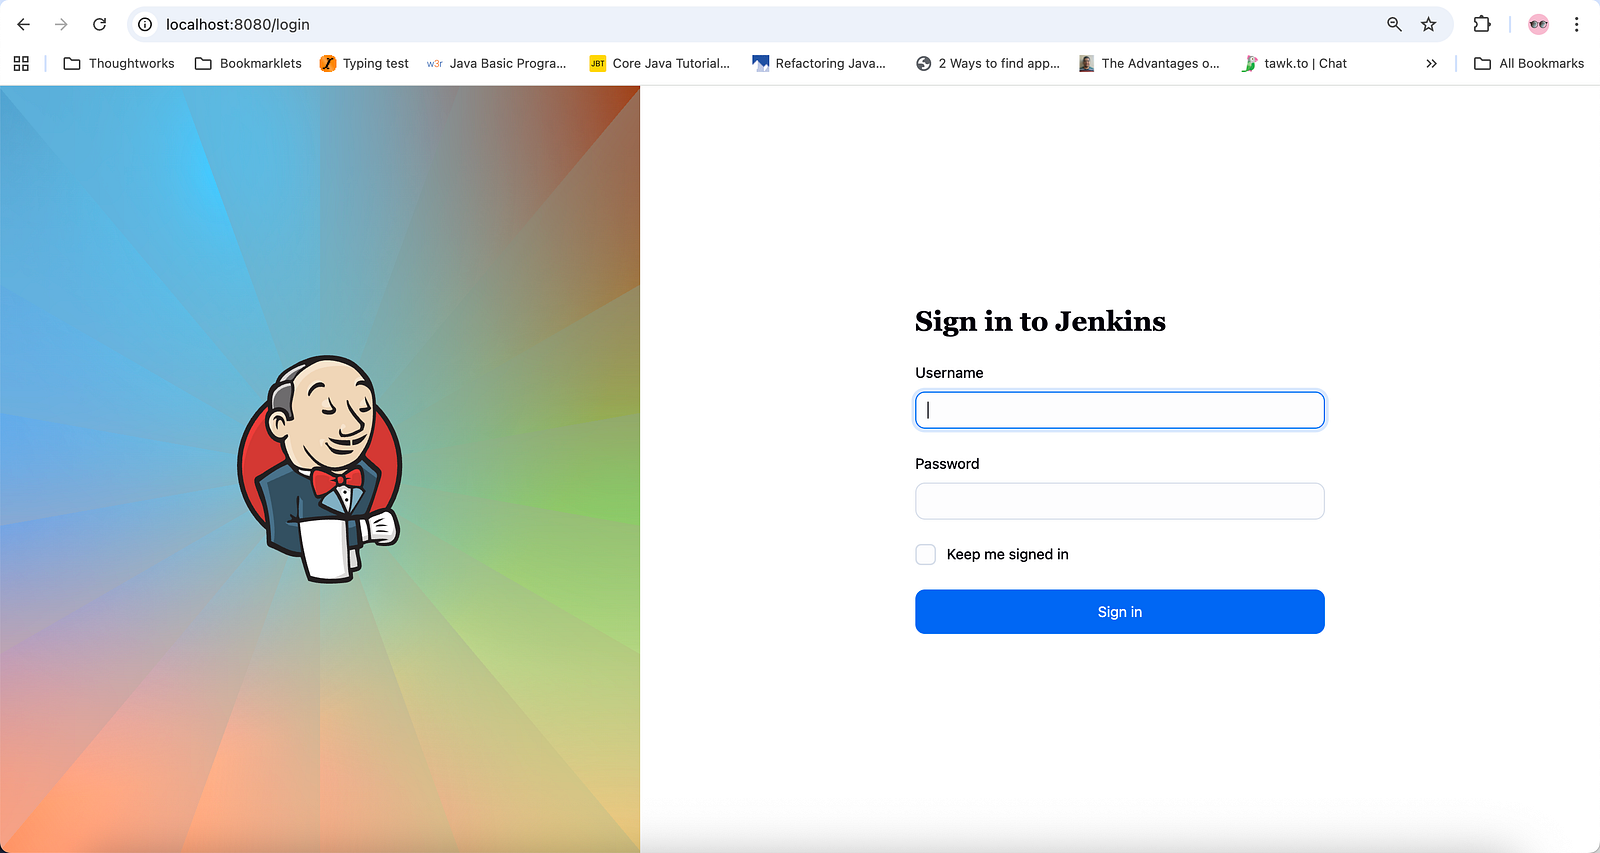
As Jenkins has already been installed and configured, the login screen is now displayed. If you are running for the first time, I would recommend checking the following blogs to set up Jenkins and Jenkins Agent:
Setting Up Selenium Grid 4 With Docker Compose
Selenium Grid 4 enables parallel execution of Selenium WebDriver tests across multiple platforms and browsers, including different browser versions.
The following Docker Compose file will be used to start the Selenium Grid 4:
version: "3"
services:
  chrome:
    image: selenium/node-chromium:latest
    shm_size: 2gb
    depends_on:
      - selenium-hub
    environment:
      - SE_EVENT_BUS_HOST=selenium-hub
      - SE_EVENT_BUS_PUBLISH_PORT=4442
      - SE_EVENT_BUS_SUBSCRIBE_PORT=4443
      - SE_NODE_MAX_INSTANCES=4
      - SE_NODE_MAX_SESSIONS=4
      - SE_NODE_SESSION_TIMEOUT=180
    networks:
      - selenium-jenkins-network

  firefox:
    image: selenium/node-firefox:latest
    shm_size: 2gb
    depends_on:
      - selenium-hub
    environment:
      - SE_EVENT_BUS_HOST=selenium-hub
      - SE_EVENT_BUS_PUBLISH_PORT=4442
      - SE_EVENT_BUS_SUBSCRIBE_PORT=4443
      - SE_NODE_MAX_INSTANCES=1
      - SE_NODE_MAX_SESSIONS=1
      - SE_NODE_SESSION_TIMEOUT=180
    networks:
      - selenium-jenkins-network

  selenium-hub:
    image: selenium/hub:latest
    container_name: selenium-hub
    ports:
      - "4442:4442"
      - "4443:4443"
      - "4444:4444"
    networks:
      - selenium-jenkins-network

networks:
  selenium-jenkins-network:
    external: true
It should be noted that the details regarding the Docker Network should be updated in this file to ensure the Selenium Grid 4 container connects with the Jenkins container for seamless execution of Selenium tests.
The networks key is updated at the end, which tells Docker to connect to the already created custom selenium-jenkins-network Similarly, the chrome , firefox , and selenium-hub services have the networks key, so all these services connect to the same network.
Starting Selenium Grid 4
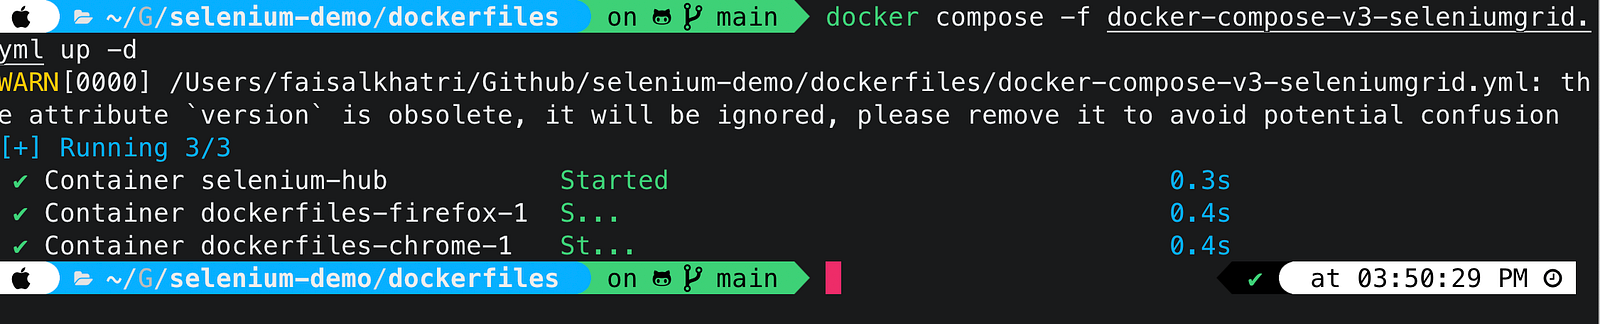
The following command should be run from a new terminal from the folder path where the Selenium Grid 4 Docker Compose file is saved:
docker compose -f docker-compose-v3-seleniumgrid.yml up -d
The -f <filename> part in the above command is optional. I have multiple Docker compose files in the same folder, so I have set different file names and am using the -f flag.
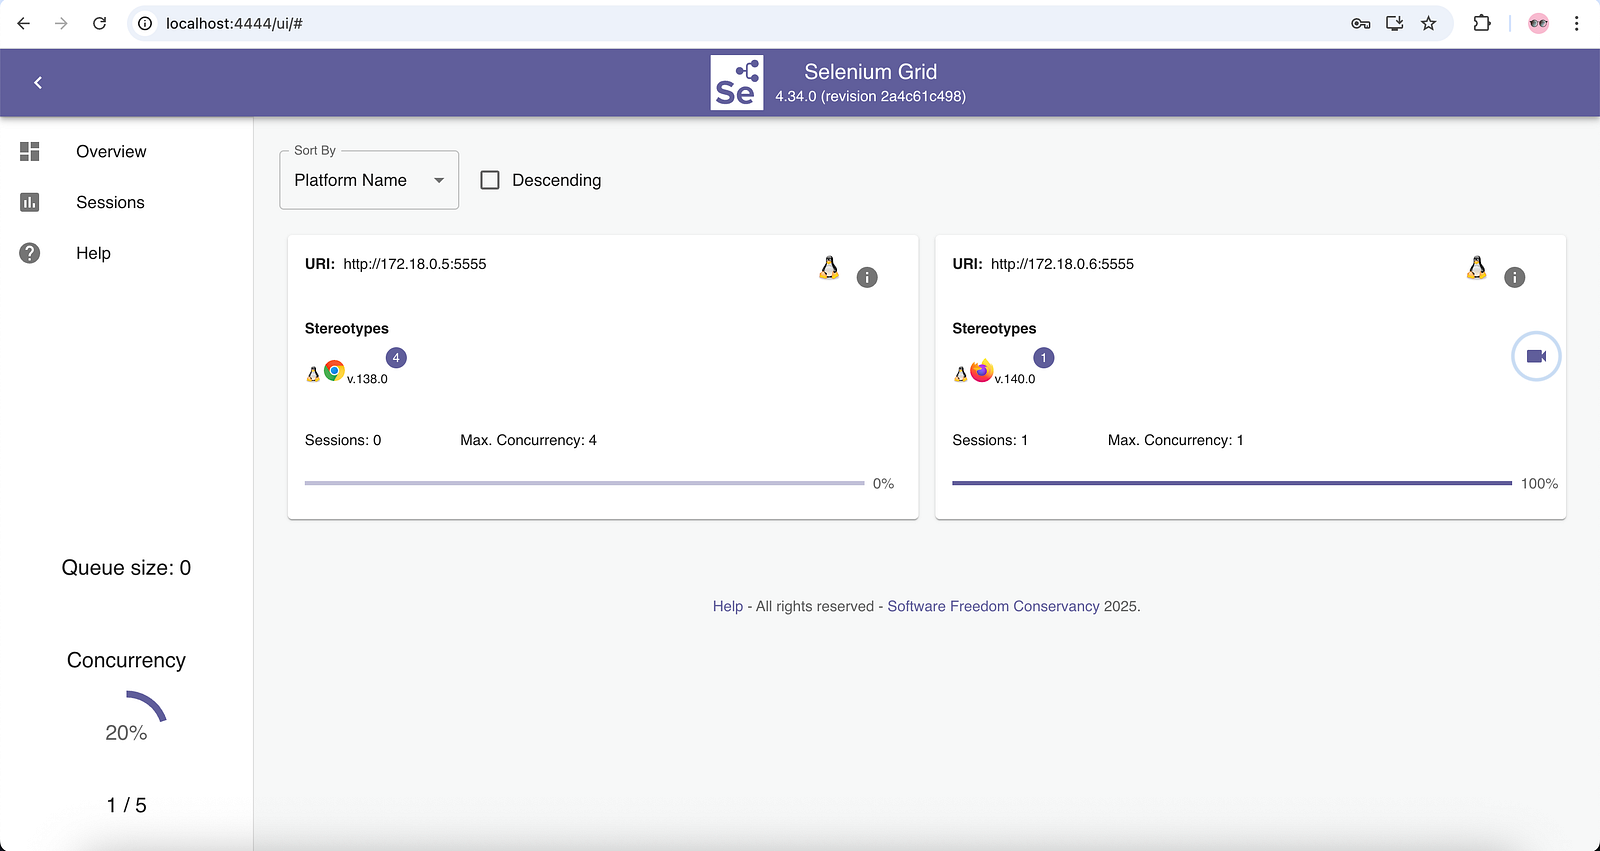
Open a browser and navigate to “http://localhost:4444” to confirm Selenium Grid 4 is up and running with one instance of Firefox browser and four instances of Chrome browser, respectively.

Check out How to setup Selenium Grid 4 with Docker Compose for a detailed understanding on Selenium Grid 4 and its components.
Docker Container Logs
As all of the applications are running with Docker Compose, it is necessary to know how to monitor the containers and check for logs in case anything goes wrong.
We started multiple containers, each serving a different purpose. Jenkins runs under a Jenkins container, and its agent runs on another container. Similarly, for Selenium Grid 4, the Selenium hub, Chrome, and Firefox run on different containers.
To check the logs for a specific container, we need to get the name of the container along with the Docker Compose file name. The following command can be run from the terminal to check the names of Docker Containers currently running:
docker container lsHowever, this command will provide all the details such as the container ID, command, status, creation time, ports, and so on. But to be specific, to get only the names of the containers, we can run the following command:
docker container ls --format "{{.Names}}"
So we now have all the container names that are currently active and running. Let's check the logs generated for the Docker Compose file “docker-compose-v3-seleniumgrid.yml”, which was used to start the Selenium Grid 4. The following command should be run:
docker compose -f docker-compose-v3-seleniumgrid.yml logsThis command will show the logs of all services that were initialized using the specified Docker Compose file. If we need to check the logs for a specific service, we can run the following command by adding the <service-name> at the end:
docker compose -f docker-compose-v3-seleniumgrid.yml logs selenium-hubWe can also run the container in interactive mode to get more details related to the Selenium Grid Status. The following command will run the container in interactive mode:
docker exec -it <container name> /bin/bashFor example, if we need to run the “selenium-hub” container in interactive mode, the following command should be used:
docker exec -it selenium-hub /bin/bashIt will start the interactive mode for the “selenium-hub” container. We can run the following curl command inside the “selenium-hub” container to check for its status:
curl http://selenium-hub:4444/status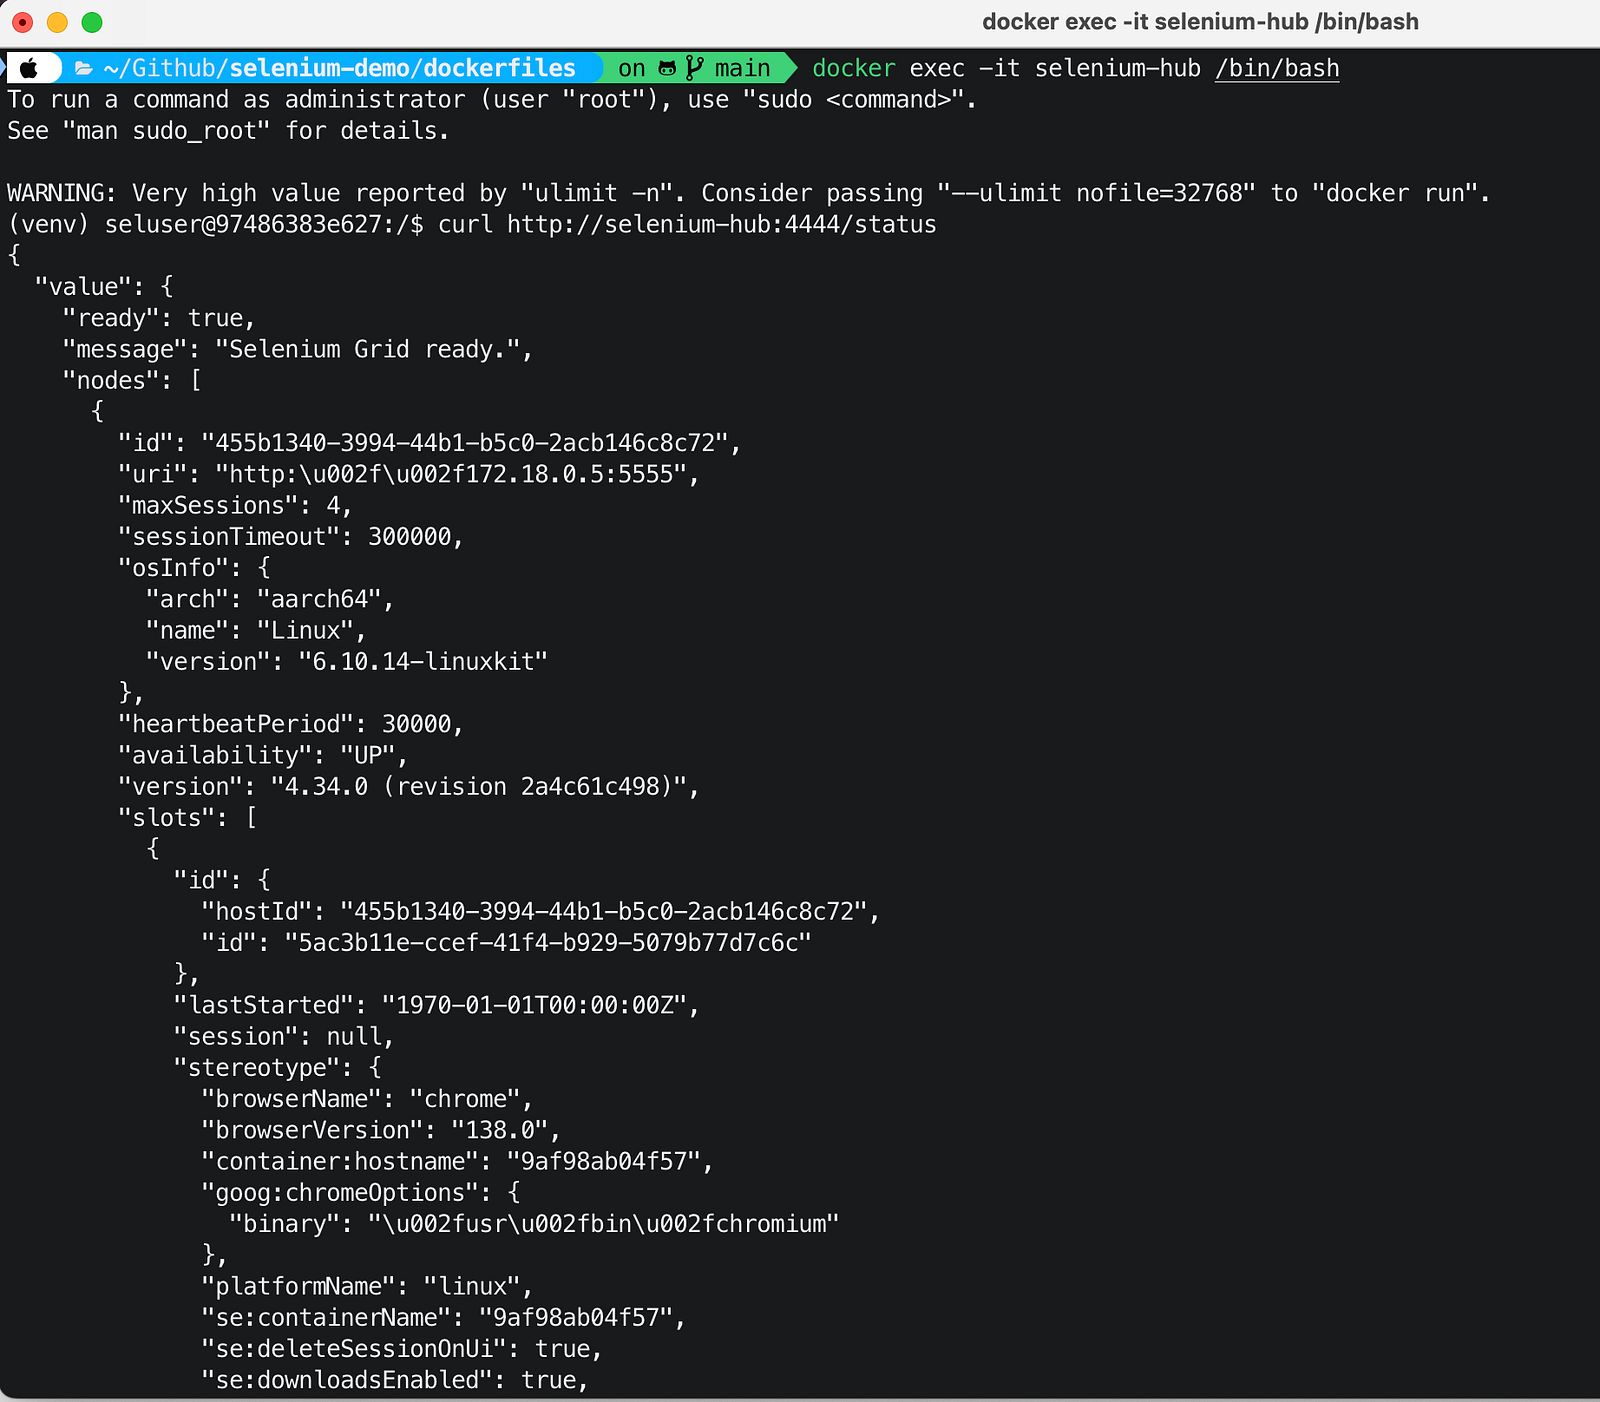
This command will output details about every registered Node. For every Node, the status includes information regarding Node availability, sessions, and slots.
Check this link for more information related to the Selenium Grid 4 Endpoints.
Docker Network Logs
After Selenium Grid 4 and Jenkins are up and running, the Docker Network can be inspected by running the following command in the terminal:
docker network inspect selenium-jenkins-networkThe output of this command will display detailed information about the selenium-jenkins-network as shown in the screenshot below:
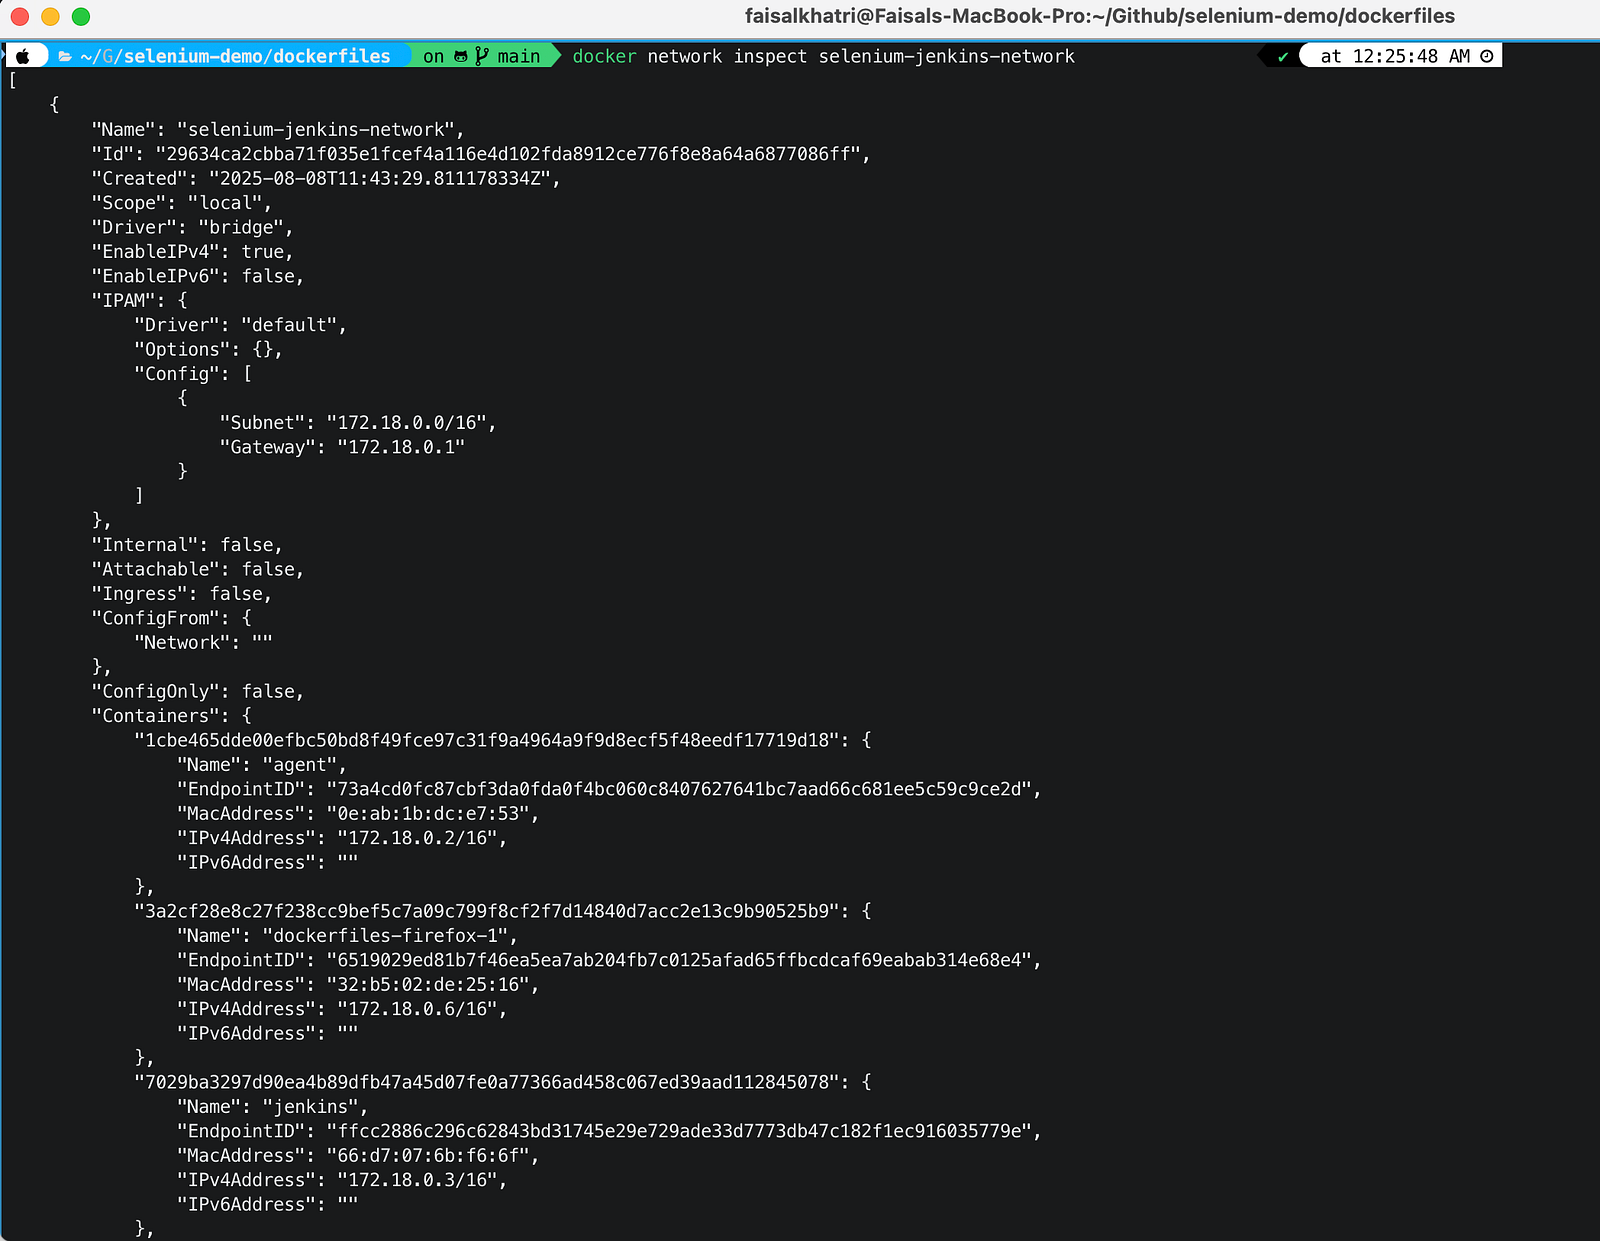
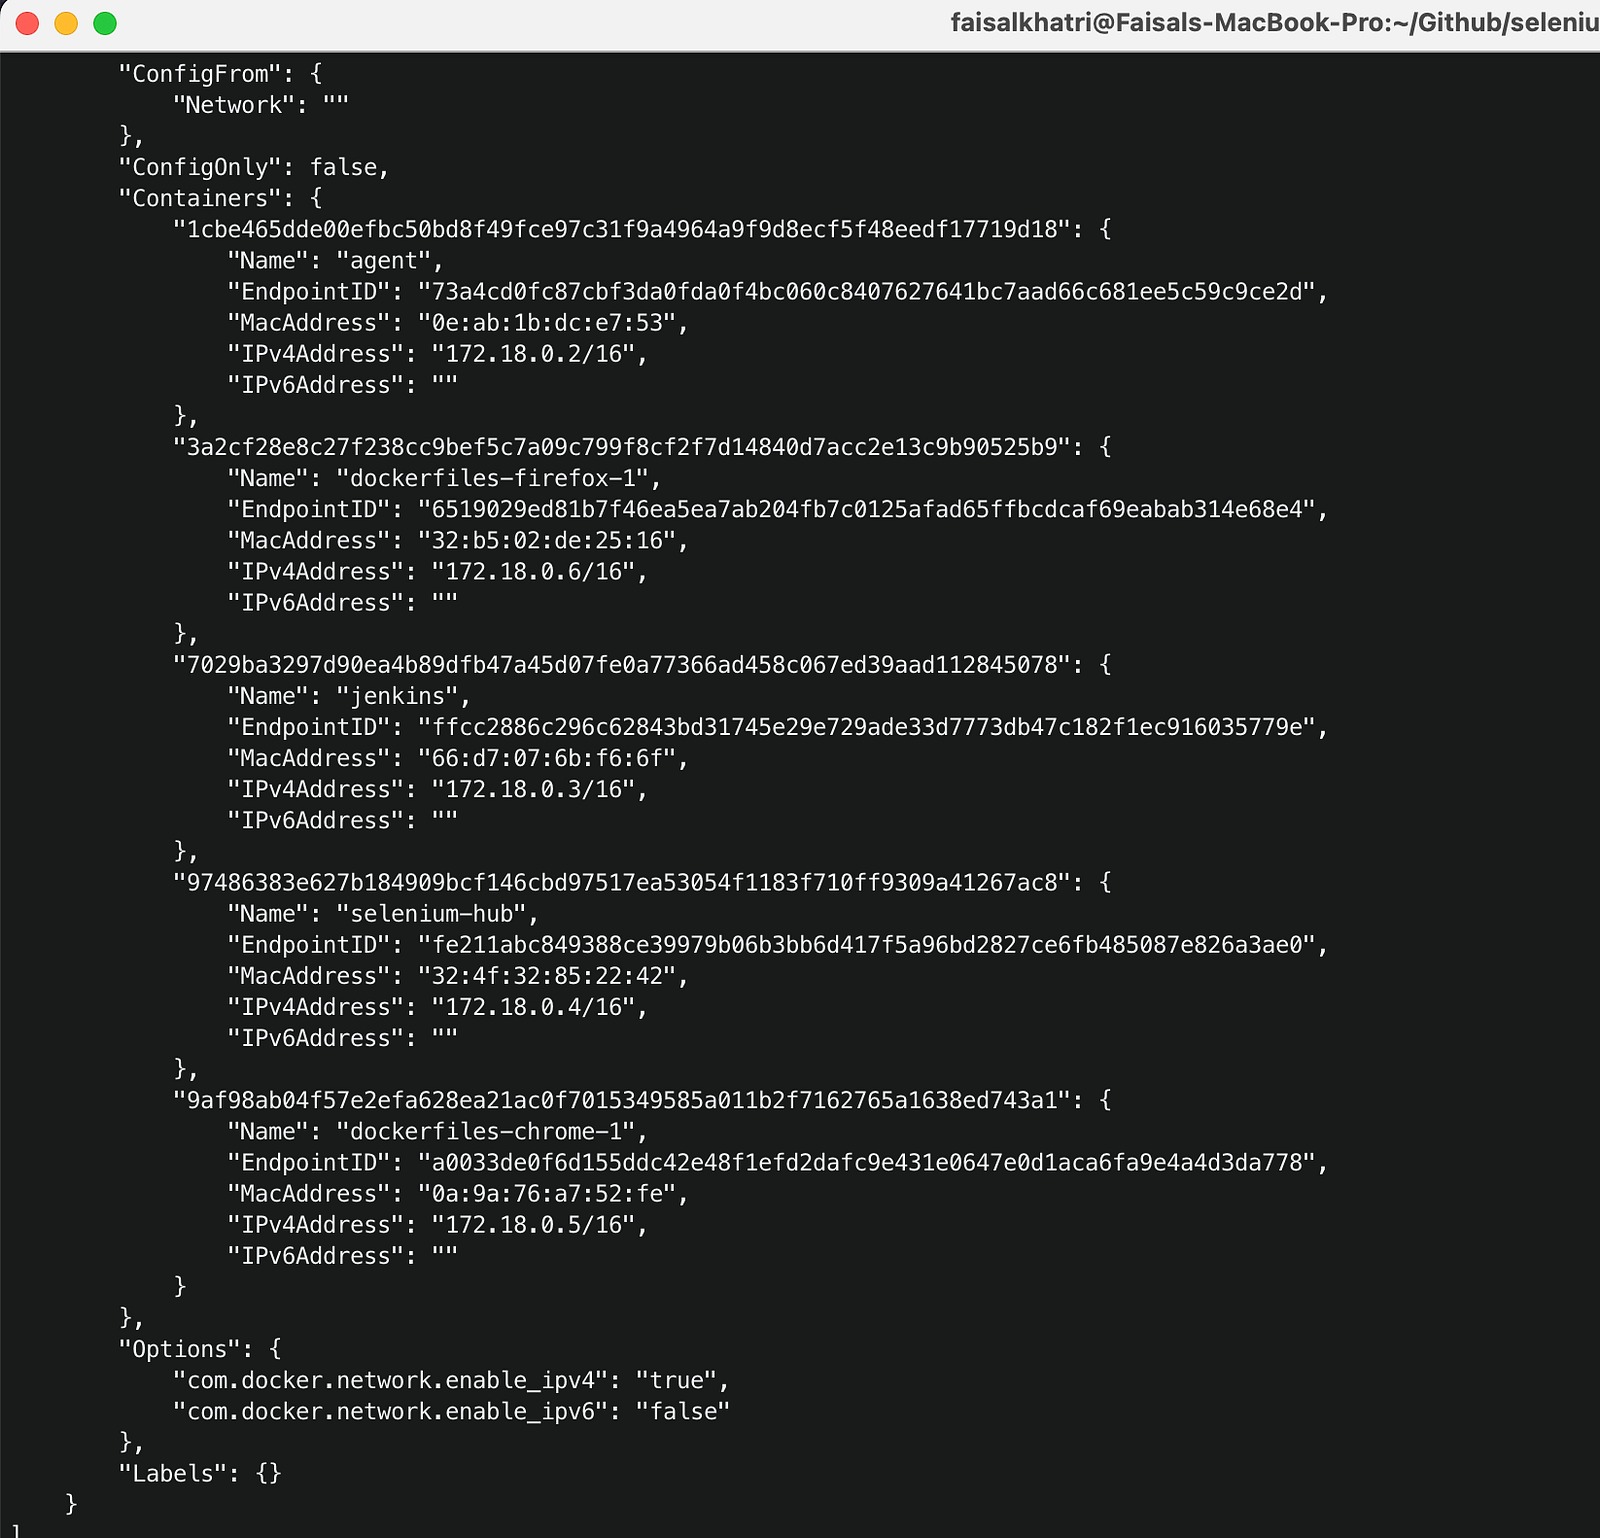
The output shows that the containers for Jenkins, Jenkins Agent, Selenium hub, Chrome, and Firefox are all connected to the Docker Network.
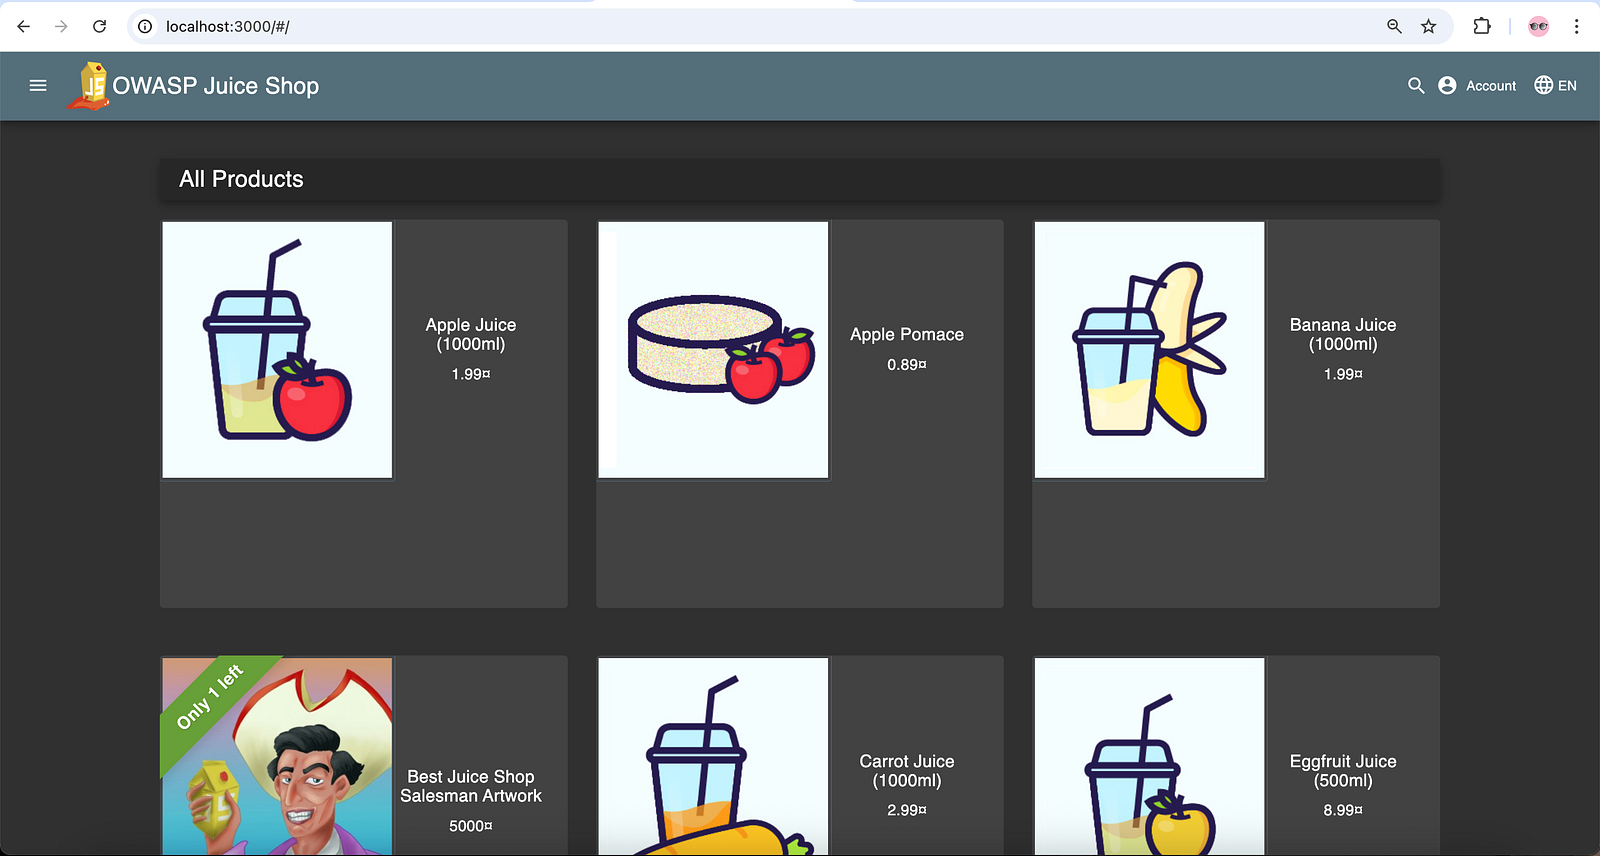
Application Under Test
The Registration and Login screens of the OWASP Juice Shop demo website are under test. We will be running this website on the local machine with the following Docker Compose file named “ docker-compose-v3-juiceshop.yml”:
version: "3"
services:
  juice-shop:
    image: bkimminich/juice-shop
    ports:
      - 3000:3000
In a new terminal screen, run the following command to start the website:
docker-compose -f docker-compose-v3-juiceshop.yml up -dAfter the command is successfully executed, open a browser and navigate to http://localhost:3000 to verify that the website is up and running.
Test Scenarios
The following two test scenarios will be used to demonstrate the Selenium test execution on Selenium Grid with Jenkins:
Test Scenario 1
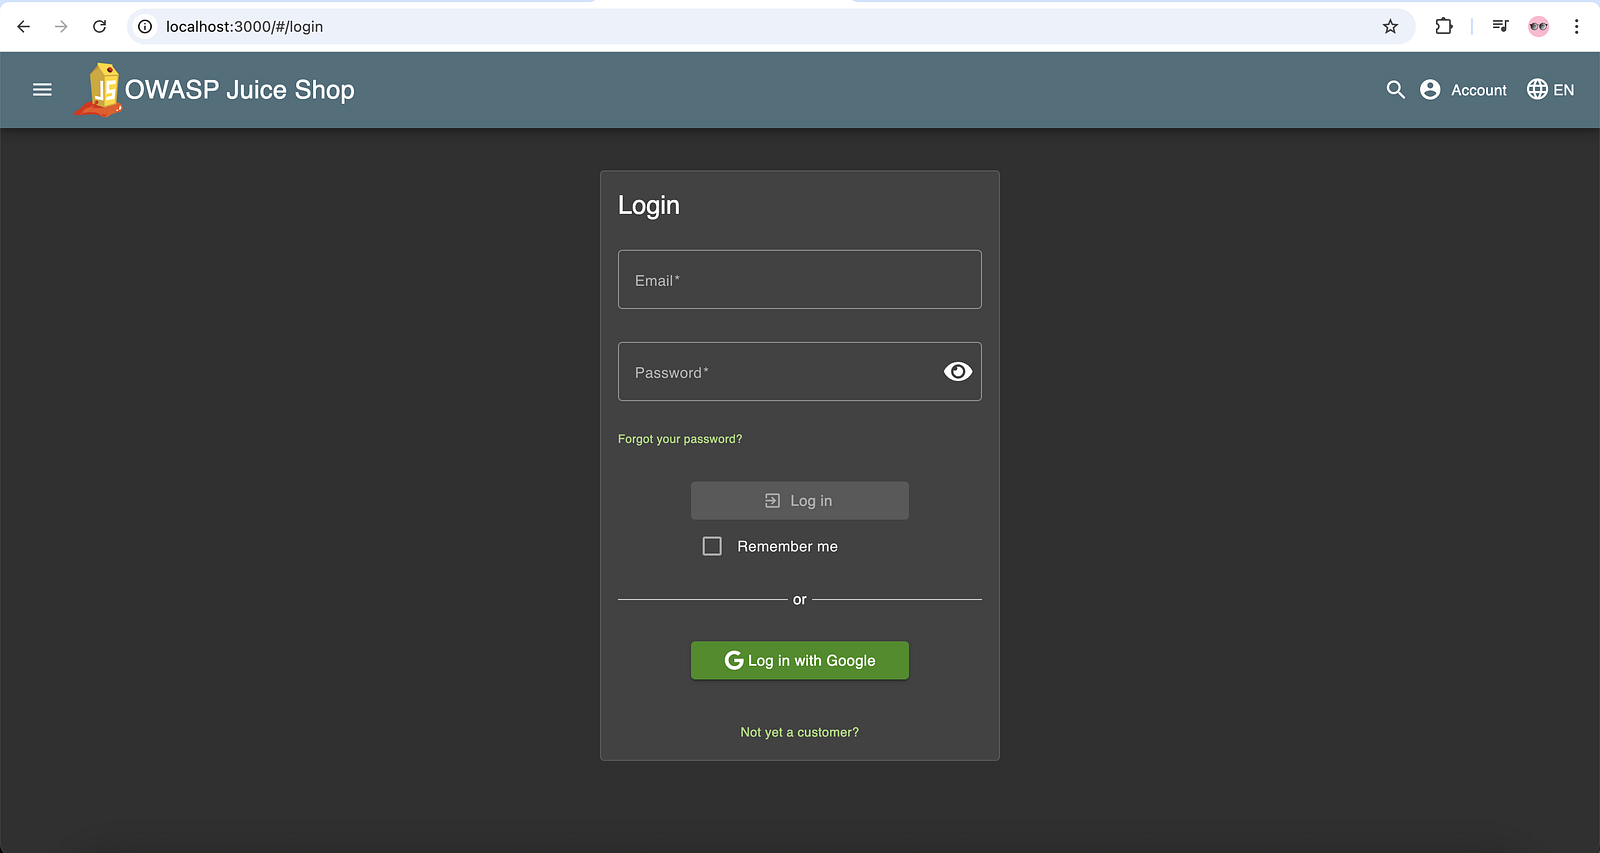
- Navigate to the Login Screen of the Juice Shop website.
- Click on the “Not yet a customer?” link.
- Fill in the registration details and click on the “Register” button.
- Verify the message “Registration completed successfully. You can now log in.”

Test Scenario 2
- Verify the Login Page title is “Login.”
- Enter the registered credentials and click on the “Log in” button.
- Verify that the “Logout” option is displayed on successful login.
Implementation
Selenium WebDriver with Java is used for implementing test scenarios. A Maven project has been created, and the dependencies for Selenium WebDriver, TestNG, and DataFaker have been added to the project’s pom.xml file.
The DataFaker library is used to create random test data in real-time. This will allow us to register new users hassle-free on every test run.

Base Test
A BaseTest class is created for browser setup and configuration. The ThreadLocal class is used to set drivers because it is thread-safe and well-suited for parallel test execution.
With ThreadLocal, each thread has its own isolated variable, ensuring that threads cannot access or interfere with each other’s values, even when using the same ThreadLocal object.
@Parameters ("browser")
    @BeforeClass (alwaysRun = true)
    public void setup (final String browser) {
        try {
            if (browser.equalsIgnoreCase ("chrome")) {
                final ChromeOptions chromeOptions = new ChromeOptions ();
                chromeOptions.setCapability ("se:name", "Test on Grid - Chrome");
                setDriver (new RemoteWebDriver (new URL ("http://selenium-hub:4444"), chromeOptions));

            } else if (browser.equalsIgnoreCase ("firefox")) {
                final FirefoxOptions firefoxOptions = new FirefoxOptions ();
                firefoxOptions.setCapability ("se:name", "Test on Grid - Firefox");
                setDriver (new RemoteWebDriver (new URL ("http://selenium-hub:4444"), firefoxOptions));

            } else if (browser.equalsIgnoreCase ("localchrome")) {
                setDriver (new ChromeDriver ());
            } else if (browser.equalsIgnoreCase ("localfirefox")) {
                setDriver (new FirefoxDriver ());
            } else {
                throw new Error ("Browser configuration is not defined!!");
            }

        } catch (final MalformedURLException e) {
            throw new Error ("Error setting up browsers in Grid");
        }
        getDriver ().manage ()
            .window ()
            .maximize ();
        getDriver ().manage ()
            .timeouts ()
            .implicitlyWait (Duration.ofSeconds (30));
    }
The RemoteWebDriver class is used since we will be running the tests on the remote machine, not on the local one. The values for the browsers will be supplied using the testng.xml file, so the browser on which the tests need to be run can be updated externally without modifying the code.
try {
            if (browser.equalsIgnoreCase ("chrome")) {
                final ChromeOptions chromeOptions = new ChromeOptions ();
                chromeOptions.setCapability ("se:name", "Test on Grid - Chrome");
                setDriver (new RemoteWebDriver (new URL ("http://selenium-hub:4444"), chromeOptions));

            } else if (browser.equalsIgnoreCase ("firefox")) {
                final FirefoxOptions firefoxOptions = new FirefoxOptions ();
                firefoxOptions.setCapability ("se:name", "Test on Grid - Firefox");
                setDriver (new RemoteWebDriver (new URL ("http://selenium-hub:4444"), firefoxOptions));

            } else if (browser.equalsIgnoreCase ("localchrome")) {
                setDriver (new ChromeDriver ());
            } else if (browser.equalsIgnoreCase ("localfirefox")) {
                setDriver (new FirefoxDriver ());
            } else {
                throw new Error ("Browser configuration is not defined!!");
            }

        } catch (final MalformedURLException e) {
            throw new Error ("Error setting up browsers in Grid");
        }
There are three conditions defined for the browsers in the setup() method; the first one is for the Chrome browser, which will start the Chrome browser session if the browser is specified as “chrome.” Similarly, if “firefox” is specified in the testng.xml, the second condition will launch the Firefox browser session.
When a session starts, a new RemoteWebDriver instance is created using the URL “http://selenium-hub:4444” along with the corresponding ChromeOptions or FirefoxOptions, depending on the selected browser.
This URL(“http://selenium-hub:4444”) is updated as we are running the test on Selenium Grid 4 with Docker Compose (Remember, we had set up the custom Docker network).
The “se:name” sets a custom capability to label the test name in Selenium Grid 4 UI. This will help us while checking the logs and verifying which test is running in Selenium Grid 4.
Test Data Generation
The test data for registering a new user is generated in real-time using the DataFaker library. The Builder design pattern in Java is used in this process of test data generation. Additionally, the Lombok library is used to automatically generate boilerplate code such as getters, setters, and constructors, reducing manual coding and keeping the classes clean and concise.
@Data
@Builder
public class RegistrationData {
    private String email;
    private String password;
    private String securityAnswer;
    private String securityQuestion;
}
The RegistrationData class contains the fields from the Registration window for which the test data needs to be supplied.
public class RegistrationDataBuilder {

    public static RegistrationData getRegistrationData () {
        final Faker faker = new Faker ();
        final String password = "Pass@123";
        final String securityQuestion = "Your favorite book?";
        final String securityAnswer = "Agile Testing";
        return RegistrationData.builder ()
            .email (faker.internet ()
                .emailAddress ())
            .password (password)
            .securityQuestion (securityQuestion)
            .securityAnswer (securityAnswer)
            .build ();
    }
}
The RegistrationDataBuilder class generates and supplies random test data in real time while running the registration tests.
Writing the Tests
A new class, JuiceShopTests, is created to implement test scenarios for user registration and verify the user login.
The first test scenario for user registration is implemented in the testRegisterUser() method:
@Test
public void testRegisterUser () {
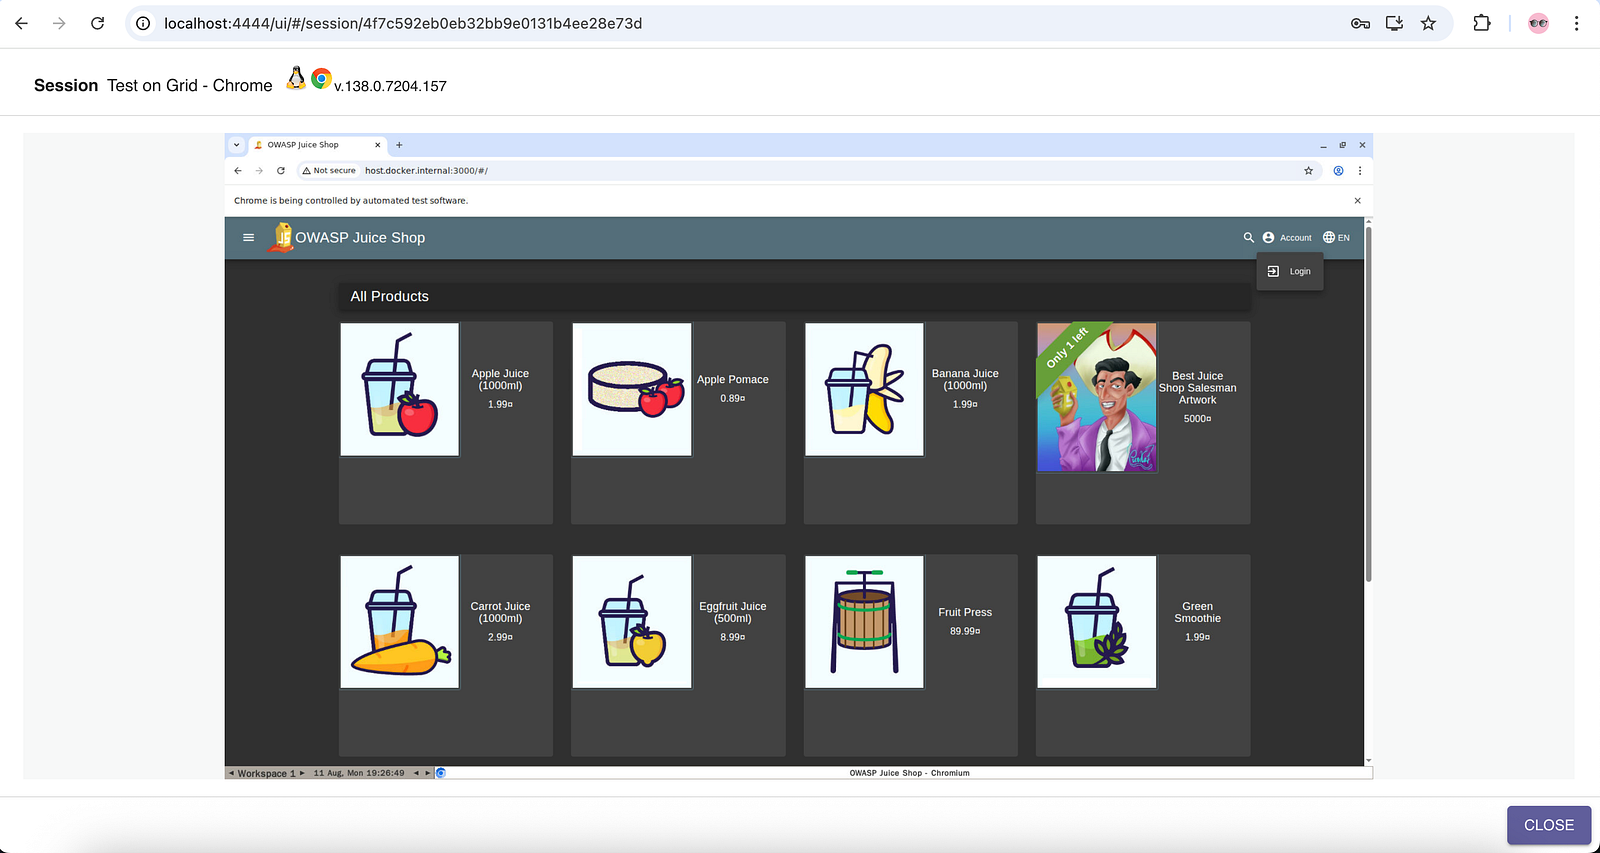
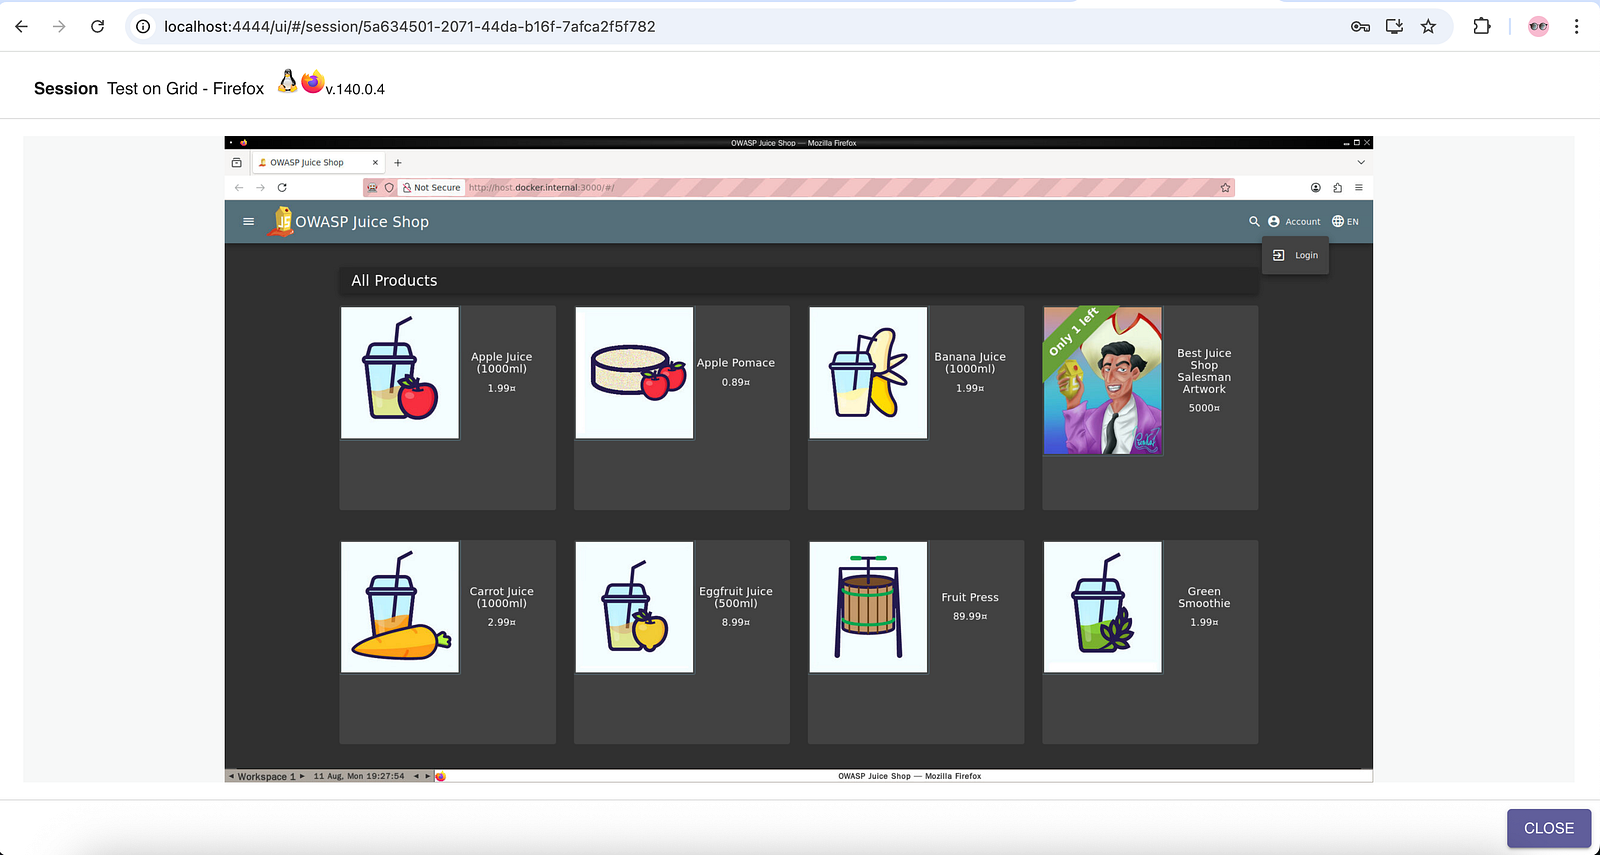
getDriver ().get ("http://host.docker.internal:3000/");
final HomePage homePage = new HomePage (getDriver ());
final LoginPage loginPage = homePage.openLoginPage ();
assertEquals (loginPage.pageHeaderText (), "Login");
final RegistrationPage registrationPage = loginPage.openRegistrationPage ();
assertEquals (registrationPage.pageHeaderText (), "User Registration");
registrationPage.registerNewUser (this.registrationData);
assertEquals (registrationPage.registrationSuccessText (),
"Registration completed successfully. You can now log in.");
registrationPage.waitForSnackBarToDisappear ();
}This method will navigate to the “http://host.docker.internal:3000”, which is the URL for the OWASP Juice Shop website running inside the Docker container.
It will open the Login page and verify that the header text “Login” is displayed. Next, from the Login page, it will open the Registration page and verify its header text “User Registration.”
The user registration steps will be performed next. After successful registration, the following message text will be verified: “Registration completed successfully. You can now log in.”
The second test scenario for user login is implemented in the testUserLogin() method:
@Test
    public void testUserLogin () {
        final LoginPage loginPage = new LoginPage (getDriver ());
        assertEquals (loginPage.pageHeaderText (), "Login");

        final HomePage homePage = loginPage.userLogin (this.registrationData.getEmail (),
            this.registrationData.getPassword ());

        assertTrue (homePage.isLogoutButtonDisplayed ());
    }
This method will verify that the Login page header shows the text “Login.” After checking the header text, it will perform user login using the registered user's email and password.
On successful login, it will verify that the “Logout” button is displayed on the screen.
Testng.xml File
The following testng.xml file has been created with the name “testng-seleniumgridjenkins.xml”:
<?xml version="1.0" encoding="UTF-8"?>
<!DOCTYPE suite SYSTEM "http://testng.org/testng-1.0.dtd">
<suite name="Selenium WebDriver Selenium Grid Jenkins test suite">
    <test name="Selenium Grid with Jenkins tests on Chrome">
        <parameter name="browser" value="chrome"/>
        <classes>
            <class name="io.github.mfaisalkhatri.seleniumgridjenkins.JuiceShopTests">
                <methods>
                    <include name="testRegisterUser"/>
                    <include name="testUserLogin"/>
                </methods>
            </class>
        </classes>
    </test>
    <test name="Selenium Grid with Jenkins tests on Firefox">
        <parameter name="browser" value="firefox"/>
        <classes>
            <class name="io.github.mfaisalkhatri.seleniumgridjenkins.JuiceShopTests">
                <methods>
                    <include name="testRegisterUser"/>
                    <include name="testUserLogin"/>
                </methods>
            </class>
        </classes>
    </test>
</suite>
This testng.xml file will execute the same tests on two different browsers, i.e., Chrome and Firefox, on Selenium Grid 4.
Setting Up the Jenkins Job to Run the Selenium Tests
Let’s create a Jenkins Job for the Maven project to run the Selenium WebDriver tests on Selenium Grid 4 with the following steps:
Step 1: Create a new Jenkins Job for the Maven Project
Step 2: Update the configuration for the project as follows:
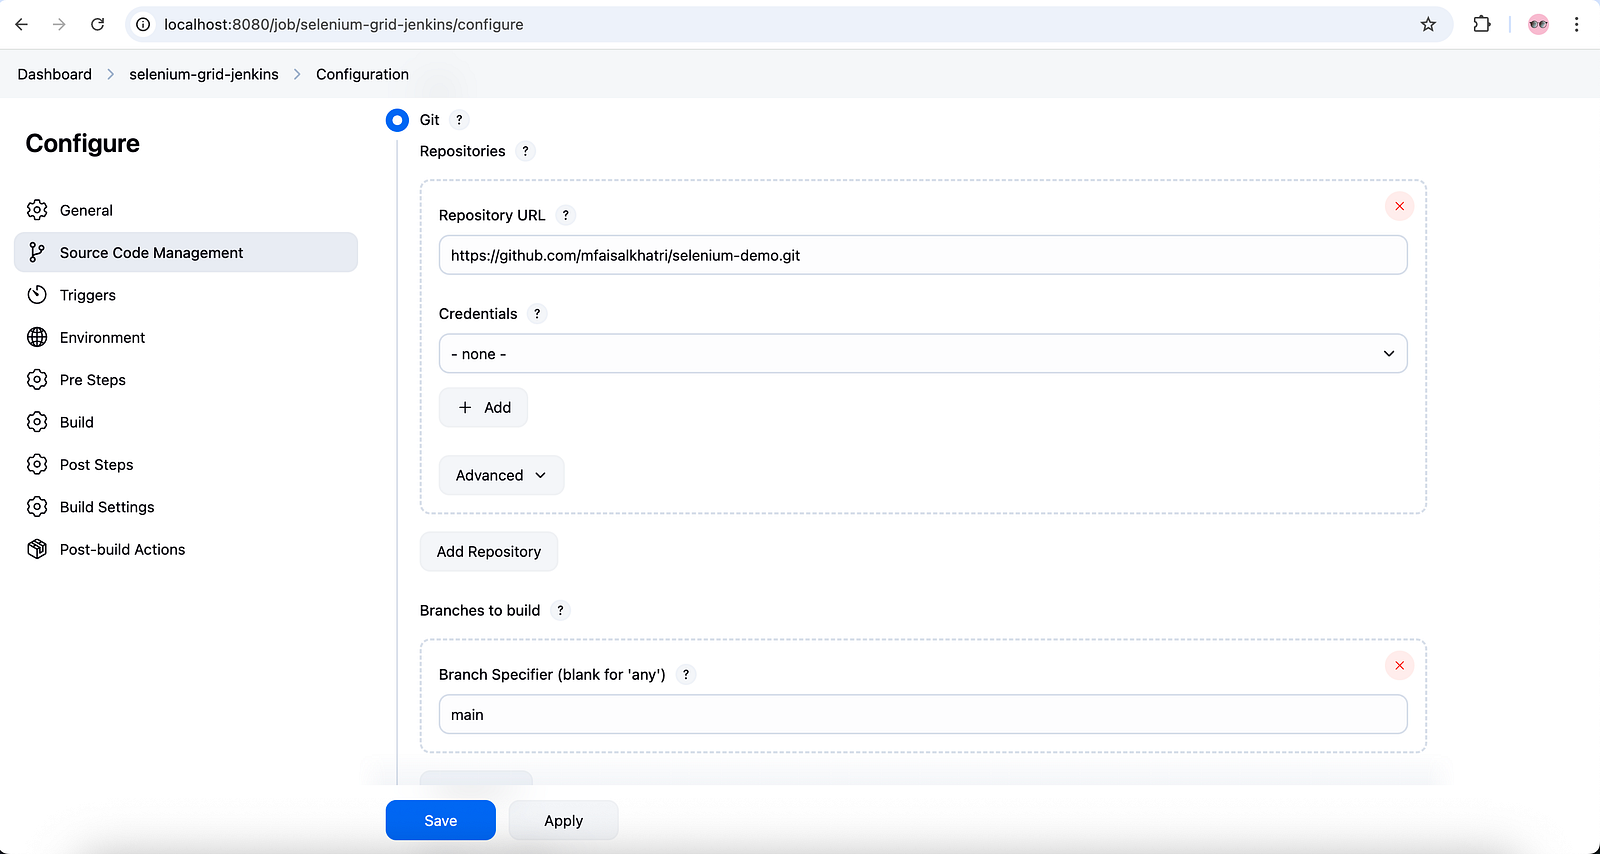
- Select “Git” in the Source Code Management Section and update the Repository URL with https://github.com/mfaisalkhatri/selenium-demo.git.
- Set the branch to “main.”
Step 3: Update the following details in the Build section:
- Root POM: pom.xml
- Goals and options: clean install -Dsuite-xml=testng-seleniumgridjenkins.xml
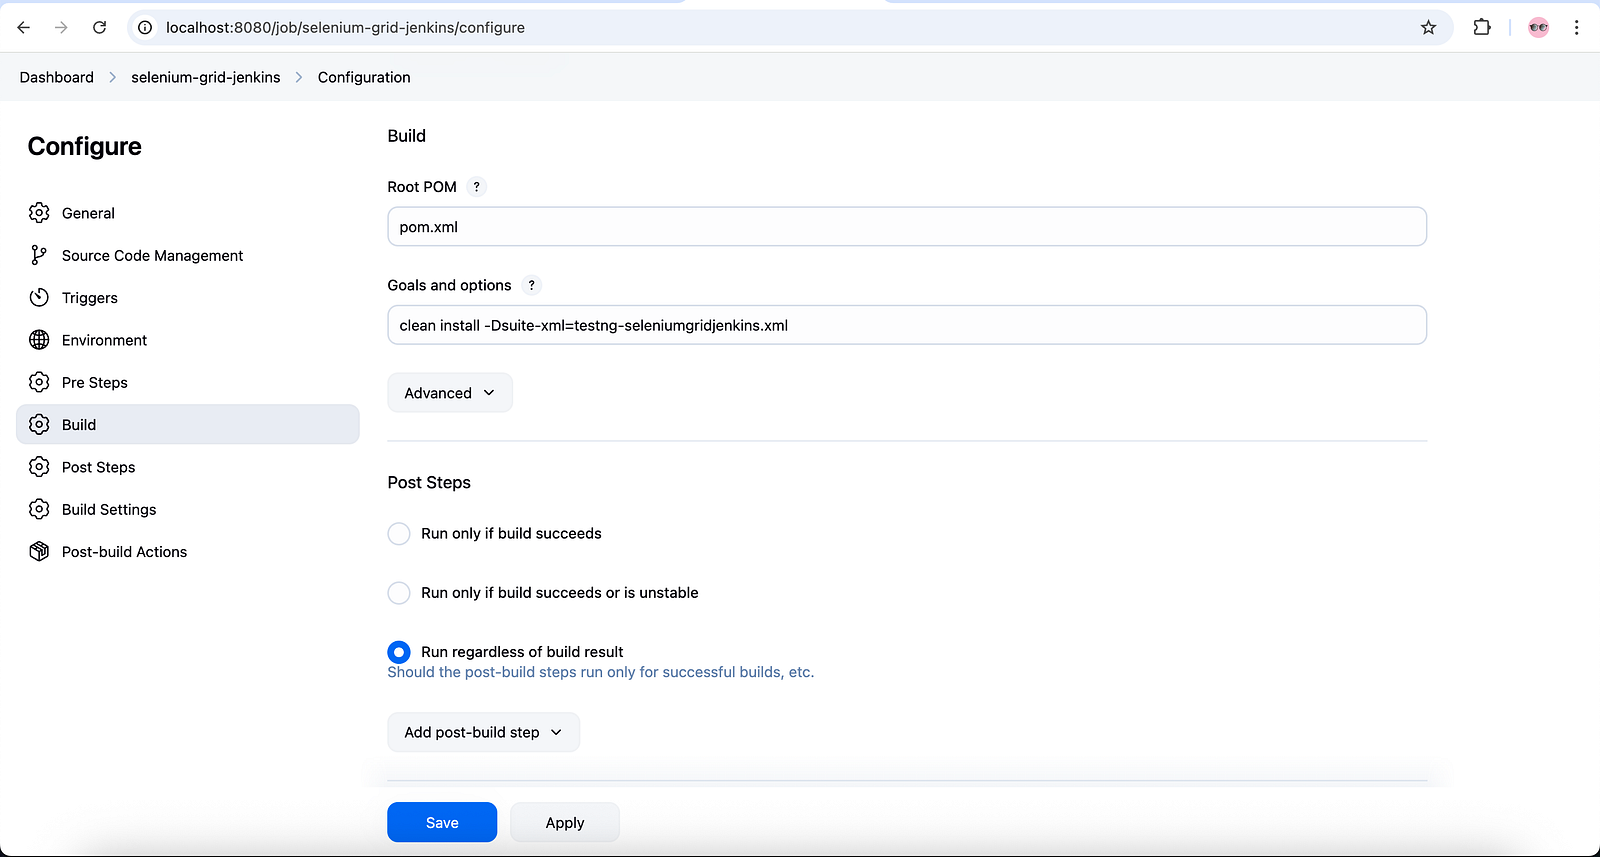
The command in the “Goal and Options” field is updated with the full name of the testng suite.xml, as in my GitHub project, there are multiple testng xml files that run different tests. Check out Working with multiple testng.xml files for more details.
Click on the Save and Apply button to save the configuration settings.
Running the Jenkins Job
There are two ways to run the Jenkins Job:
- By clicking on the “Build Now” button.
- Using webhooks to run the build as soon as the code is pushed to the remote repository.
Let’s click on the “Build Now” button on the left-hand pane of the Jenkins Job screen to start the job.
The details of the job, which is in progress, can be checked by clicking on the “Builds in progress” section.
Let’s check the live test execution on the Selenium Grid 4 by opening a new tab and navigating to http://localhost:4444.
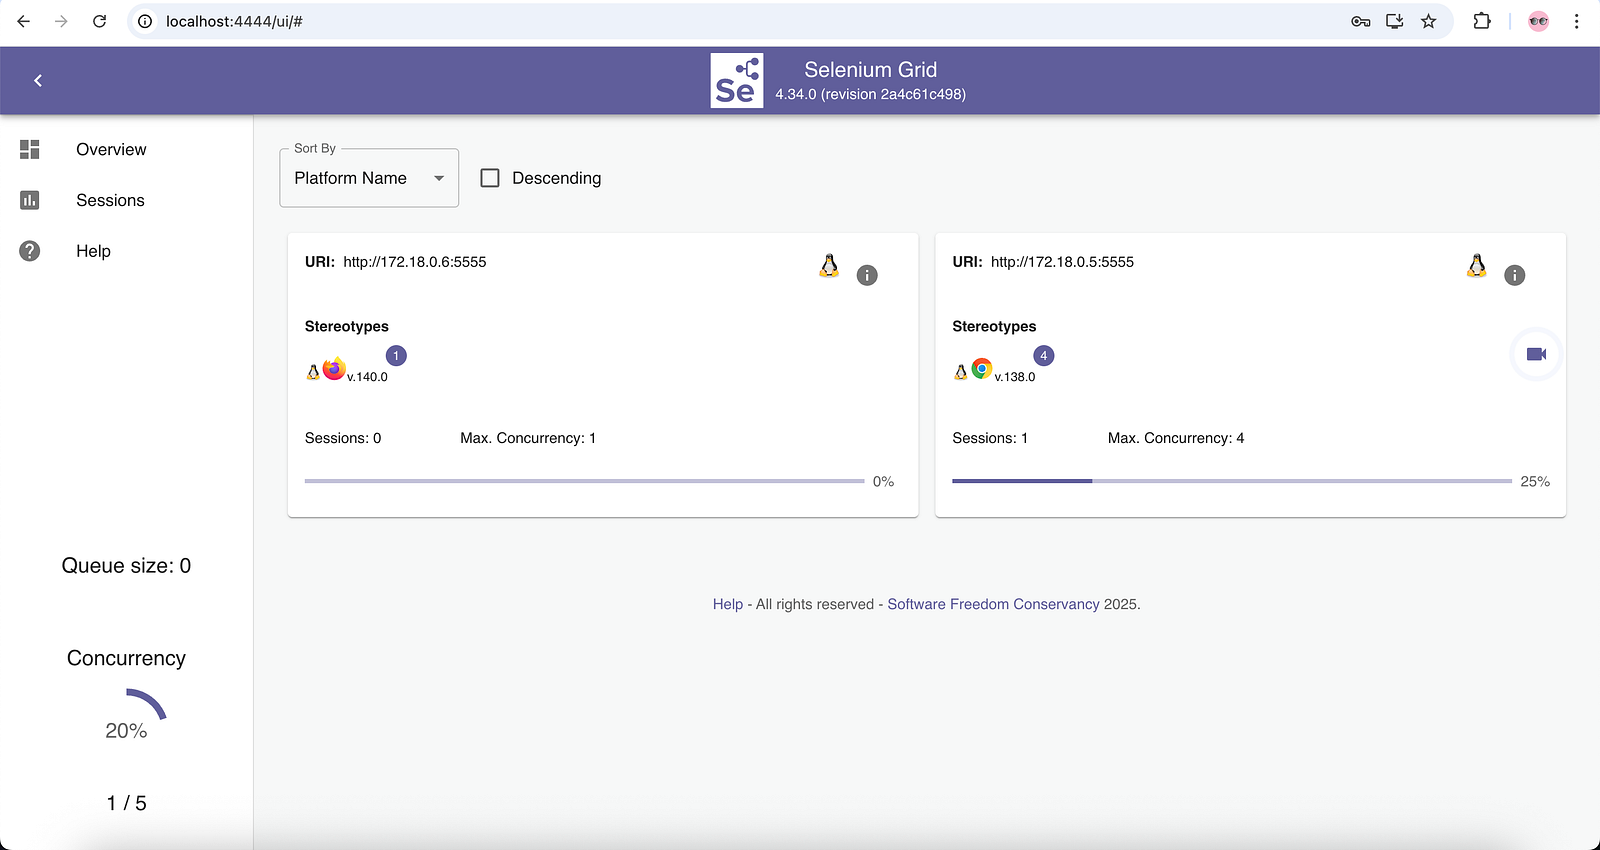
It can be seen that the test execution has begun on the Chrome browser. Click on the “video” icon shown on the right-hand side of the Chrome browser. It will open the Sessions window, where we can see the live test execution in the Chrome browser. It will ask for the password to view the session; the password is “secret.”
Similarly, the test execution for the Firefox browser can also be viewed.
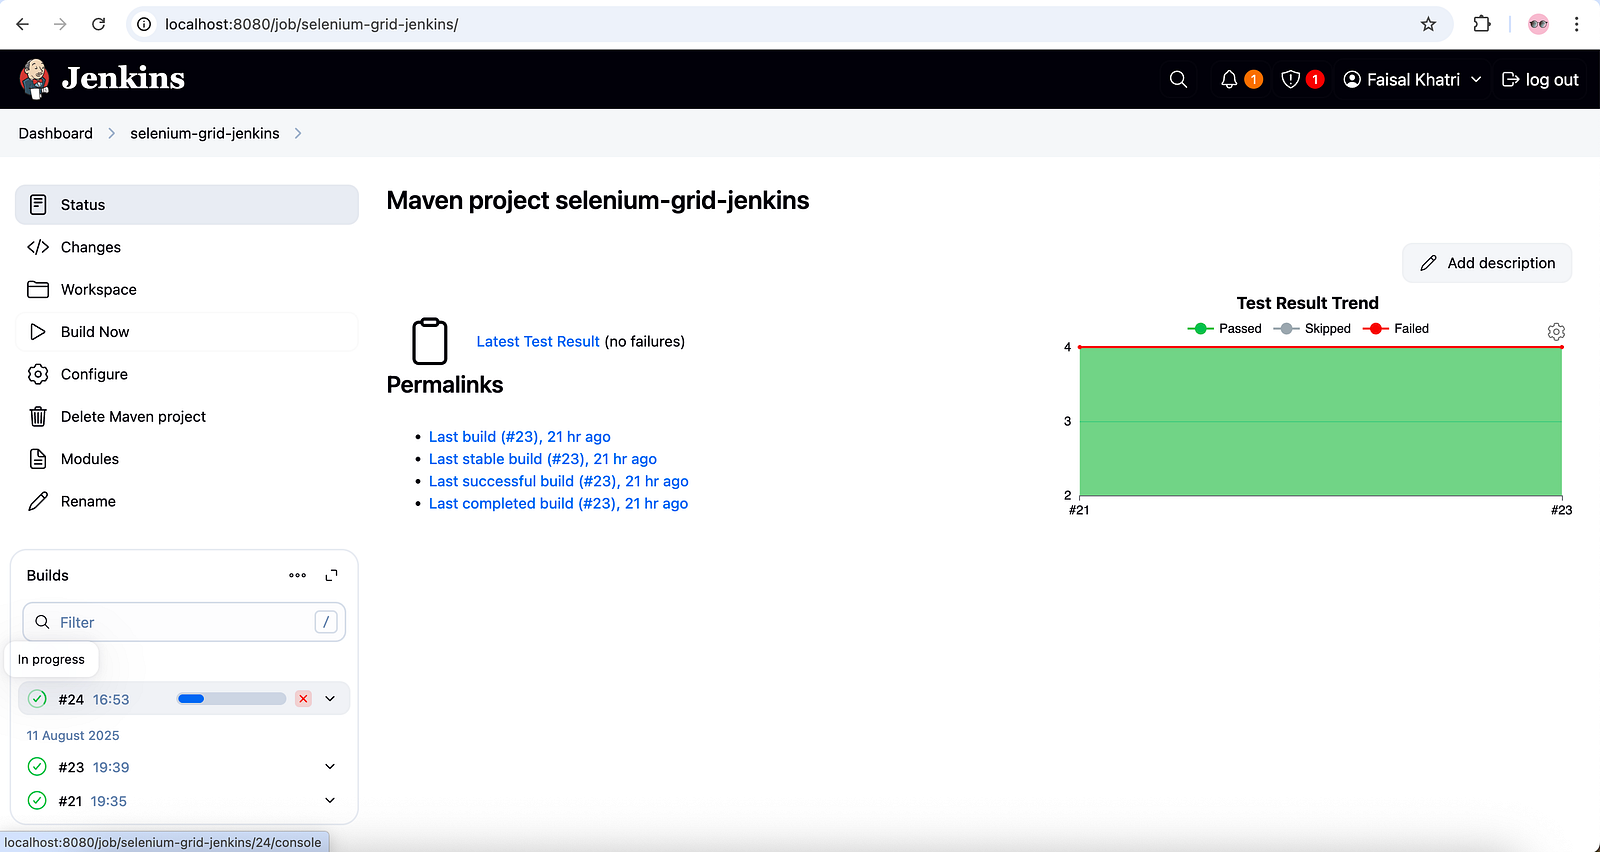
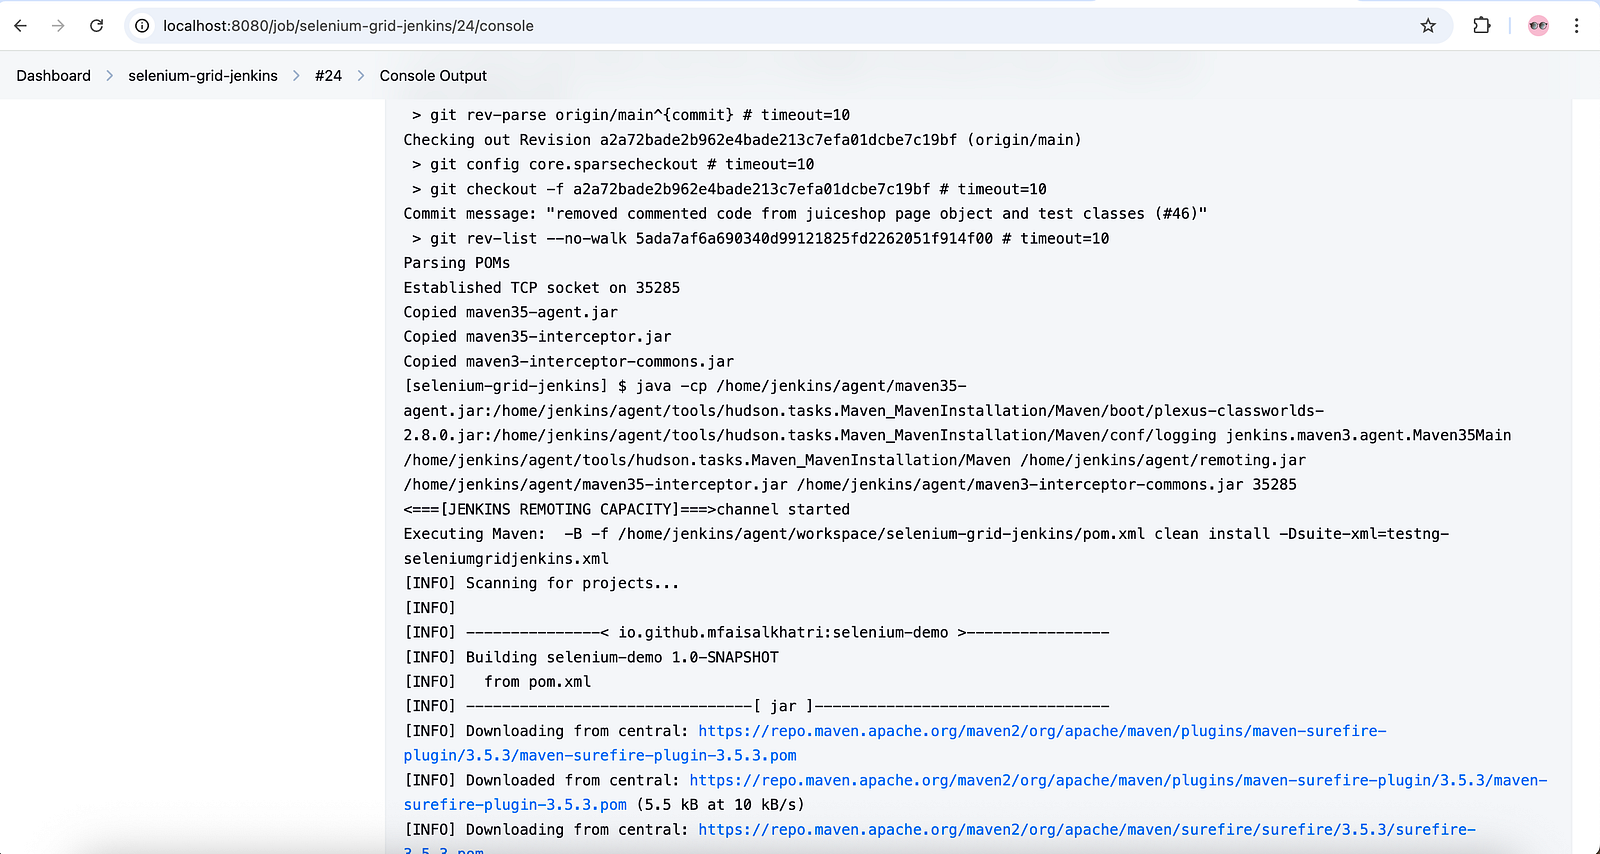
After all the tests are executed successfully, the details of the test execution can be viewed in the console logs of the Jenkins Job.
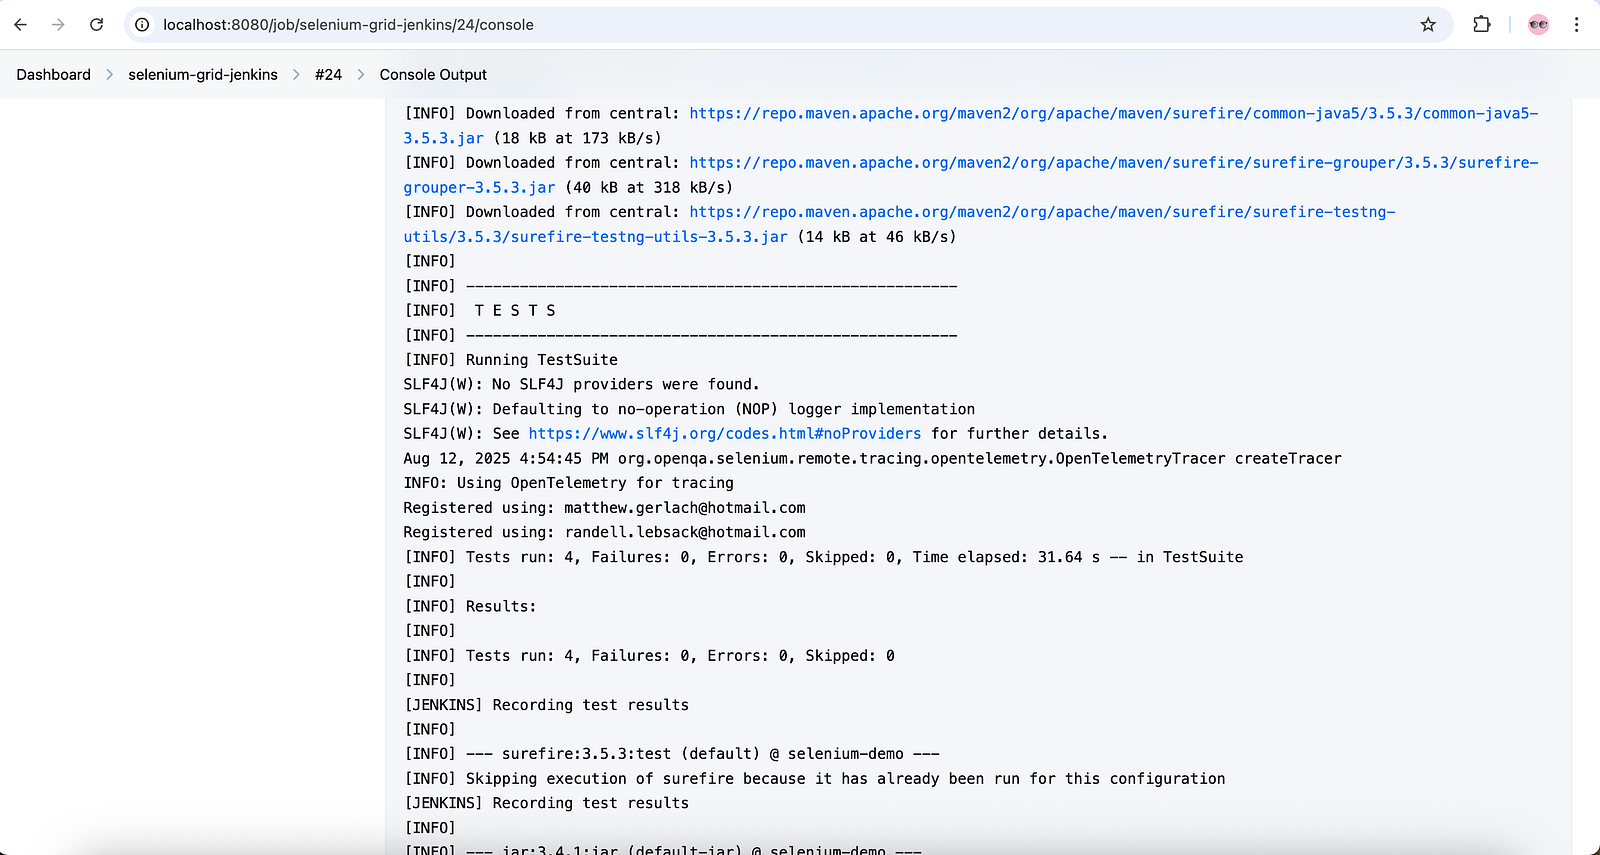
A total of four tests were executed successfully. The details of the Jenkins Job can be checked on the Job dashboard.
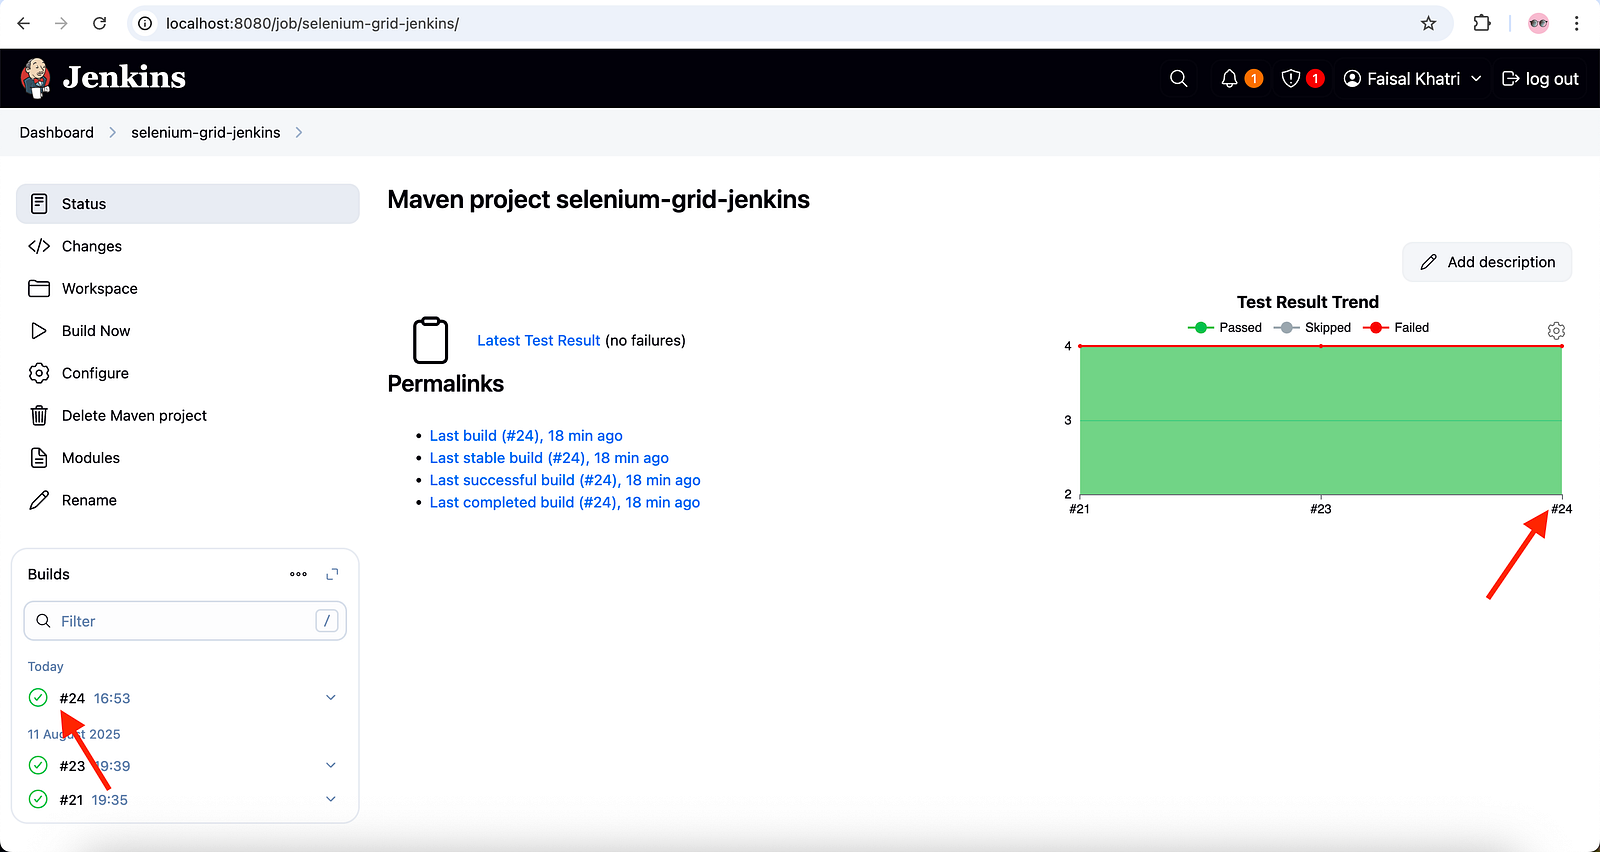
The dashboard displays everything in green, indicating that the job was run successfully and all the tests passed.
Summary
Web automation testing requires a browser setup to run the tests. Combining the powerful Selenium WebDriver, Selenium Grid 4, and Jenkins with Docker Compose, an on-demand local infrastructure can be set up with minimal effort.
With Docker Compose, we started Jenkins, Selenium Grid 4, and the OWASP Juice Shop website. Docker network is a powerful feature of Docker that allows different containers to communicate easily. Using Docker network, we connected all the containers to communicate with each other, allowing us to seamlessly run Selenium WebDriver tests on Selenium Grid using a Jenkins Job.
With Docker, local infrastructure can be set up at the fingertips, allowing us to create an automated CI/CD pipeline for getting faster feedback.
Happy testing!
Published at DZone with permission of Faisal Khatri. See the original article here.
Opinions expressed by DZone contributors are their own.
Comments