Setting up iOS Framework for Unity
Running iOS framework from Unity using interoperability between Swift and C. Expanding the usage of Swift in Unity and exploring its limitations.
Join the DZone community and get the full member experience.
Join For FreePart 1: Launch UIViewController from Unity
I won’t waste your time on a long introduction about the technologies that I will describe here. You most likely already work as an iOS Engineer or Game Developer, which means you probably have some questions regarding the topic of this article. So, let’s get started.
This article is split into two parts. In the first part, you will learn how to launch a simple UIViewController from Unity. We will force C# to understand Swift. In the second part, we will try to expand the usage of Swift in Unity and explore its limitations.
All right, here we go.
Prerequisites
- macOS Monterey
- Xcode 13 (or 14)
- Unity LTS 2021.3
- iOS Device (with at least iOS14 or higher)

iOS Framework
Open Xcode and create a new Swift project — framework.

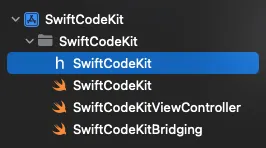
The name of the project is up to you. I named it SwiftCodeKit. It’s going to be a simple framework with one view controller. We need only three files:
In SwiftCodeKitViewController, let’s create a simple UIViewController — with a button at the center of the view.
final class SwiftCodeKitViewController: UIViewController {

    private lazy var button: UIButton = {
        let button = UIButton(type: .system)
        button.setTitle("Press me", for: .normal)
        button.backgroundColor = .white
        button.layer.cornerRadius = 20
        button.translatesAutoresizingMaskIntoConstraints = false
        button.addTarget(self, action: #selector(onTap), for: .touchUpInside)
        return button
    }()

    override func viewDidLoad() {
        super.viewDidLoad()

        view.backgroundColor = .orange

        view.addSubview(button)

        NSLayoutConstraint.activate([
            button.widthAnchor.constraint(equalToConstant: 150),
            button.heightAnchor.constraint(equalToConstant: 50),
            button.centerXAnchor.constraint(equalTo: view.centerXAnchor),
            button.centerYAnchor.constraint(equalTo: view.centerYAnchor)
        ])
    }

    @objc
    func onTap() {
        dismiss(animated: true)
    }
}
In SwiftCodeKit.swift we will collect all our public methods. Having this public class will allow you to test your framework in iOS projects. The first one will bestart(). This method presents our SwiftCodeKitViewController.
public class SwiftCodeKit {
    public static func start() {
        DispatchQueue.main.async {
            if let rootViewController = UIApplication.shared.windows.first?.rootViewController {
                let viewController = SwiftCodeKitViewController()
                rootViewController.present(viewController, animated: true)
            }
        }
    }
}
The third file SwiftCodeKitBridging.swift will contain a list of public exposed methods with C declaration notation @_cdecl. These methods should be stored only in a non-local scope. First, let’s create a method: startSwiftCodeKitController().
@_cdecl("startSwiftCodeKitController")
public func startSwiftCodeKitController() {
    SwiftCodeKit.start()
}
The attribute @_cdecl is not documented. For now, you only have to know that this attribute exposes a Swift function to C. Further, we will experiment a little bit with this attribute and will figure out the limitation.
Building Framework
In your Xcode project status of the toolbar, choose Any iOS Device (arm64) destination. Yes, we are going to build only for iOS devices, not for Simulators. Now, you need only tap Command + B.

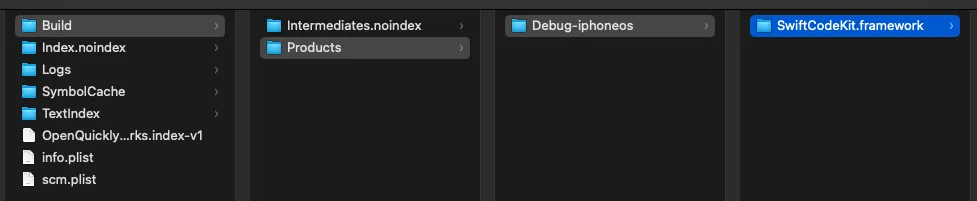
To get our baked framework, we need to go to Derived data and take it from there. You should open the Derived data folder from Xcode: Go to Xcode Preferences (cmd + ,), then open Locations and tap on the arrow at the end of the Derived data path.
In the Derived data folder, find your project and use this path:Build / Products / Debug-iphoneos / SwiftCodeKit.framework
Unity Project
It’s time to set up our Unity project. Open Unity and create a project; I called it UnityClientProject.

Creating a Unity Project
In the Unity project, you will find folder assets. Drag your SwiftCodeKit.framework and drop it into the Assetsfolder.

SwiftCodeKit.framework in Assets/iOS folder
Regarding UI in Unity, we are going to make a simple button. This button will summon our SwiftCodeKit View Controller. Right-click on Hierarchy, choose UI, and then Button.

Also, in the hierarchy, we have to make another object for our button. I call it ButtonController. In the inspector the ButtonController, add a component/new script and name it ButtonControllerScript.cs. Open this file.
Actually, we need only one public method: OnPressButton(). But before that, we have to import System.Runtime.InteropServices. This will help us to recognize our methods from the SwiftCodeKit.framework. If you remember, we have only one public function: startSwiftCodeKitController(), so let’s import it using DllImport.
using System.Collections;
using System.Collections.Generic;
using UnityEngine;
using System.Runtime.InteropServices;

public class ButtonControllerScript : MonoBehaviour
{
    [DllImport("__Internal")]
    private static extern void startSwiftCodeKitController();

    public void OnPressButton()
    {
        startSwiftCodeKitController();
    }
}(ButtonController.cs handles method from iOS using Runtime.InteropServices)
Building Unity Project
We are ready to build our iOS project from Unity. Open File/Build Settings and change the Platform to iOS. Then press Build.

After pressing build, it will automatically run an Xcode project. This project is generated by Unity, and there you will see only one Framework called UnityFramework.
A couple of problems you can stumble upon at this moment: the first one is you have to sign this project, and the second one is the bitcode error — this can only happen if you use Xcode 14. It’s not such a big deal. Let’s just disable bitcode in this project and run it again.
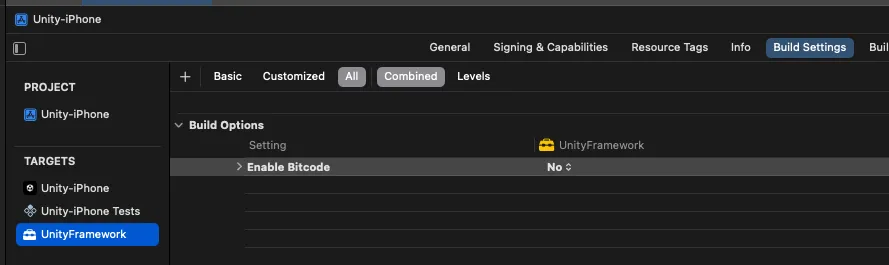
Xcode Build settings
On your iPhone, you will see your Unity app. The first blue screen with a button — this is the Unity part and the orange presented screen is your framework!
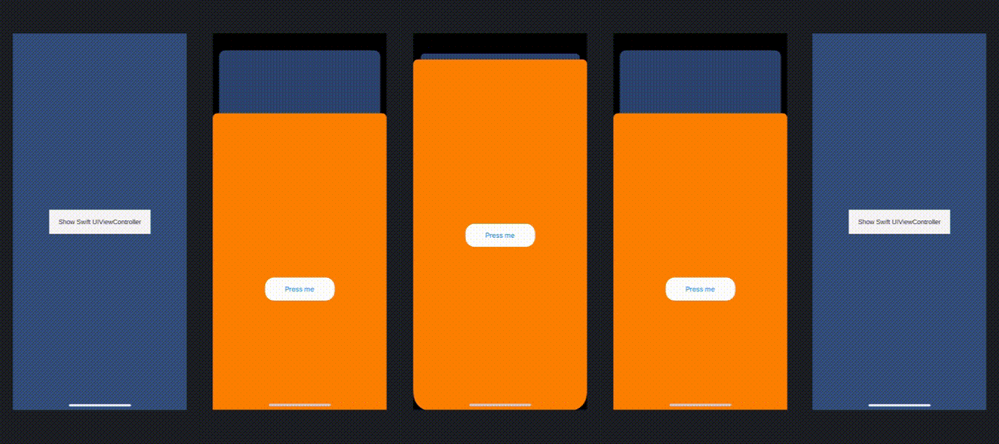
Unity Button presents a View Controller implemented in Swift
Wrapping up of Part 1
Let’s quickly go through what we did:
- Prepared a Framework with a public method for iOS and for C# using
@_cdeclattribute. - Created a simple Unity project with a button at the center.
- Added our Framework to the assets of the Unity project.
- Prepared the
ButtonControllerobject with C# script where we imported our method usingSystem.Runtime.InteropServices - Built an iOS project from Unity.
As you can see, these are basic steps that give you an opportunity to understand how it works. In part two (see below), we will try to make this project closer to real usage. We will experiment with @_cdecl attribute and explore the limitations.
Part 2: Exposing Swift Functions to C# in Unity
This article is written in two parts. In the second part, we will experiment with @_cdeclto understand the limitations of interoperability of Swift and C#. Let’s get started.
If you read the first part of this article, you should remember the SwiftCodeKitBridging.swift file:
@_cdecl("startSwiftCodeKitController")
public func startSwiftCodeKitController() {
    SwiftCodeKit.start()
}
In this file, we store a list of public methods for exposing, using @_cdecl attribute. As you can see, we already know how to call some functions from C#. But obviously, it’s not so usable because in real iOS applications, we use functions with parameters, and our functions return some values. Moreover, we use closures, delegates, and so on. How do expose this code to the Unity project?
Let’s resume what we are gonna try today:
- Function with parameters
- Function returns value
- Function with closure
iOS Framework Update
I prepared a small update of our SwiftCodeKitViewController.
final class SwiftCodeKitViewController: UIViewController {

    private lazy var label: UILabel = {
        let label = UILabel()
        label.textColor = .black
        label.font = .systemFont(ofSize: 128, weight: .bold)
        label.translatesAutoresizingMaskIntoConstraints = false
        return label
    }()

    private lazy var stepper: UIStepper = {
        let stepper = UIStepper()
        stepper.value = 5
        stepper.translatesAutoresizingMaskIntoConstraints = false
        stepper.addTarget(self, action: #selector(stepperChanged), for: .valueChanged)
        return stepper
    }()

    private lazy var button: UIButton = {
        let button = UIButton(type: .system)
        button.setTitle("Done", for: .normal)
        button.backgroundColor = .black.withAlphaComponent(0.1)
        button.setTitleColor(UIColor.black, for: .normal)
        button.layer.cornerRadius = 8
        button.translatesAutoresizingMaskIntoConstraints = false
        button.addTarget(self, action: #selector(onTap), for: .touchUpInside)
        return button
    }()

    override func viewDidLoad() {
        super.viewDidLoad()

        setupViews()
    }

    func setupViews() {
        view.backgroundColor = .white
        label.text = String(stepper.value)

        view.addSubview(button)
        view.addSubview(stepper)
        view.addSubview(label)

        NSLayoutConstraint.activate([
            button.widthAnchor.constraint(equalToConstant: 92),
            button.heightAnchor.constraint(equalToConstant: 50),
            button.centerXAnchor.constraint(equalTo: view.centerXAnchor),
            button.bottomAnchor.constraint(equalTo: view.safeAreaLayoutGuide.bottomAnchor, constant: -40),

            stepper.centerXAnchor.constraint(equalTo: view.centerXAnchor),
            stepper.bottomAnchor.constraint(equalTo: button.topAnchor, constant: -20),

            label.centerXAnchor.constraint(equalTo: view.centerXAnchor),
            label.centerYAnchor.constraint(equalTo: view.centerYAnchor)
        ])
    }

    @objc
    func onTap() {
        dismiss(animated: true)
    }

    @objc
    func stepperChanged(_ sender: UIStepper) {
        label.text = String(sender.value)
    }
}
Let's add two more views: UILabel and UIStepper. Using stepper control, we can increment and decrement a value and set it to the label.

It will be enough to experiment with real UI. Let’s take a look at our public class:
public class SwiftCodeKit {

    private static let viewController = SwiftCodeKitViewController()

    public static func start() {
        DispatchQueue.main.async {
            if let rootViewController = UIApplication.shared.windows.first?.rootViewController {
                rootViewController.present(viewController, animated: true)
            }
        }
    }

    public static func configure(min: Double, max: Double) {
        viewController.configureStepper(min: min, max: max)
    }

    public static func configure(value: Double) {
        viewController.configureStepper(value: value)
    }

    public static func getValue() -> Double {
        viewController.stepperValue
    }

    public static func getVersion() -> String {
        return "Swift Code Kit 0.0.1"
    }
}

// MARK: Delegates
public extension SwiftCodeKit {
    static var swiftCodeKitDidStart: (() -> Void)?
    static var swiftCodeKitDidFinish: (() -> Void)?
    static var swiftCodeKitStepperValueDidChange: ((Double) -> Void)?
}
As you can see, this class was extended with methods that we are going to use in C#. The most interesting part is the Delegates — they are represented by closures. Let’s connect all these methods to our UI. In viewDidLoad, add our first delegate method SwiftCodeKit.swiftCodeKitDidStart?().
Here are other methods that can be used in extensions:
extension SwiftCodeKitViewController {
    @objc
    func onTap() {
        dismiss(animated: true)
        SwiftCodeKit.swiftCodeKitDidFinish?()
    }

    @objc
    func stepperChanged(_ sender: UIStepper) {
        label.text = String(sender.value)
        SwiftCodeKit.swiftCodeKitStepperValueDidChange?(sender.value)
    }
}

extension SwiftCodeKitViewController {
    func configureStepper(min: Double, max: Double) {
        stepper.minimumValue = min
        stepper.maximumValue = max
    }

    func configureStepper(value: Double) {
        stepper.value = value
    }

    var stepperValue: Double {
        stepper.value
    }
}
iOS Framework Bridging Methods
All our public methods should be recognized from C#. I suggest walking through them one by one.
Here’s the function with parameters:
@_cdecl("swiftCodeKitConfigureMinMax")
public func swiftCodeKitConfigureMinMax(min: Double, max: Double) {
    SwiftCodeKit.configure(min: min, max: max)
}

@_cdecl("swiftCodeKitConfigureValue")
public func swiftCodeKitConfigureValue(value: Double) {
    SwiftCodeKit.configure(value: value)
}
The function returns a value (Double):
@_cdecl("swiftCodeKitGetValue")
public func swiftCodeKitGetValue() -> Double {
    SwiftCodeKit.getValue()
}
The function returns a string. Here you can notice a difference. Specifically for this kind of data, we need to allocate memory and pass our string to strdup() — this method will duplicate the string for UnsafePointer().
@_cdecl("swiftCodeKitGetVersion")
public func swiftCodeKitGetVersion() -> UnsafePointer<CChar>? {
    let string = strdup(SwiftCodeKit.getVersion())
    return UnsafePointer(string)
}
Ok, now about Delegates: As you can see, they are functions with escaping closures. But besides escaping closure, it has an interesting add-on called @convention(c).
There is a short description from docs.swift.org:
"Apply this attribute to the type of a function to indicate its calling conventions. The
cargument indicates a C function reference. The function value carries no context and uses the C calling convention."
@_cdecl("setSwiftCodeKitDidStart")
public func setSwiftCodeKitDidStart(delegate: @convention(c) @escaping () -> Void) {
    SwiftCodeKit.swiftCodeKitDidStart = delegate
}

@_cdecl("setSwiftCodeKitDidFinish")
public func setSwiftCodeKitDidFinish(delegate: @convention(c) @escaping () -> Void) {
    SwiftCodeKit.swiftCodeKitDidFinish = delegate
}

@_cdecl("setSwiftCodeKitStepperValueDidChange")
public func setSwiftCodeKitStepperValueDidChange(delegate: @convention(c) @escaping (Double) -> Void) {
    SwiftCodeKit.swiftCodeKitStepperValueDidChange = delegate
}
All methods for exposing are ready, so this means we are ready to build our updated framework, get this artifact, and drop it into the Unity project assets folder (see part 1 for how to do this).
Unity ButtonControllerScript update
Our C# script file has only one imported function for now: startSwiftCodeKitController, so it’s time to add the rest of them. We will walk through the same way as we did with Swift methods:
Here’s the function with parameters:
[DllImport("__Internal")]
private static extern void swiftCodeKitConfigureMinMax(double min, double max);

[DllImport("__Internal")]
private static extern void swiftCodeKitConfigureValue(double value);
This function returns a value, as shown below:
[DllImport("__Internal")]
private static extern void swiftCodeKitConfigureMinMax(double min, double max);

[DllImport("__Internal")]
private static extern void swiftCodeKitConfigureValue(double value);
And finally Delegates using AOT:
using AOT;

public class ButtonControllerScript : MonoBehaviour
{
    // Delegates

    public delegate void SwiftCodeKitDidStartDelegate();
    [DllImport("__Internal")]
    private static extern void setSwiftCodeKitDidStart(SwiftCodeKitDidStartDelegate callBack);

    public delegate void SwiftCodeKitDidFinishDelegate();
    [DllImport("__Internal")]
    private static extern void setSwiftCodeKitDidFinish(SwiftCodeKitDidFinishDelegate callBack);

    public delegate void SwiftCodeKitStepperValueDidChange(double value);
    [DllImport("__Internal")]
    private static extern void setSwiftCodeKitStepperValueDidChange(SwiftCodeKitStepperValueDidChange callBack);

    // Handle delegates

    [MonoPInvokeCallback(typeof(SwiftCodeKitDidStartDelegate))]
    public static void swiftCodeKitDidStart()
    {
        Debug.Log("SwiftCodeKit did start");
    }

    [MonoPInvokeCallback(typeof(SwiftCodeKitDidFinishDelegate))]
    public static void swiftCodeKitDidFinish()
    {
        Debug.Log("SwiftCodeKit did finish");
    }

    [MonoPInvokeCallback(typeof(SwiftCodeKitStepperValueDidChange))]
    public static void setSwiftCodeKitStepperValueDidChange(double value)
    {
        Debug.Log("SwiftCodeKit value did change. Value: " + value);
    }
}
The last thing we need to do is to update OnPressButton() method where we use all methods from our Swift framework.
// On Press Button

public void OnPressButton()
{
    startSwiftCodeKitController();

    swiftCodeKitConfigureMinMax(0, 20);
    swiftCodeKitConfigureValue(10);

    Debug.Log("SwiftCodeKit get value: " + swiftCodeKitGetValue());
    Debug.Log("SwiftCodeKit get version: " + swiftCodeKitGetVersion());

    setSwiftCodeKitDidStart(swiftCodeKitDidStart);
    setSwiftCodeKitDidFinish(swiftCodeKitDidFinish);
    setSwiftCodeKitStepperValueDidChange(setSwiftCodeKitStepperValueDidChange);
}
Directly from Unity, we configured our iOS Controller and used our three delegates. Now, it’s time to build our project. If you followed me correctly and all your methods were recognizable by Unity, your result will look like the following GIF animation.
The console of Xcode should print something like this:
SwiftCodeKit did start
SwiftCodeKit get value: 10
SwiftCodeKit get version: Swift Code Kit 0.0.1
SwiftCodeKit value did change. Value: 11
SwiftCodeKit value did change. Value: 12
SwiftCodeKit value did change. Value: 13
SwiftCodeKit did finish
Wrapping up of Part 2
I always ask the same question every time when finalizing a task: How can we make this better? I think this task could be improved endlessly. I’m not an expert with Unity (if you know better, please comment), but I know that we can even build DLL Library with all our functions and eventually just import this build directly to the script.
Also, as an iOS Developer using UnsafePointer keep in mind that this memory should be released.
Thanks for reading.
Source Code
Published at DZone with permission of Max Kalik. See the original article here.
Opinions expressed by DZone contributors are their own.
Comments