Altering XML Tag Position Using Mule 4 With Basic Authentication
Discover how DataWeave in Mule 4 lets you reorder XML elements quickly and efficiently, simplifying data transformation without complicated code.
Join the DZone community and get the full member experience.
Join For FreeSometimes when working with XML data, you need to rearrange the order of elements to match a specific format the business requires. But going through each tag one by one and looping over everything can get complicated and slow. Luckily, with Mule 4 and DataWeave 2.0, you can easily shift XML tags around without having to write complex loops or extra code.
On top of that, if your service needs to be secured, basic authentication can be seamlessly added to keep things safe and simple.
In this article, we’ll walk you through how to take JSON data and turn it into a predefined CSV report, all while showing you how to efficiently rearrange the XML structure. You’ll see how to do this cleanly and clearly using Mule’s tools, saving you time and making your integration smoother.
Problem Statement: Alter/Shifting the Position of the XML Tag Without Having a Single Iteration
To solve this, we built a Mule flow that takes an XML input and returns the same data, just with the tag positions changed to match the required format.
Here’s the input XML we’re working with:
<Report>
<Order>
<id>2121212121</id>
<name>Arindam Goswami</name>
<Address>Kolkata</Address>
<Amount>1333.20</Amount>
</Order>
<Order>
<id>2121212121</id>
<name>Arindam Goswami</name>
<Address>Kolkata</Address>
<Amount>1333.20</Amount>
</Order>
<Order>
<id>2121212121</id>
<name>Arindam Goswami</name>
<Address>Kolkata</Address>
<Amount>1333.20</Amount>
</Order>
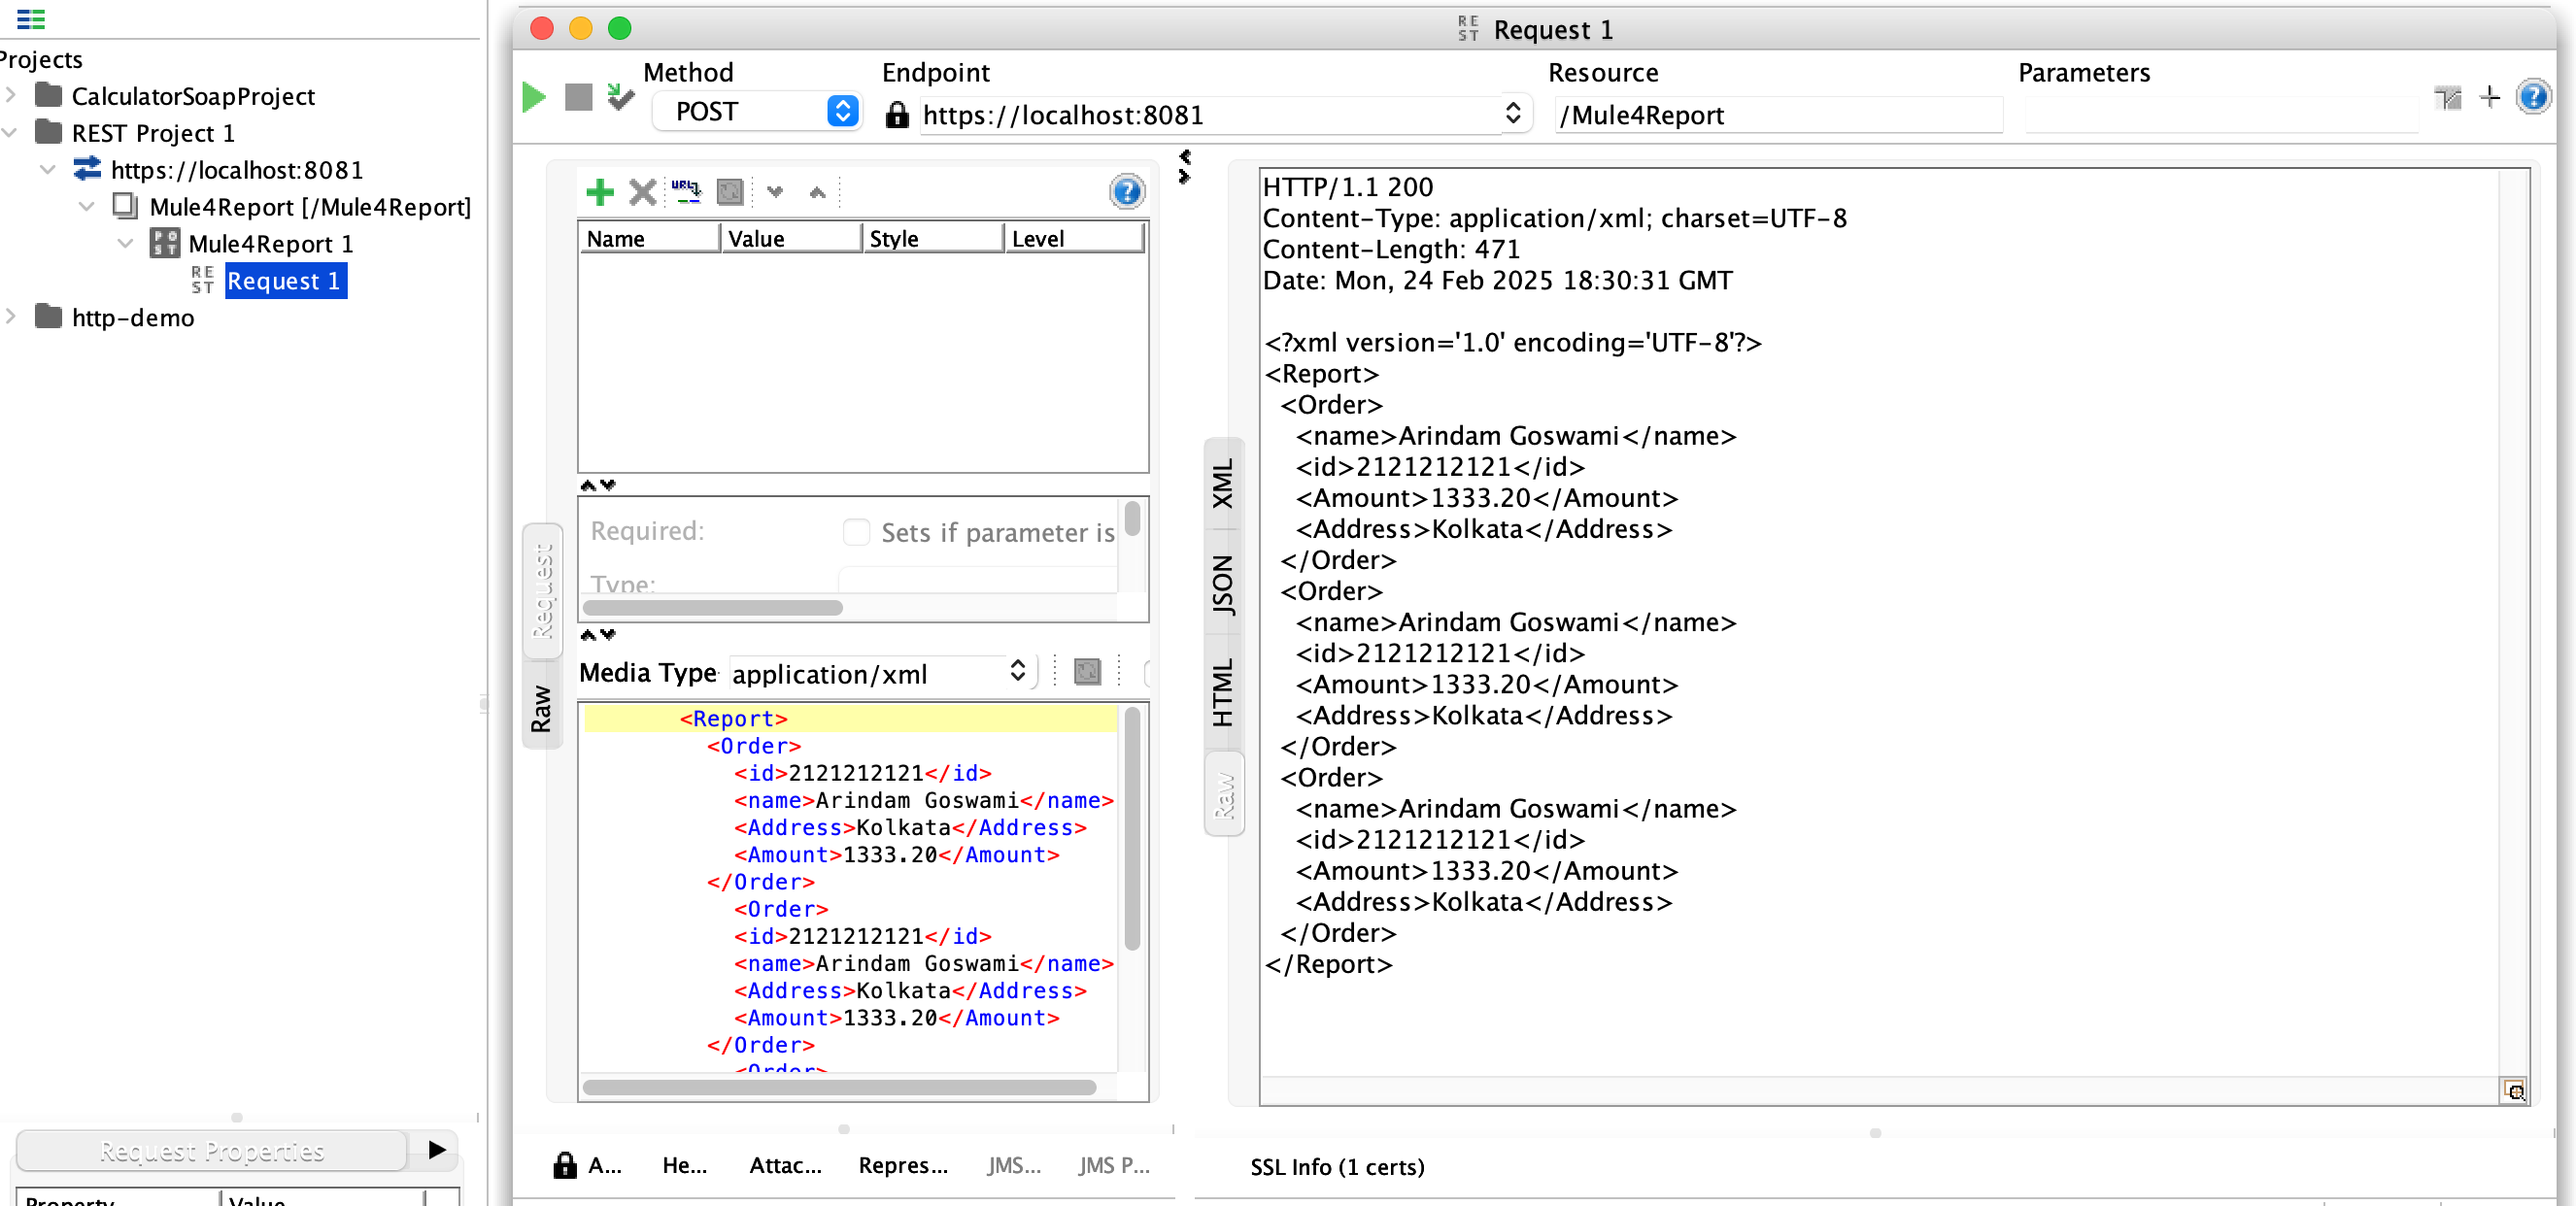
</Report>The output payload looks like this:
<?xml version='1.0' encoding='UTF-8'?>
<Report>
  <Order>
    <name>Arindam Goswami</name>
    <id>2121212121</id>
    <Amount>1333.20</Amount>
    <Address>Kolkata</Address>
  </Order>
  <Order>
    <name>Arindam Goswami</name>
    <id>2121212121</id>
    <Amount>1333.20</Amount>
    <Address>Kolkata</Address>
  </Order>
  <Order>
    <name>Arindam Goswami</name>
    <id>2121212121</id>
    <Amount>1333.20</Amount>
    <Address>Kolkata</Address>
  </Order>
</Report>
The main difference between these two payloads is the order of the tags. In the input, the tags go in this order: id, name, Address, amount. In the output, the order changes to: name, id, amount, Address.
Take a look at the Mule flow below. It starts with an HTTP inbound connector using basic authentication, then uses DataWeave 2.0 to rearrange the payload as needed.
Here’s the Mule flow:
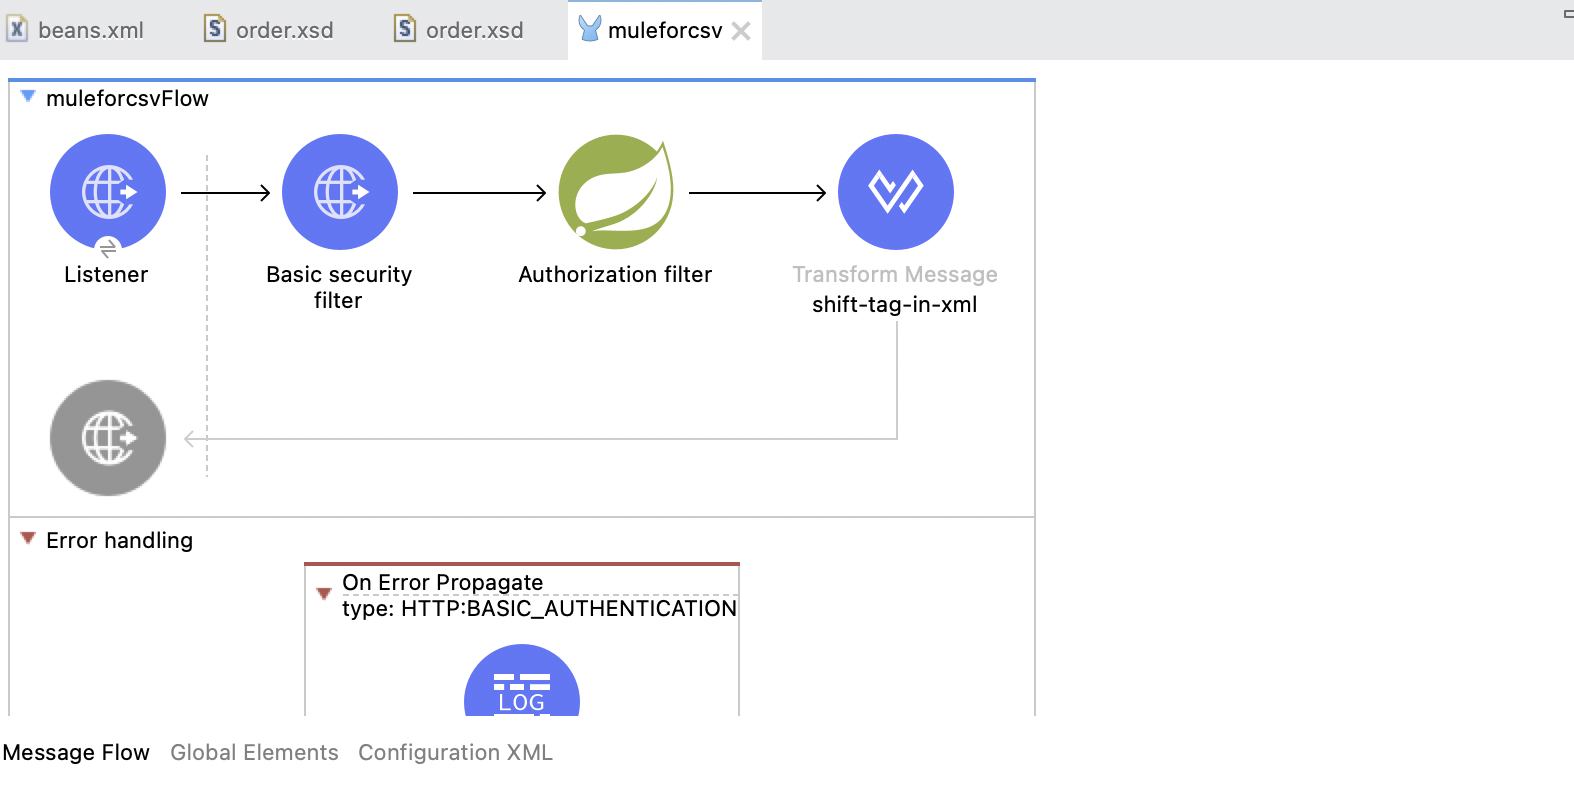
Note that once you add the authorization filter component, the following dependency is automatically added to your
pom.xml.
<dependency>
<groupId>org.mule.modules</groupId>
<artifactId>mule-spring-module</artifactId>
<version>1.3.6</version>
<classifier>mule-plugin</classifier>
</dependency>
<dependency>
<groupId>org.springframework</groupId>
<artifactId>spring-context</artifactId>
<version>5.3.2</version>
</dependency>
<dependency>
<groupId>org.springframework</groupId>
<artifactId>spring-beans</artifactId>
<version>5.3.2</version>
</dependency>
<dependency>
<groupId>org.springframework.security</groupId>
<artifactId>spring-security-config</artifactId>
<version>5.4.2</version>
</dependency>
<dependency>
<groupId>org.springframework.security</groupId>
<artifactId>spring-security-core</artifactId>
<version>5.4.2</version>
</dependency>
<dependency>
<groupId>org.springframework</groupId>
<artifactId>spring-core</artifactId>
<version>5.3.2</version>
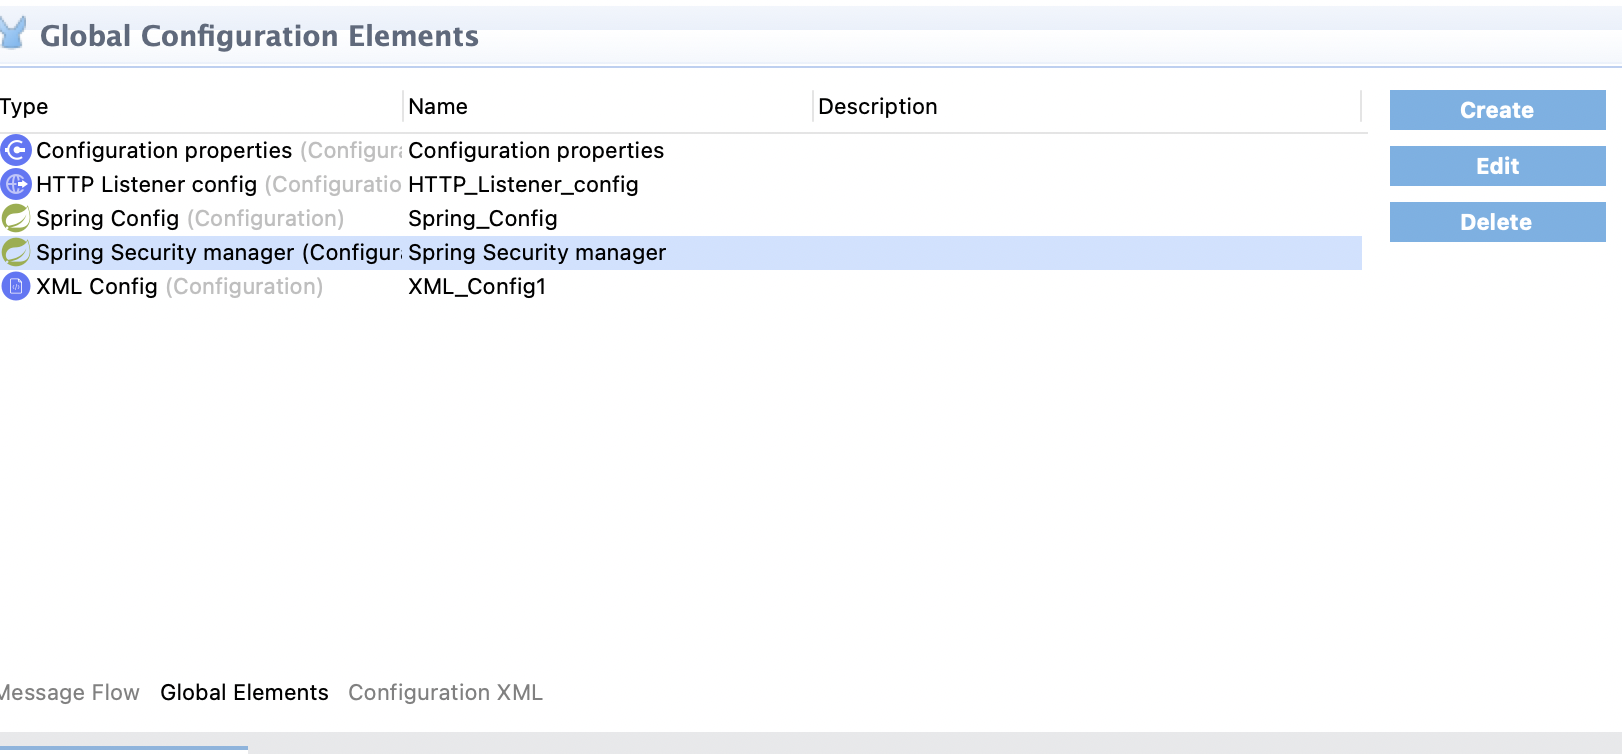
</dependency>Please take a look at the global elements, Spring configuration, and Spring Security manager that need to be added to enable basic authentication in Mule using Spring beans.
Keep in mind that the Spring config file references beans.xml, and the Spring Security manager includes a reference to authenticationManager, which is defined in beans.xml.
We also need to mention beans.xml in the mule-artifact.json file so Mule knows it’s there and can load it properly.
{
    "name": "MuleForCsv",
    "minMuleVersion": "4.2.2",
    "classLoaderModelLoaderDescriptor": {
        "id": "mule",
        "attributes": {
            "exportedResources": [
                "beans.xml"
            ]
        }
    }
  }
Here’s the beans.xml containing the usernames and passwords assigned to each role.
<beans xmlns="http://www.springframework.org/schema/beans"
  xmlns:context="http://www.springframework.org/schema/context"
  xmlns:xsi="http://www.w3.org/2001/XMLSchema-instance"
  xmlns:jdbc="http://www.springframework.org/schema/jdbc"
  xmlns:ss="http://www.springframework.org/schema/security"

 xsi:schemaLocation="http://www.springframework.org/schema/beans
	    http://www.springframework.org/schema/beans/spring-beans-4.2.xsd
	    http://www.springframework.org/schema/jdbc
	    http://www.springframework.org/schema/jdbc/spring-jdbc-4.2.xsd
	    http://www.springframework.org/schema/context
	    http://www.springframework.org/schema/context/spring-context-4.2.xsd
      http://www.springframework.org/schema/security
      http://www.springframework.org/schema/security/spring-security-5.4.xsd">

  <ss:authentication-manager alias="authenticationManager">
    <ss:authentication-provider>
      <ss:user-service id="userService">
        <ss:user name="admin" password="{noop}admin" authorities="ROLE_ADMIN" />
        <ss:user name="joe" password="{noop}secret" authorities="ROLE_DEV" />
      </ss:user-service>
    </ss:authentication-provider>
  </ss:authentication-manager>

</beans>
When calling this through SoapUI, you need to provide the username and password.
The {noop} means the password is stored without encryption.
Now, let me walk you through the DataWeave code.
	<ee:transform doc:name="shift-tag-in-xml" doc:id="6905446b-6b9c-4b56-b4ab-2635adc33f33" >
			<ee:message >
				<ee:set-payload ><![CDATA[%dw 2.0
output application/xml
var inputPayload = payload
var finalResponsePayload = Report: {
    (inputPayload.Report mapObject {
        ($$) : ($ mapObject {
           ((($$) : $) if $$ as String != "name" and $$ as String != "id"
                          and $$ as String != "Address" and $$ as String !=                             "Amount")

    }) ++  ("name" : $.name) ++ ("id" : $.id) ++ ("Amount" : $.Amount) ++ ("Address" : $.Address)

    })
}
---
finalResponsePayload]]></ee:set-payload>
			</ee:message>
		</ee:transform>
We all know that mapObject works on an object. Here’s how it works in this code:
$$is the key$is the value
So, on line 8, $$ holds the key "Report", and $ contains the entire Order array. Basically, the value inside the Report tag.
Next, on line 9,
$$represents all the keys inside the Order array, likeid,name,amount, andAddress.$holds their corresponding values, likeArindam Goswami,2121212121,"Kolkata", and so on.
If you look at line 12, you’ll see we’ve rearranged the key order to fit our needs. The new order is: name, id, amount, Address.
The if section is there to make sure tags aren’t duplicated.
The output XML is shown above.
Everything’s ready. Just hit the SOAP UI to test it out!
I’ve attached the Mule code snippet below.
<?xml version="1.0" encoding="UTF-8"?>

<mule xmlns:ee="http://www.mulesoft.org/schema/mule/ee/core" xmlns:xml-module="http://www.mulesoft.org/schema/mule/xml-module"
	xmlns:spring="http://www.mulesoft.org/schema/mule/spring"
	xmlns:tls="http://www.mulesoft.org/schema/mule/tls" xmlns:http="http://www.mulesoft.org/schema/mule/http" xmlns="http://www.mulesoft.org/schema/mule/core" xmlns:doc="http://www.mulesoft.org/schema/mule/documentation" xmlns:xsi="http://www.w3.org/2001/XMLSchema-instance" xsi:schemaLocation="http://www.mulesoft.org/schema/mule/core http://www.mulesoft.org/schema/mule/core/current/mule.xsd
http://www.mulesoft.org/schema/mule/http http://www.mulesoft.org/schema/mule/http/current/mule-http.xsd
http://www.mulesoft.org/schema/mule/tls http://www.mulesoft.org/schema/mule/tls/current/mule-tls.xsd
http://www.mulesoft.org/schema/mule/spring http://www.mulesoft.org/schema/mule/spring/current/mule-spring.xsd
http://www.mulesoft.org/schema/mule/xml-module http://www.mulesoft.org/schema/mule/xml-module/current/mule-xml-module.xsd
http://www.mulesoft.org/schema/mule/ee/core http://www.mulesoft.org/schema/mule/ee/core/current/mule-ee.xsd">
	<configuration-properties doc:name="Configuration properties" doc:id="025a3944-f3da-4f42-87c5-753bd13b4966" file="config.properties" />
	<http:listener-config name="HTTP_Listener_config" doc:name="HTTP Listener config" doc:id="45534598-25a4-4456-a847-f832e6ef7c43" >
		<http:listener-connection host="0.0.0.0" port="8081" protocol="HTTPS">
			<tls:context >
				<tls:key-store type="jks" path="${keystore.path}" keyPassword="changeit" password="password"/>
			</tls:context>
		</http:listener-connection>
	</http:listener-config>
	<spring:config name="Spring_Config" doc:name="Spring Config" doc:id="d58f4c7d-caed-4cfe-ad84-8136d3356ca2" files="beans.xml"/>
	<spring:security-manager doc:name="Spring Security manager" doc:id="8437c57a-60d3-44f0-831d-a92340bd02c5" >
		<spring:delegate-security-provider name="memory-provider" delegate-ref="authenticationManager" />
	</spring:security-manager>
	<xml-module:config name="XML_Config1" doc:name="XML Config" doc:id="92e840ef-87d4-4560-8c57-1601bc7961b7" />
	<flow name="muleforcsvFlow" doc:id="0bcc90ce-290c-4654-85d2-fd06bdcdfe9c" >
		<http:listener doc:name="Listener" doc:id="654aadd8-0654-4d3c-ae3d-d7509fc612f5" config-ref="HTTP_Listener_config" path="/Mule4Report"/>
		<http:basic-security-filter doc:name="Basic security filter" doc:id="c0b6a378-9091-4a2a-9151-e140ed972b84" realm="mule-realm"/>
		<spring:authorization-filter doc:name="Authorization filter" doc:id="e203c02b-4de6-4a8b-8498-703e47986134" requiredAuthorities="ROLE_ADMIN"/>
		<ee:transform doc:name="shift-tag-in-xml" doc:id="6905446b-6b9c-4b56-b4ab-2635adc33f33" >
			<ee:message >
				<ee:set-payload ><![CDATA[%dw 2.0
output application/xml
var inputPayload = payload
var finalResponsePayload = Report: {
    (inputPayload.Report mapObject {
        ($$) : ($ mapObject {
           ((($$) : $) if $$ as String != "name" and $$ as String != "id"
                          and $$ as String != "Address" and $$ as String !=                             "Amount")

    }) ++  ("name" : $.name) ++ ("id" : $.id) ++ ("Amount" : $.Amount) ++ ("Address" : $.Address)

    })
}
---
finalResponsePayload]]></ee:set-payload>
			</ee:message>
		</ee:transform>
		<error-handler >
			<on-error-propagate enableNotifications="true" logException="true" doc:name="On Error Propagate" doc:id="1d7b32bd-1576-4522-bc91-a8b45c85fe01" type="HTTP:BASIC_AUTHENTICATION">
				<logger level="ERROR" doc:name="basic-auth-error" doc:id="14615039-fda5-4cdc-8920-9d9fd872342c" message="Unable to validate client reqest"/>
			</on-error-propagate>
		</error-handler>
	</flow>
</mule>
The complete Mule project, along with the SoapUI project, is available at this link. This is especially helpful if you want the output in a customized order.
Hope you found this article useful! If you have any questions, feel free to leave a comment below.
Published at DZone with permission of ARINDAM GOSWAMI. See the original article here.
Opinions expressed by DZone contributors are their own.
Comments