Stop Prompt Hacking: How I Connected My AI Agent to Any API With MCP
Learn how to use the Model Context Protocol (MCP) to give AI agents real access to your APIs; no prompt-hacking, just clean, maintainable integration.
Join the DZone community and get the full member experience.
Join For FreeIn Part 1 of this series, I laid out the high-level architecture for my "InstaVibe Ally" and made the case for building a team of specialist AI agents instead of a single, monolithic brain. I sketched out a system where an Orchestrator delegates tasks to a Social Profiler, a Planner, and a Platform Interaction Agent.
Now, I'm going to zoom in on one of the most critical, practical challenges you’ll face: How do you actually let your agent use your application's APIs?
An AI agent, powered by a Large Language Model (LLM) like Gemini, is a master of language and reason. But by default, it's a brain in a jar—isolated from the real world of your applications. It can't update a Salesforce record, book a flight, or, in my case, post an event to the InstaVibe platform. To do useful work, it needs to connect with the code I've already built.
The first instinct for many developers is to start prompt-hacking. You try stuffing API documentation, cURL commands, and examples directly into the agent's prompt. Let’s be honest, this feels clever for about five minutes, and then it becomes a maintenance nightmare and a pile of technical debt. Every time your API changes, you have to hunt down and update every single prompt that uses it. You’re tightly coupling your agent's logic to your API's implementation details, and it will come back to bite you.
This is not the way.
The solution for me was the Model Context Protocol (MCP). MCP is an open standard that acts as a structured, standardized bridge between an AI agent and any external tool. It's the universal adapter that lets you plug your application's existing capabilities directly into your agent's brain, without creating a messy, unmaintainable prompt.
Let's dive into exactly how I used MCP to transform my own internal REST APIs into a set of clean, discoverable tools for my Platform Interaction Agent.
The Problem: My Agent on the Outside, My API on the Inside
My InstaVibe application, like most modern web apps, has a standard set of internal REST endpoints. For this feature, I cared about two in particular:
POST /api/postsfor creating a new social post.POST /api/eventsfor creating a new event.
My goal was to allow my agent to call these endpoints intelligently. It needed to be a first-class citizen of my application ecosystem, not a guest who has to be told how to do everything. I wanted the agent to take a user's request like, "Post a positive message from Julia about her new cat!", and have it translate that into a well-formed, secure API call to my existing service.
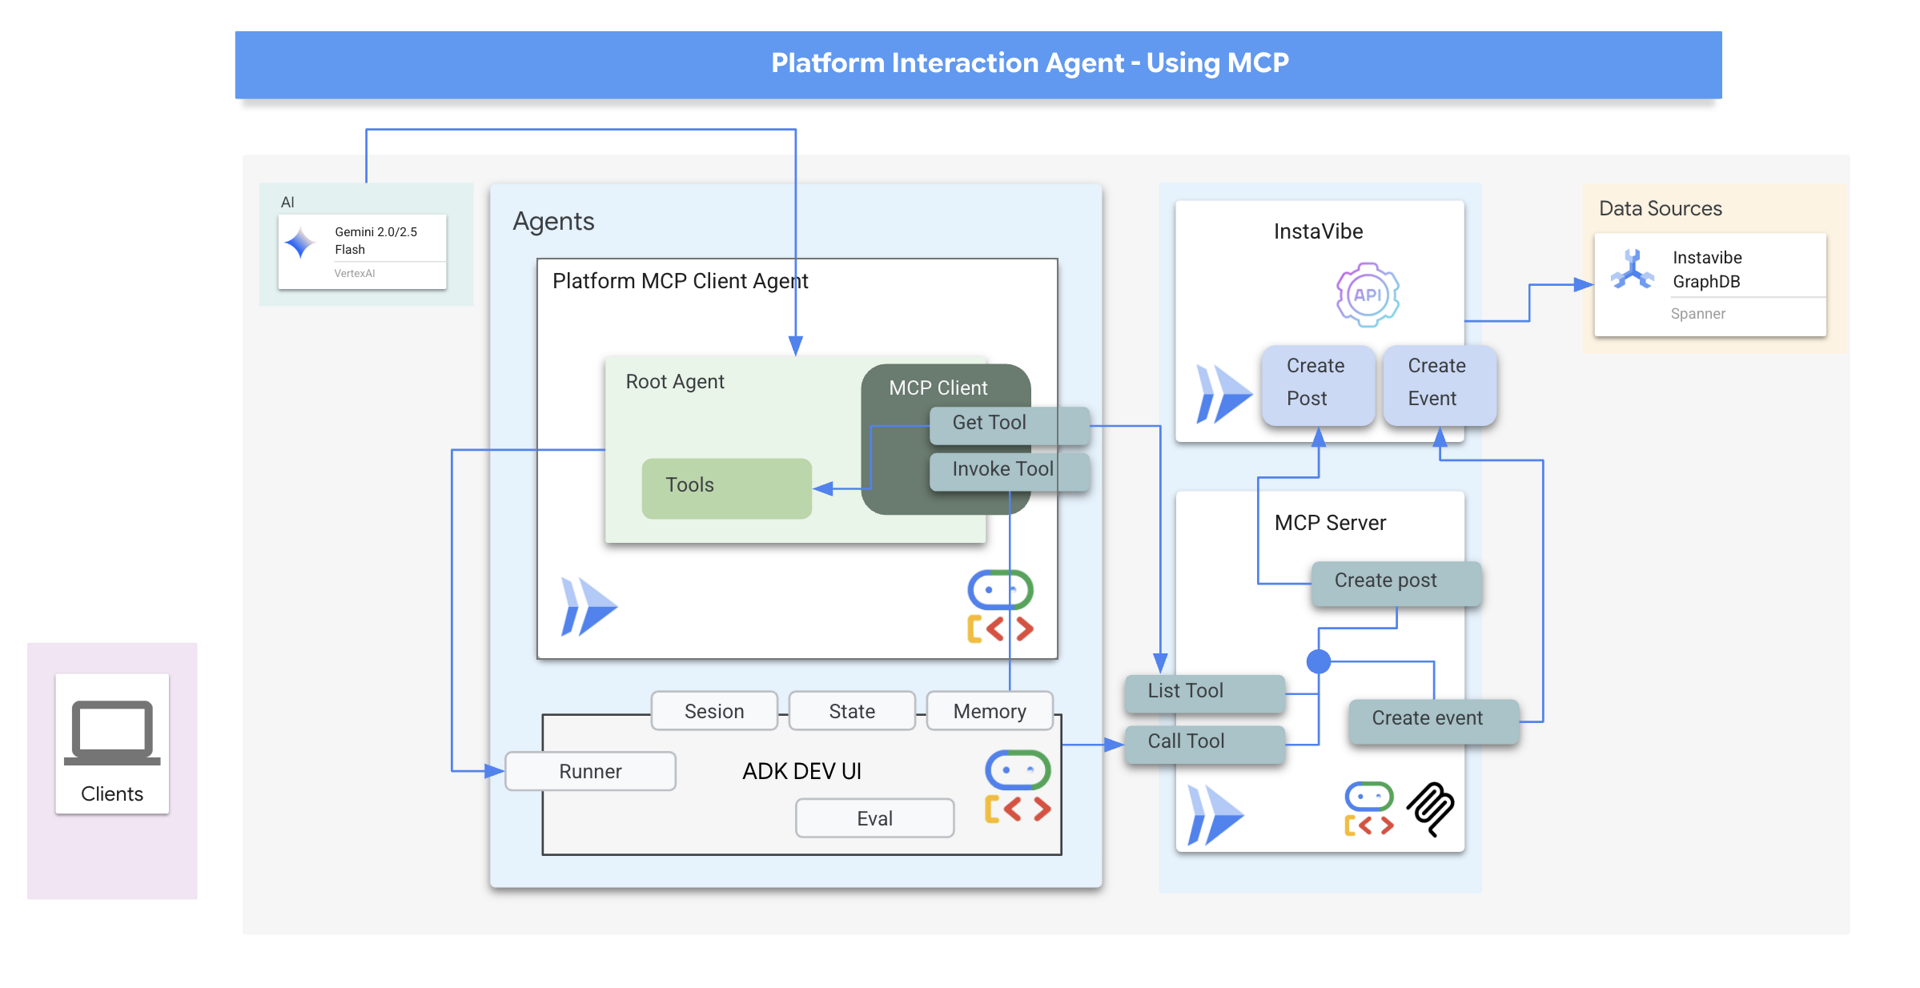
To do this cleanly, I introduced the MCP Tool Server. You can think of it as a dedicated microservice that acts as an API proxy specifically for my agents. It's an integration hub, a translation layer, and a security gateway all in one.
The architecture is simple but powerful, and I love it for a few key reasons:
- Separation of concerns. It only communicates with my
MCP Tool Server. It has no idea the InstaVibe API even exists. - Easy to introduce security. My
MCP Tool Serveris the only component that communicates directly with the internal InstaVibe API and acts as a centralized security control point.
This completely decouples the agent from the application. The agent's world is simple: it just knows about tools. The application's world is unchanged: it just serves its API. The MCP server is the bridge that connects them, and that separation makes your life a whole lot easier down the road.
Step 1: Write a Function, Not a Prompt
The first thing I did was create a clean separation of concerns. My agent shouldn't have to think about HTTP methods, headers, or authentication. That's application logic. So, on my MCP server, I wrote simple Python functions that represent each tool I wanted to expose. These wrappers handle all the ugly details.
For example, here’s the wrapper for my create_post API. It's the only place where the requests library and the API's URL are mentioned.
def create_post(author_name: str, text: str, sentiment: str):
    """
    Sends a POST request to the /posts endpoint to create a new post.
    This function encapsulates the API call logic.
    """
    url = f"{BASE_URL}/posts"
    headers = {"Content-Type": "application/json"}
    payload = {
        "author_name": author_name,
        "text": text,
        "sentiment": sentiment
    }

    try:
        response = requests.post(url, headers=headers, json=payload)
        response.raise_for_status() # Raise an exception for bad status codes
        print(f"Successfully created post.")
        return response.json()
    except requests.exceptions.RequestException as e:
        print(f"Error creating post: {e}")
        return None
Look how clean that is! My agent will never see a URL or an HTTP header. It will only know about a tool called create_post, along with the arguments they need.
Step 2: Build the MCP Server—The Agent's New Best Friend
With the wrapper functions ready, the next step was to build the MCP Server itself. It’s a lightweight web application (I used FastAPI, which is great for this) that implements two fundamental endpoints defined by the MCP standard:
list_tools(): This is the discovery mechanism. You can think of it as the "handshake." When an agent first connects, it calls this endpoint to ask, "Hey, what can you do?" The server responds with a machine-readable list of all available tools (create_post,create_event), their descriptions, and, most importantly, a JSON Schema for their arguments. This schema is critical—it tells the LLM exactly what parameters are needed and what their data types are, which drastically reduces errors and hallucinations.call_tool(name, arguments): This is the execution endpoint. After the agent has decided which tool to use (based on the user's request and the info fromlist_tools), it calls this endpoint and says, "Okay, do this." It sends the tool's name and a dictionary of arguments. The server then acts as a router, finds the matching Python function I wrote in Step 1, and executes it.
I packaged this MCP server into a Docker container and deployed it to Cloud Run. Now it has its own unique, publicly accessible URL and runs as an independent microservice.
Step 3: Plug It In—The Easy Part
This is where I LOVED using Google's Agent Development Kit (ADK). After all the careful setup of the server, telling the agent to use it was incredibly simple. I didn't need to write a custom client, parse JSON, or deal with any networking logic myself. I just had to point the ADK at my deployed MCP server.
from google.adk.agents import Agent
from google.adk.mcp import MCPToolset, SseServerParams

....

async def build_agent_with_mcp_tools():
    """Connects to the MCP server and initializes an agent with the discovered tools."""

    print(f"Connecting to MCP server at {MCP_SERVER_URL} to fetch tools...")

    # This single line handles the entire MCP handshake. It connects to the server,
    # calls list_tools(), gets the definitions, and creates ADK-compatible tool objects.
    # It's beautiful.
    tools = MCPToolset(
        connection_params=SseServerParams(url=MCP_SERVER_URL)
    )

    print(f"Successfully loaded tools: {[tool.name async for tool in tools.tools()]}")

    # Now I create my agent and pass in the dynamically loaded tools.
    # The agent's toolset is now whatever the MCP server provides.
    platform_agent = Agent(
        model="gemini-2.5-flash",
        instruction="You are an expert at interacting with the InstaVibe platform using the provided tools.",
        tools=[tools]
    )
    return platform_agent
And just like that—boom! The process is automated and flexible. My agent's toolset is no longer hardcoded. The tool logic is centralized on the MCP server, making it a breeze to update. I've successfully unlocked my existing API for my AI agent without getting tangled in a mess of prompts.
What's Next? From Theory to Your Terminal
By embracing the Model Context Protocol, I've built a robust and maintainable bridge between my agent's reasoning capabilities and my application's existing API. I've treated AI integration like proper software engineering, and the result is a clean, scalable system.
But this is only one piece of the puzzle. My Platform Agent can now talk to my application, but how does the Orchestrator talk to the Platform Agent? What happens when agents need to talk to each other? That’s a job for the Agent-to-Agent (A2A) protocol, and it’s exactly what I’ll cover in Part 3, the final post of this series.
In the meantime, reading is great, but building is better.
I turned this entire project—from the multi-agent design in Part 1 to the MCP integration I just covered, and even the A2A orchestration I'll discuss next—into a hands-on InstaVibe Multi-Agent Google Codelab. You can build this exact system yourself, step-by-step, and get the gift of simplicity so you can spend less time scrolling and more time coding.
You'll get to:
- Build your first agent with the Agent Development Kit (ADK).
- Expose your application’s APIs as tools using MCP.
- Connect your agents with the A2A protocol.
- Orchestrate the whole team and deploy it to Cloud Run and Vertex AI Agent Engine.
It's the perfect way to skip the steep learning curves and see how these powerful concepts work in practice.
Give the Codelab a try and drop a comment below with any questions. I'll see you in Part 3.
Opinions expressed by DZone contributors are their own.
Comments