Authenticating Android Apps Developed in Kotlin
In this tutorial, we will learn to use JWTs to secure a Kotlin Android app, using AuthOto issue a token to communicate with the API.
Join the DZone community and get the full member experience.
Join For FreeLast May, at the Google I/O keynote, the Android team announced first-class support for Kotlin. So, yes, Kotlin is a good choice for Android development. Otherwise, the Android team would never make a move like that. Besides that, for the last 4 years, Android Studio has been based on the IntelliJ Platform. For those who don't know, IntelliJ is a product from JetBrains, the creator of the Kotlin programming language. As such, we can rest assured that, when choosing Kotlin for our next project, the development experience will be smooth. At least from the perspective of the IDE support.
How Does Kotlin Differ From Java?
Kotlin is a whole new programming language with a different syntax. Java developers won't have that much trouble when reading a project's source code written in Kotlin. Although, there are many differences and many cool features that Java developers should learn before diving into Kotlin.
If you have never used Kotlin before, you can still follow this blog post along, as it won't have that much advanced subjects. But, for the sake of completeness, here is a list of resources where you can learn more about Kotlin:
- Kotlin Reference—where the details of Kotlin's syntax are explained.
- Try Kotlin—where you can do some hands on exercises to learn Kotlin.
- Kotlin in Action—if you want to dive deep into this new language.
Besides that, be aware that JetBrains has been investing a lot on tools to help Java developers migrate to Kotlin. For example, IntelliJ and Android Studio 3.0 are both shipped with tools that automatically translates Java source code to Kotlin.
Developing an Android App in Kotlin
To start a new project, you can take advantage of the Create New Project wizard that comes with Android Studio. Its usage is quite simple, and just a few steps are needed, as shown in this tutorial. But, to speed things up, we are going to clone this repository in our local machine.
(This post was made using Android Studio 3 Canary 3. New versions of the IDE should be supported as long as we update the versions of Kotlin's plugin and Gradle's wrapper.)
git clone https://github.com/auth0-blog/kotlin-app.git
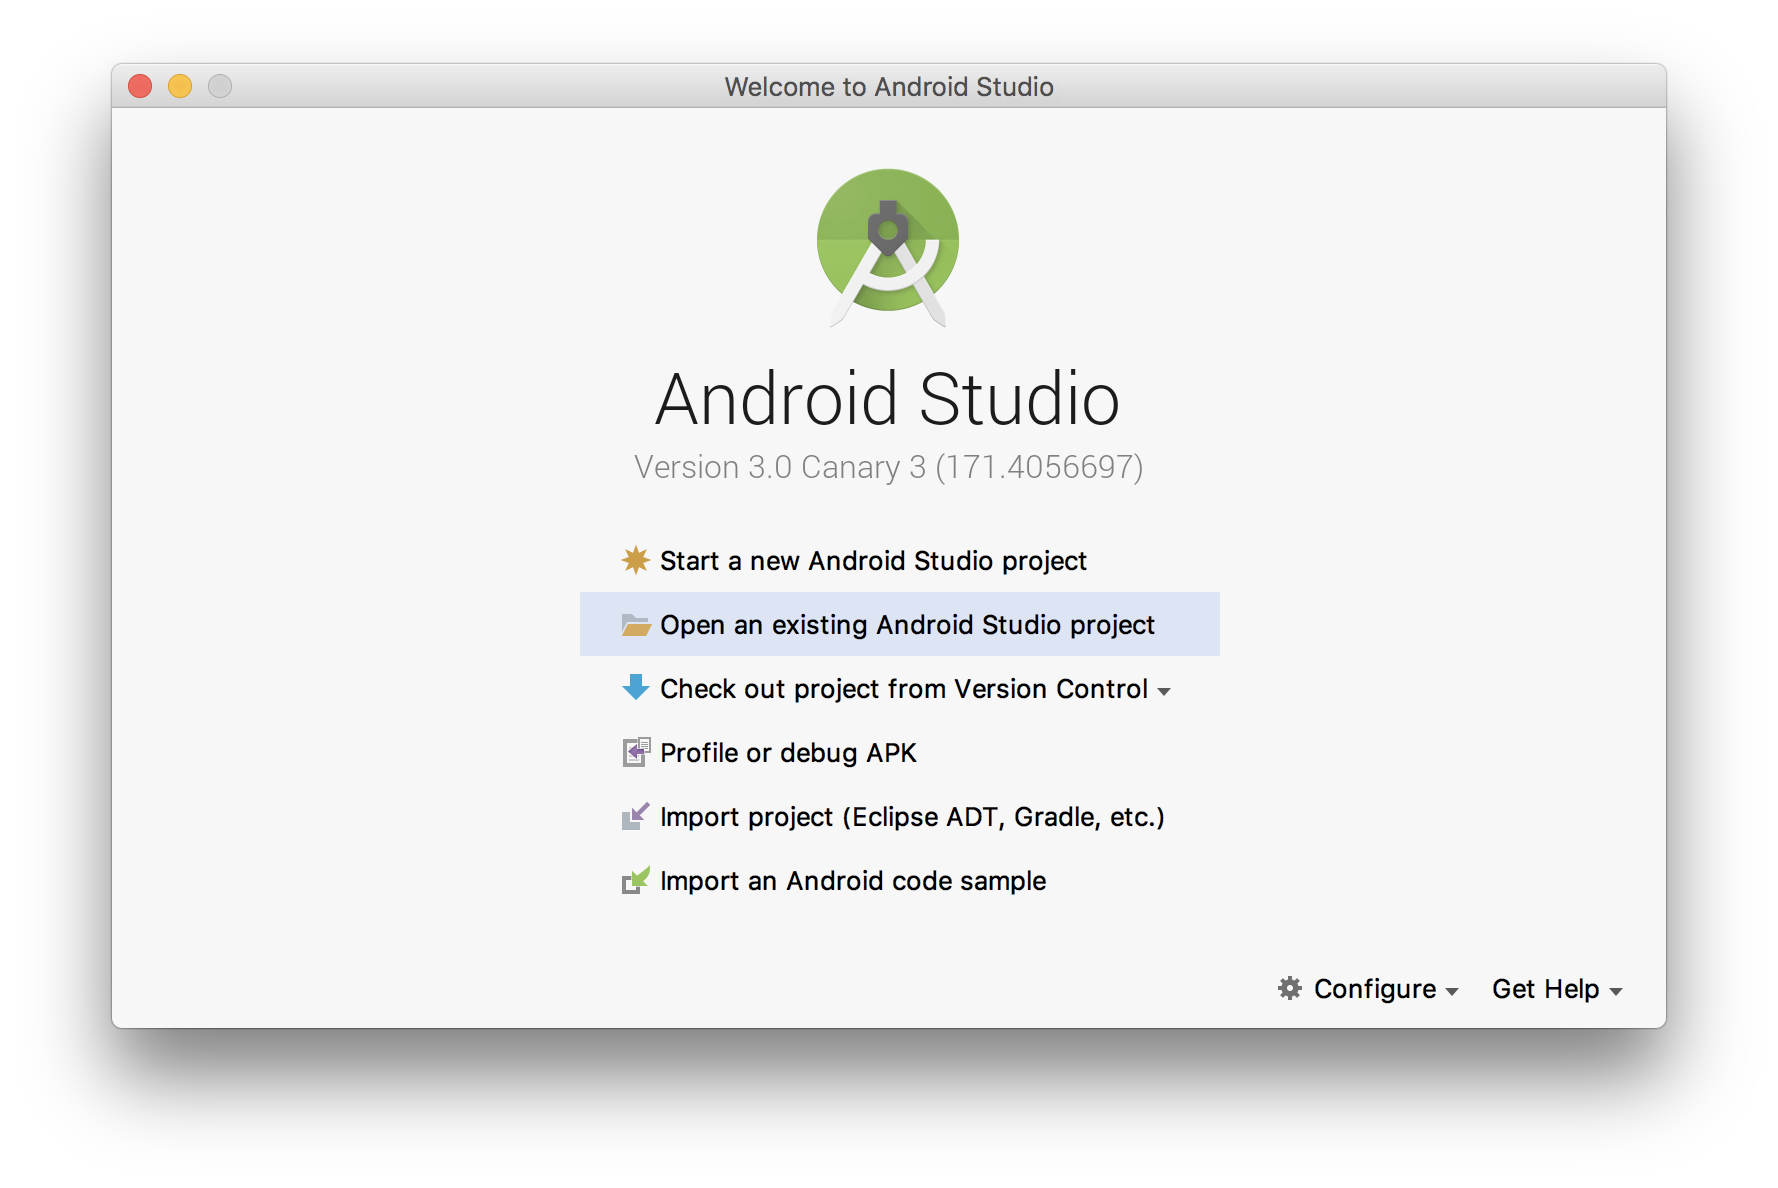
After that we are going to open it in Android Studio through the Open an existing Android Studio project option:
If this is the first time that you are using Android Studio, you will also need to install an Android emulator or integrate your own Android device with the IDE. I had no trouble installing a new Android emulator locally through the IDE. But, for whatever reason, if you find yourself stuck, you can check this resource to see if it helps.
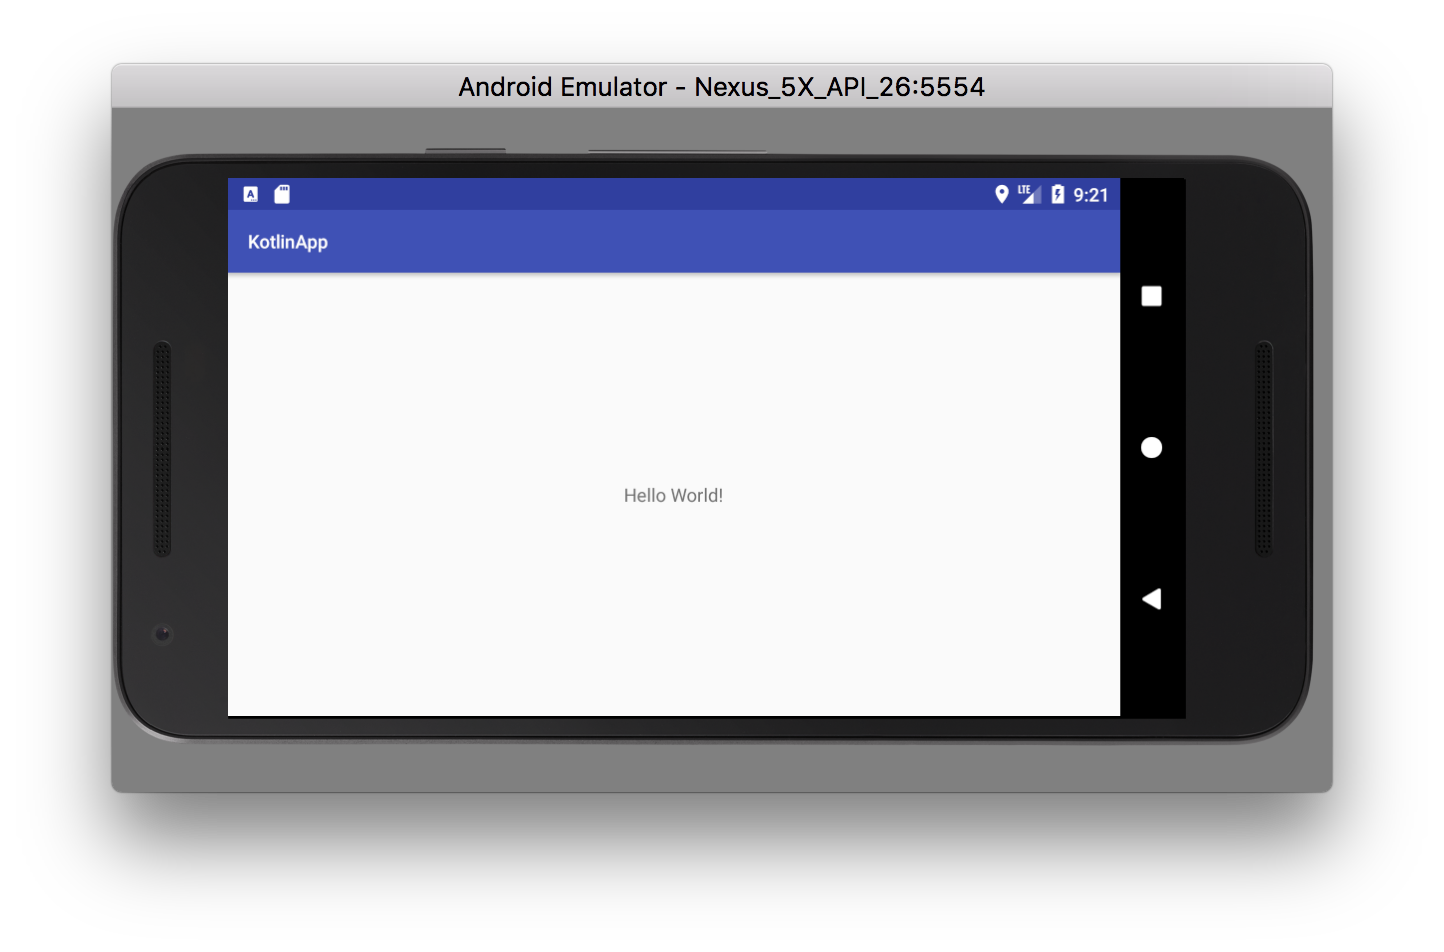
To guarantee that everything is working as expected, let's start the application as it is. This can be done through the Run app button (a green play button on the top of the IDE) which will launch the app on the chosen emulator (or on your own device) with a Hello World! message.
What Will We Build With Kotlin?
As mentioned, we are going to build a simple application. This application will consist of three features:
- A list of to-do items. This list will be fetched from a RESTful API that will be publicly available.
- An input text and a button to allow users to add new items to the existing list. This will be available only to logged in users.
- Sign in and sign up functionality provided by Auth0. We are going to get an
access_tokenfrom Auth0 and will use it to interact with a secured endpoint.
Booting Up the RESTful API
The RESTful API that we are going to use is an Express application that can be found here. Therefore, before developing the features mentioned on our Kotlin app, we are going to need to clone this repository.
git clone https://github.com/auth0-blog/nodejs-auth0/
cd nodejs-auth0
npm install
As our RESTful API will be protected by Auth0, we are going to go for a free account now (if we don't already have one). As Auth0 manages identity based on standards, like OAuth and OpenID Connect, we will follow the best practices and create an API representation of our backend in the web-based management tool. On this page, let's click the Create API button and fill the form as shown below:
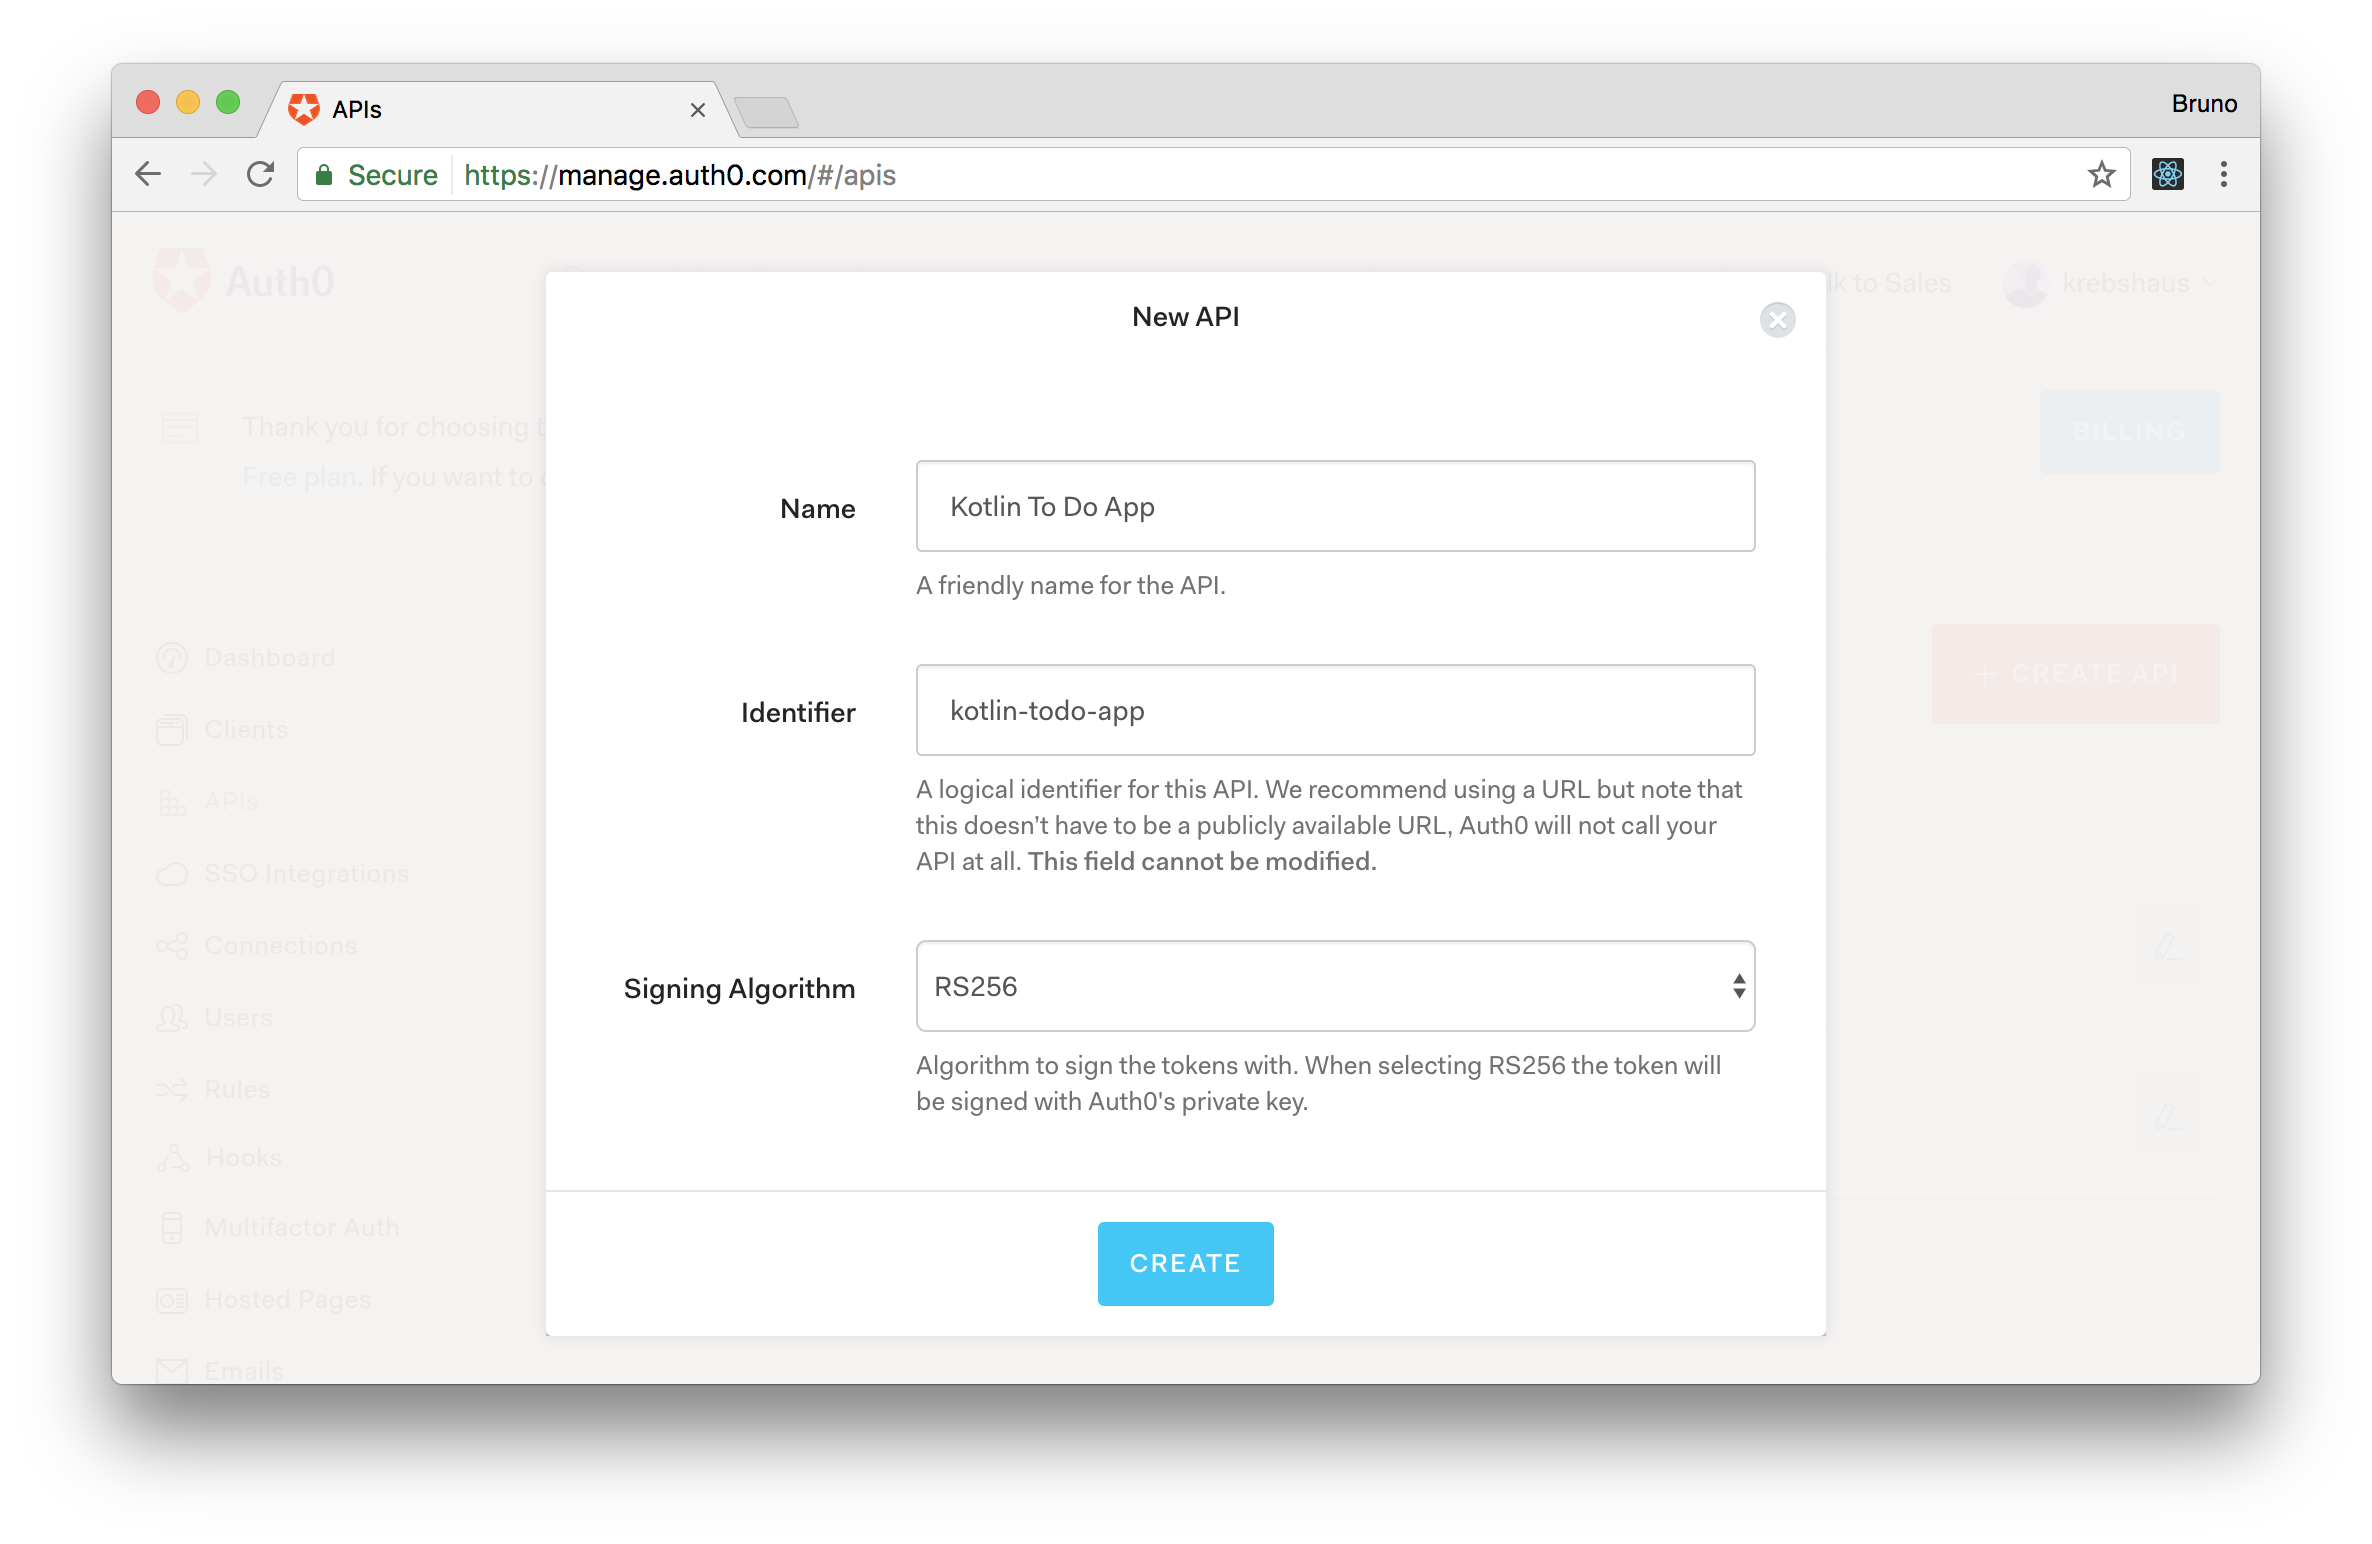
The first field in this form, called Name, is just a friendly name for the tool and its value won't matter to us. The second field, Identifier, is the audience of our API. We are going to use this value when configuring our backend and also on our Kotlin Android app. The last field, Signing Algorithm, defines how our tokens will be signed. RS256 uses a private key to sign tokens and a public key to validate it. To learn more about how the signing process works, take a look at this article.
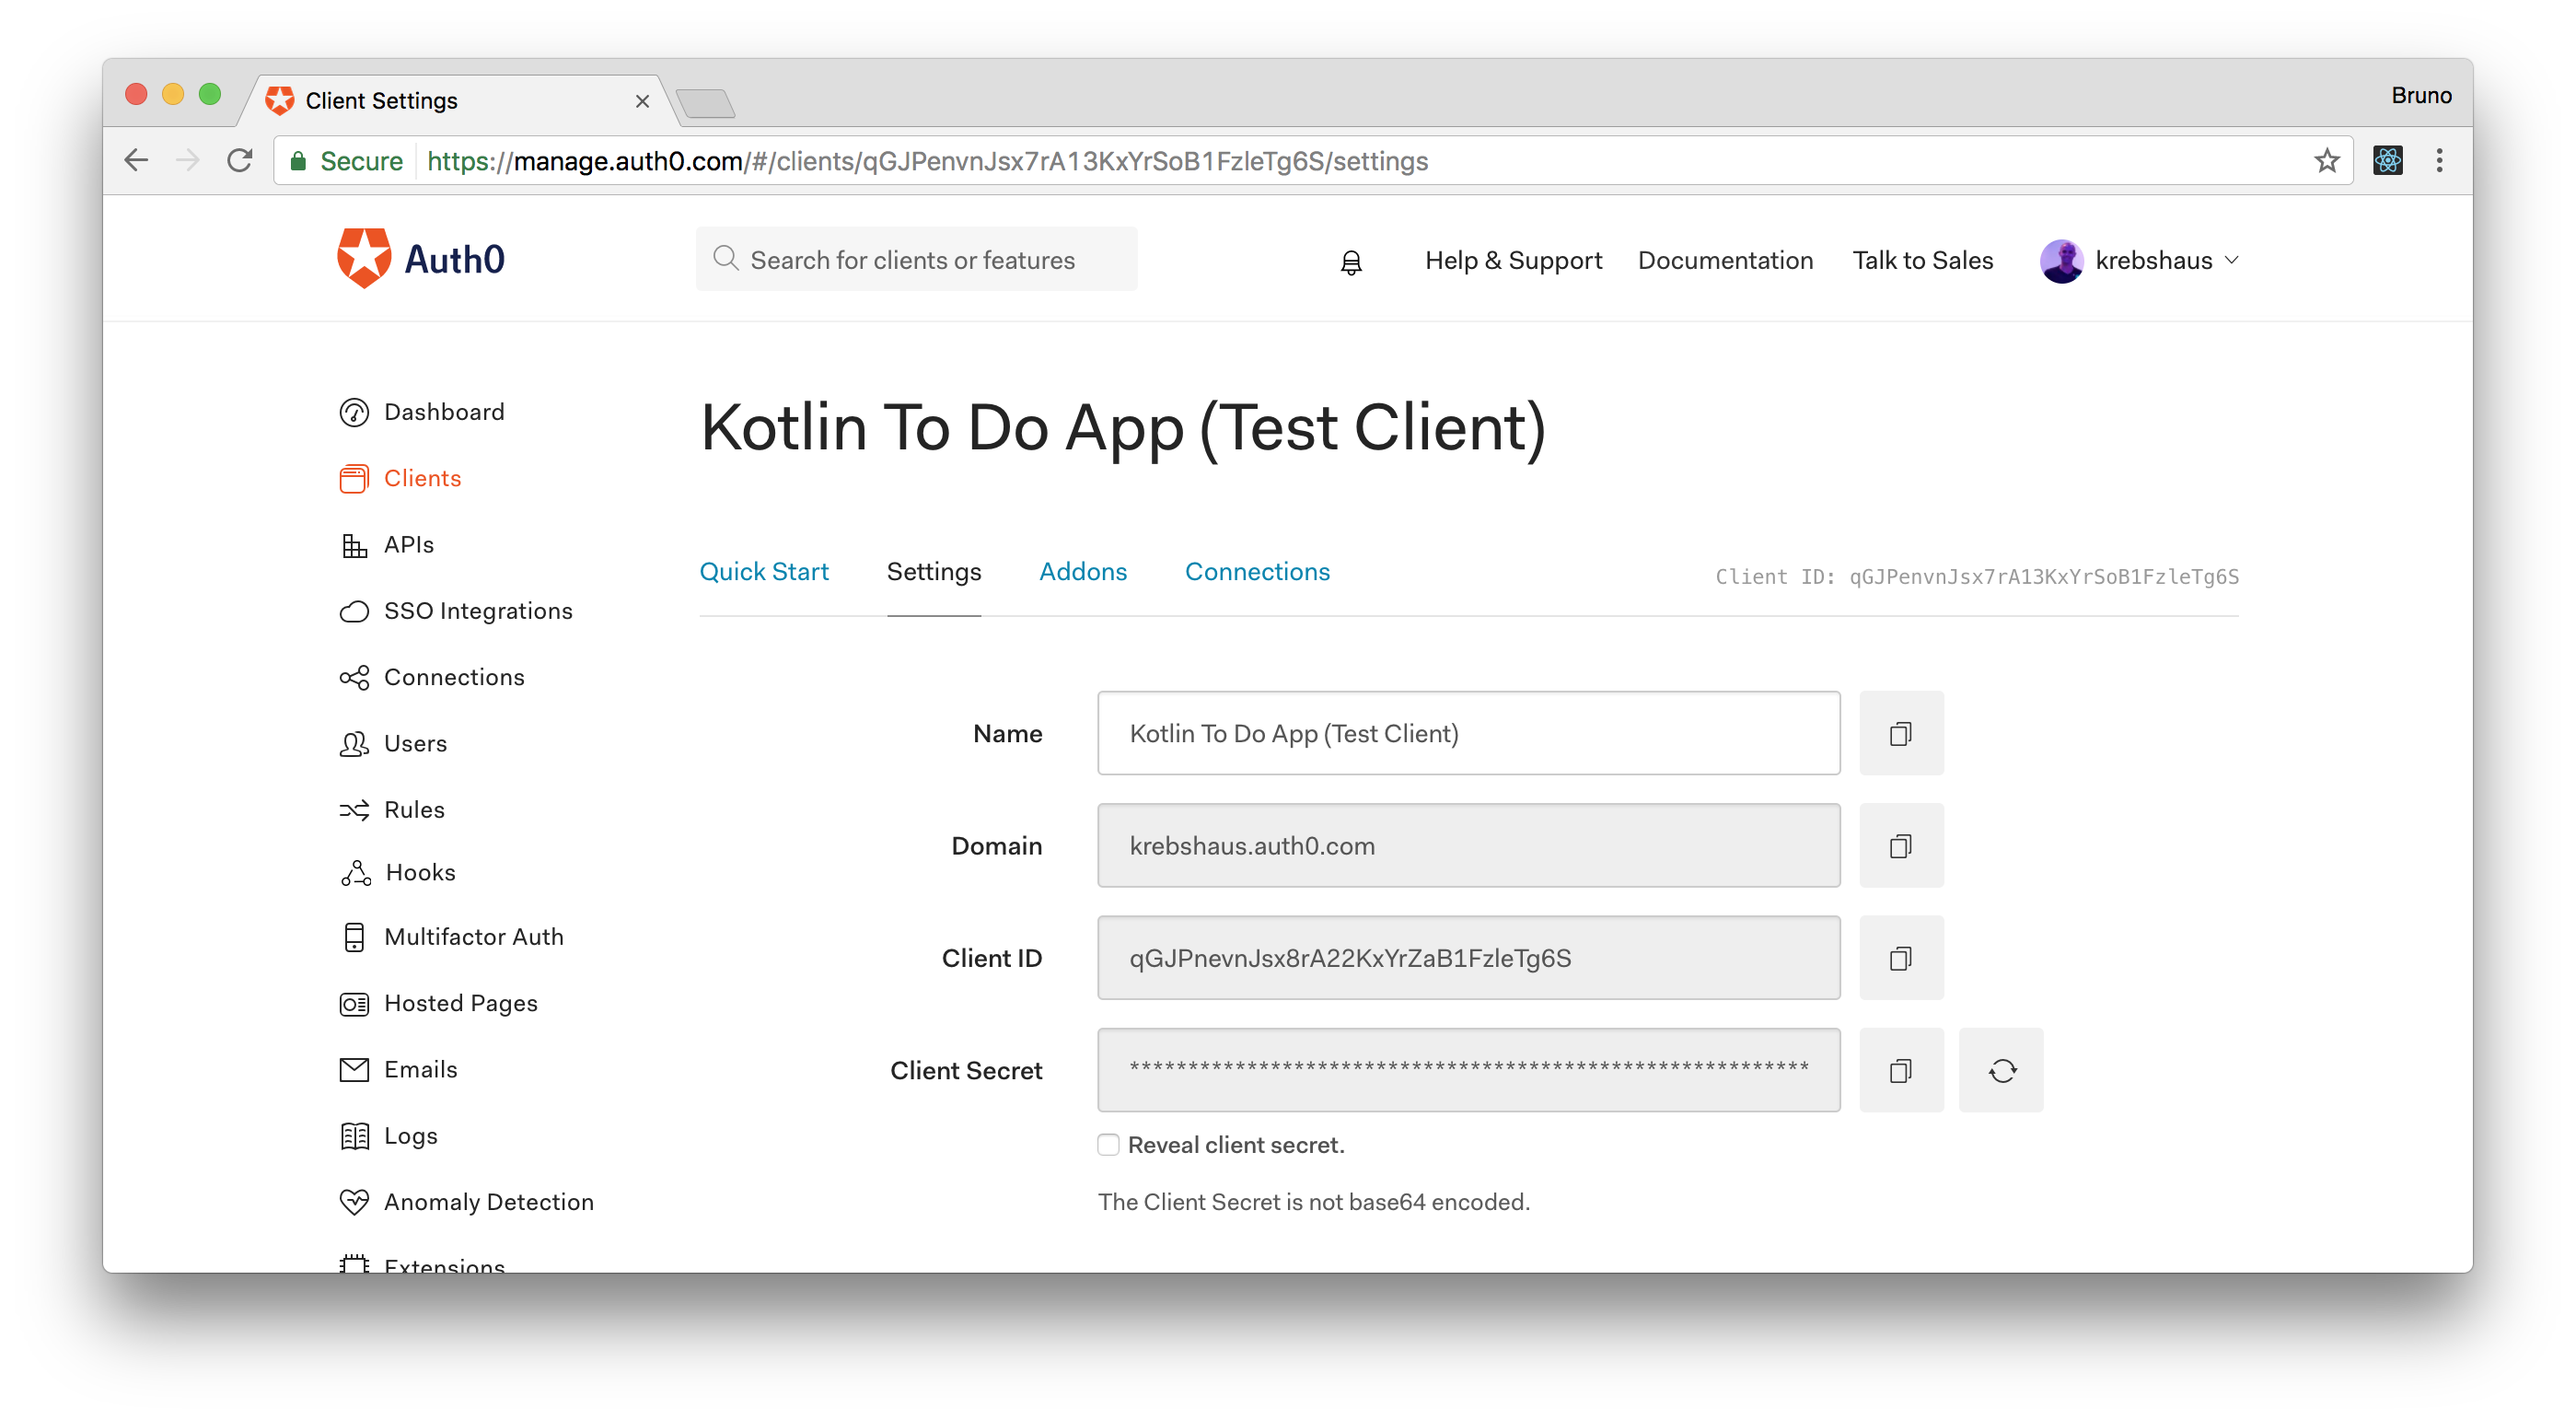
Auth0 will also create a test client when we finish creating our API. If we head to the Clients menu we will see a client called Kotlin To Do App (Test Client). Let's access this client to copy the Domain value from it.
With this value, we will be able to run our RESTful API. In the root directory of the cloned repository, let's issue the following commands:
export AUTH0_AUDIENCE=kotlin-todo-app
export AUTH0_DOMAIN=krebshaus.auth0.com
export AUHT0_ALGORITHM=RS256

node index
Be aware that the values exported above refer to my own account at Auth0. Your value for the AUTH0_DOMAIN environment variable will diverge for sure. The other two values, AUTH0_AUDIENCE and AUHT0_ALGORITHM, will be the same as mine, if you didn't change anything while configuring the API.
After running the last command, node index, our RESTful API will be up and running. We can issue two simple requests to test it:
# get to-do items
curl http://localhost:8080
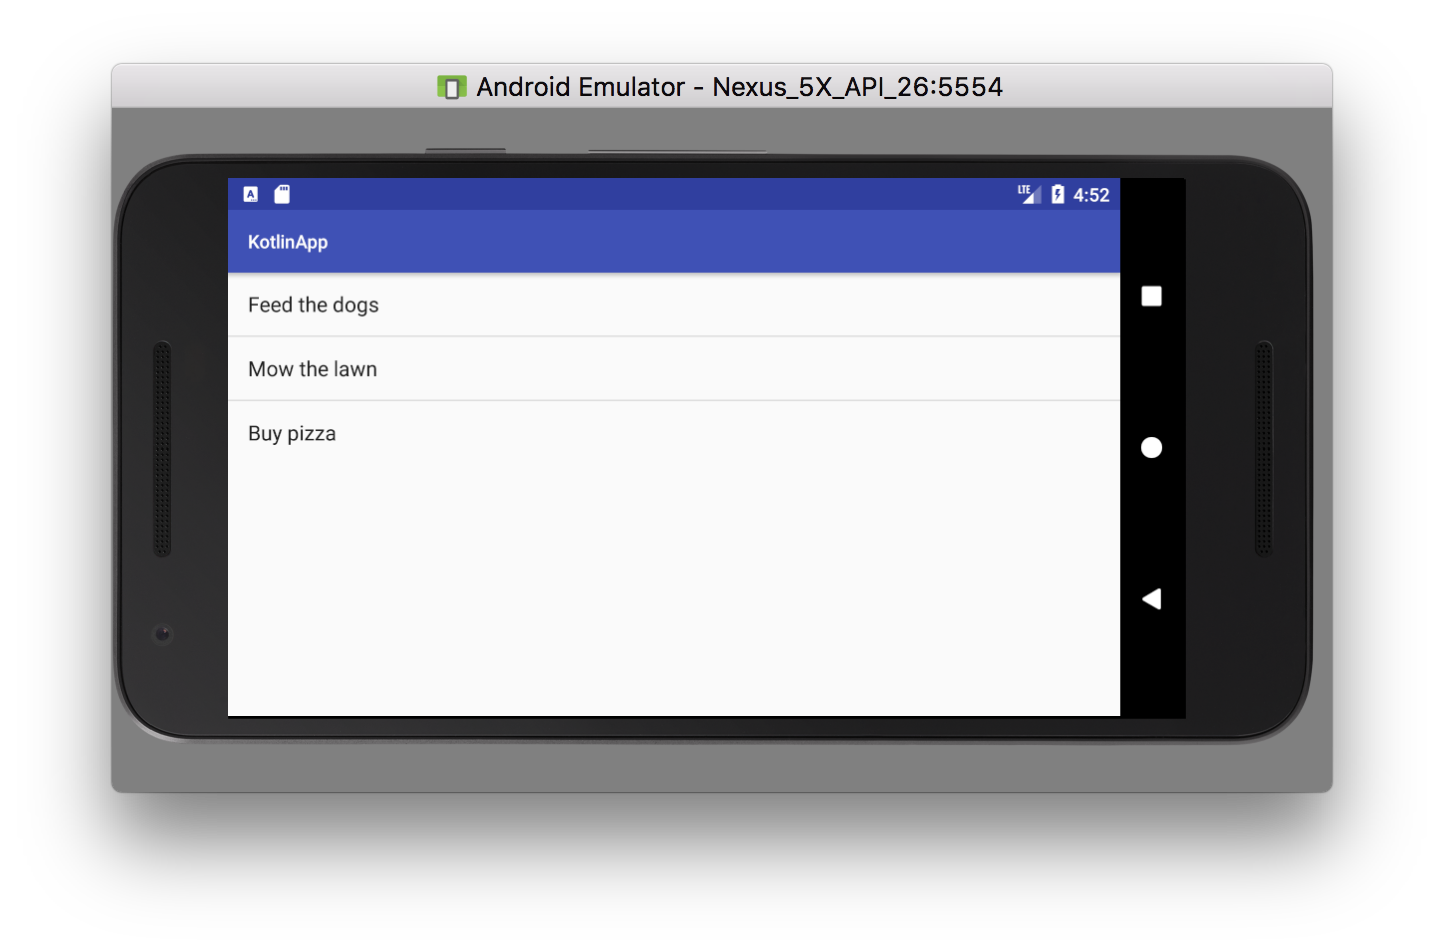
# which will result on: ["Feed the dogs","Mow the lawn","Buy pizza"]
# try to post a new item without an authorization token
curl -d 'new item' -X POST -v http://localhost:8080
# which will result on a 401 status code (unauthorized)
Consuming the RESTful API With Kotlin
To start developing our Kotlin to-do application for Android, we are going to tackle the communication with the backend first. To interact with our RESTful API, we are going to make three changes in our project. First, we will need to add a dependency to Volley. This can be achieved by changing the ./app/build.gradle file like that:
// ...

dependencies {
    // ...
    compile 'com.android.volley:volley:1.0.0'
}

// ...
The second change that we will need is to explicitly define that our Android app will use internet connection. This will be done by editing the ./app/src/main/AndroidManifest.xml file as follows:
<?xml version="1.0" encoding="utf-8"?>
<manifest xmlns:android="http://schemas.android.com/apk/res/android"
    package="com.auth0.samples.kotlinapp">

    <uses-permission android:name="android.permission.INTERNET" />

    <!-- ... application definition -->

</manifest>
After defining the dependency to Volley and that our app needs permission to use the internet, we will create a utility class that will handle all the interaction with our backend. We will define this class as a sibling to the MainActivityclass, calling it ToDoAPIUtils.kt, with the following code:
package com.auth0.samples.kotlinapp

import android.app.Activity
import android.widget.ArrayAdapter
import android.widget.ListView
import android.widget.Toast
import com.android.volley.Request
import com.android.volley.RequestQueue
import com.android.volley.Response
import com.android.volley.toolbox.JsonArrayRequest
import org.json.JSONArray

val ENDPOINT = "http://10.0.2.2:8080/"

fun getItems(activity: Activity, queue: RequestQueue, listView: ListView) {
    val jsonArrayRequest = JsonArrayRequest(Request.Method.GET, ENDPOINT, null,
            Response.Listener<JSONArray> { response ->
                val list = ArrayList<String>()

                (0 until response.length()).mapTo(list) {
                    response[it].toString()
                }

                val adapter = ArrayAdapter(activity,
                        android.R.layout.simple_list_item_1, list)
                listView.adapter = adapter
            },
            Response.ErrorListener { error ->
                Toast.makeText(
                        activity.applicationContext,
                        error.toString(),
                        Toast.LENGTH_SHORT).show()
            }
    )
    //add getItems to queue
    queue.add(jsonArrayRequest)
}
This file contains a single function (for now) that will issue GET requests to the backend and populate a ListView with the response. Note that in Kotlin, functions can be declared at the top level in a file, meaning you do not need to create a class to hold a function.
Another important aspect of the code above is that the ENDPOINT is hard-coded to http://10.0.2.2:8080/. This URL refers to the RESTful API that we have started before so, if you are not using an emulator, you might need to change this value to the IP address of your computer on your local network.
Rendering To-Do Items
As we already have the function that will retrieve items from our backend, we will use it to render them to the user. Since the list of items is publicly available, we are going to show it on the first view, the activity_main.xml layout that is referenced by the MainActivity. Let's define the contents of this file as follows:
<?xml version="1.0" encoding="utf-8"?>
<LinearLayout android:orientation="vertical"
    android:layout_width="match_parent"
    android:layout_height="match_parent"
    xmlns:android="http://schemas.android.com/apk/res/android">

    <ListView xmlns:android="http://schemas.android.com/apk/res/android"
        android:id="@+id/list_todo"
        android:layout_width="wrap_content"
        android:layout_height="wrap_content" />

</LinearLayout>
Afterwards, we will update the MainActivity with the following code:
package com.auth0.samples.kotlinapp

import android.os.Bundle
import android.support.v7.app.AppCompatActivity
import android.widget.ListView
import com.android.volley.toolbox.Volley

class MainActivity : AppCompatActivity() {

    override fun onCreate(savedInstanceState: Bundle?) {
        super.onCreate(savedInstanceState)
        setContentView(R.layout.activity_main)

        // setting up a Volley RequestQueue
        val queue = Volley.newRequestQueue(this)

        // getting a reference for the ListView
        val listToDo = findViewById(R.id.list_todo) as ListView

        // passing the activity, the queue and the ListView to the function
        // that consumes the RESTful endpoint
        getItems(this, queue, listToDo)
    }
}
This is the last change that we need to make on our application to see the list of to-do items. Let's run the app on the emulator (or on our own device) to see it.
Securing Kotlin App With Auth0
As we already rendered the public list of to-do items in our app, we are now going to work on the authentication layer. This will enable our users to log into our app (and sign up as well), which will generate a JWT (JSON Web Token). This JWT, called access_token, will be validated by our backend to allow or deny users to add new items to the to-do list.
To integrate our app with Auth0, we need to add a dependency to this open-source library. We do this by changing the ./app/build.gradle file as follows:
// ...

android {
    // ...
    dataBinding {
        enabled = true
    }
}

dependencies {
    // ...
    kapt 'com.android.databinding:compiler:3.0.0-alpha4'
    compile 'com.auth0.android:auth0:1.8.0'
}

// ...
Besides adding the new dependency, we have also configured our application to use data binding, which will be used to define when certain components must be rendered or hidden.
After that, we will modify the MainActivity and its layout to add a button that, when clicked, starts the authentication process. Let's start by adding the authentication button in the app/src/main/res/layout/activity_main.xmlfile, which will end up as follows:
<?xml version="1.0" encoding="utf-8"?>
<layout xmlns:android="http://schemas.android.com/apk/res/android">

    <data>
        <import type="android.view.View" />
        <variable name="loggedIn" type="java.lang.Boolean" />
    </data>

    <LinearLayout android:layout_width="match_parent"
        android:layout_height="match_parent"
        android:orientation="vertical">

        <Button android:id="@+id/login_button"
            android:layout_width="match_parent"
            android:layout_height="wrap_content"
            android:text="Please, identify yourself."
            android:visibility="@{loggedIn ? View.GONE : View.VISIBLE}" />

        <ListView android:id="@+id/list_todo"
            android:layout_width="wrap_content"
            android:layout_height="wrap_content" />

    </LinearLayout>
</layout>
(We would usually define labels and static texts in the strings.xmlfile. However, to simplify the tutorial, we will leave them defined in the layout file.)
We had to change the main element on this file to layout to correctly define a loggedIn variable. This variable is used in this layout to hide the login button when the user is successfully identified. Its value will be managed (and bound) by the MainActivity class.
Let's focus now on updating the MainActivity class to integrate it with Auth0's library and also to control the state of the loggedIn variable:
package com.auth0.samples.kotlinapp

import android.app.Dialog
import android.content.Intent
import android.databinding.DataBindingUtil
import android.os.Bundle
import android.support.v7.app.AppCompatActivity
import android.widget.ListView
import android.widget.Toast
import com.android.volley.toolbox.Volley
import com.auth0.android.Auth0
import com.auth0.android.authentication.AuthenticationException
import com.auth0.android.provider.AuthCallback
import com.auth0.android.provider.WebAuthProvider
import com.auth0.android.result.Credentials
import com.auth0.samples.kotlinapp.databinding.ActivityMainBinding

class MainActivity : AppCompatActivity() {

    var binding: ActivityMainBinding? = null

    override fun onCreate(savedInstanceState: Bundle?) {
        super.onCreate(savedInstanceState)
        setContentView(R.layout.activity_main)

        // setting up a Volley RequestQueue
        val queue = Volley.newRequestQueue(this)

        // referencing the binding object of the view
        binding = DataBindingUtil.setContentView(this, R.layout.activity_main)

        // loggedIn should be false by default to show the button
        binding?.loggedIn = false

        // getting a reference for the ListView
        val listToDo = findViewById(R.id.list_todo) as ListView

        // passing the activity, the queue and the ListView to the function
        // that consumes the RESTful endpoint
        getItems(this, queue, listToDo)

        // triggering the login method when the button is clicked
        val loginButton = findViewById(R.id.login_button)
        loginButton.setOnClickListener { login() }
    }

    // Auth0 triggers an intent on a successful login
    override fun onNewIntent(intent: Intent) {
        if (WebAuthProvider.resume(intent)) {
            return
        }
        super.onNewIntent(intent)
    }

    private fun login() {
        val account = Auth0(getString(R.string.auth0_client_id), getString(R.string.auth0_domain))
        account.isOIDCConformant = true

        WebAuthProvider.init(account)
                .withScheme("demo")
                .withAudience("kotlin-todo-app")
                .start(this, object : AuthCallback {
                    override fun onFailure(dialog: Dialog) {
                        runOnUiThread { dialog.show() }
                    }

                    override fun onFailure(exception: AuthenticationException) {
                        runOnUiThread {
                            Toast.makeText(
                                    this@MainActivity, "Ops, something went wrong!",
                                    Toast.LENGTH_SHORT).show()
                        }
                    }

                    override fun onSuccess(credentials: Credentials) {
                        CredentialsManager.saveCredentials(this@MainActivity, credentials)
                        binding?.loggedIn = true
                    }
                })
    }
}
The onCreate function was changed to get a reference to the binding object related to the layout, in order to initialize the loggedIn variable as false, and to set the listener to the loginButton. The login function, which is called when the user clicks on the login button, triggers the WebAuthProvider component exposed by Auth0's library. This component has to be initialized with an instance of Auth0, which depends on the Client ID of the Kotlin To Do App (Test Client)and on our Auth0 domain. This is the same domain that we exported as an environment variable before running the backend application.
Both of these properties, auth0_client_id and auth0_domain, are read from the strings.xml file. Let's open this file and add them with the values that we find in the Kotlin To Do App (Test Client) that was created for us on Auth0:
<resources>
    <string name="app_name">KotlinApp</string>
    <!-- replace the values with yours account details -->
    <string name="auth0_client_id">4gDhRaCvv2ESmAlL0JAtYX3SD8OkFoi3</string>
    <string name="auth0_domain">krebshaus.auth0.com</string>
</resources>
Back to the modifications made to the MainActivity class, it is important to note that we also configured WebAuthProvider to:
- Use a
demoschema, which will help Android to trigger our app when a link starting withdemo://is called - Use the
kotlin-todo-appaudience, which is the name of the API that we've created on Auth0 management tool.
The start function of WebAuthProvider expects an implementation of AuthCallback to handle the results of the sign-in and sign-up attempts. To define our implementation we have created an inline class that, when an error occurs, we just render a Toast message saying that "something went wrong". And when the sign-in or sign-up process succeeds, we save the credentials to the CredentialsManager. This manager is not part of the library provided by Auth0, we actually have to implement it.
The CredentialsManager will have two responsibilities: to hold the credentials of the logged-in user; and to provide a method to retrieve the access_token of this user. We will also create this class as a sibling to MainActivity, naming it as CredentialsManager.kt. This class will contain the following code:
package com.auth0.samples.kotlinapp

import android.content.Context
import com.auth0.android.result.Credentials

object CredentialsManager {
    private val PREFERENCES_NAME = "auth0"
    private val ACCESS_TOKEN = "access_token"

    fun saveCredentials(context: Context, credentials: Credentials) {
        val sp = context.getSharedPreferences(
                PREFERENCES_NAME, Context.MODE_PRIVATE)

        sp!!.edit().putString(ACCESS_TOKEN, credentials.accessToken)
                .apply()
    }

    fun getAccessToken(context: Context): String {
        val sp = context.getSharedPreferences(
                PREFERENCES_NAME, Context.MODE_PRIVATE)

        return sp!!.getString(ACCESS_TOKEN, null)
    }
}
Notice that we start the definition of this class with object instead of class. This is the idiomatic way to define singletons in Kotlin.
To wrap the changes in our project, we need to register an intent filter inside our main activity's tag and make this activity to be launched as a single task. Let's open ./app/src/main/AndroidManifest.xml and replace it with the following contents:
<?xml version="1.0" encoding="utf-8"?>
<manifest xmlns:android="http://schemas.android.com/apk/res/android"
    package="com.auth0.samples.kotlinapp">

    <uses-permission android:name="android.permission.INTERNET" />

    <application
        android:allowBackup="true"
        android:icon="@mipmap/ic_launcher"
        android:label="@string/app_name"
        android:roundIcon="@mipmap/ic_launcher_round"
        android:supportsRtl="true"
        android:theme="@style/AppTheme">
        <activity android:name=".MainActivity"
                  android:launchMode="singleTask">
            <intent-filter>
                <action android:name="android.intent.action.MAIN" />

                <category android:name="android.intent.category.LAUNCHER" />
            </intent-filter>

            <intent-filter>
                <action android:name="android.intent.action.VIEW" />

                <category android:name="android.intent.category.DEFAULT" />
                <category android:name="android.intent.category.BROWSABLE" />

                <data
                    android:host="@string/auth0_domain"
                    android:pathPrefix="/android/com.auth0.samples.kotlinapp/callback"
                    android:scheme="demo" />
            </intent-filter>
        </activity>
    </application>

</manifest>
Before testing the integration with Auth0, we need to go back to the Clients page in the management tool and do two modifications. First, we have to configure the Allowed Callback URLs option of our client to accept the following url:
demo://krebshaus.auth0.com/android/com.auth0.samples.kotlinapp/callback
Of course, krebshaus.auth0.com domain in this URL must be changed accordingly to your domain on Auth0.
Second, we have to change the Client Type to Native to enable PKCE.
Running our app now will show the list of to-do items, and above it the login button saying Please, Identify Yourself.. If we click it, we will see the default sign-in & sign-up screen of Auth0.

Using Access Tokens to Interact with the Backend
We have successfully integrated our Kotlin app with Auth0 and managed to get an access_token back from it. We will now focus on using this token to communicate with the backend. We will start by adding an EditText and another Button on the layout of the MainActivity, and then we will use both of them to add new items to the to-do list. To add these elements in our layout, let's open the activity_main.xml file and insert them as the first children of the LinearLayout element:
<?xml version="1.0" encoding="utf-8"?>
<layout xmlns:android="http://schemas.android.com/apk/res/android">
    <!-- ... data element with import and variable -->
    <LinearLayout android:layout_width="match_parent"
        android:layout_height="match_parent"
        android:orientation="vertical">
        <EditText
            android:id="@+id/item"
            android:layout_width="match_parent"
            android:layout_height="wrap_content"
            android:inputType="text"
            android:labelFor="@+id/item"
            android:visibility="@{loggedIn ? View.VISIBLE : View.GONE}" />

        <Button
            android:id="@+id/add_item"
            android:layout_width="match_parent"
            android:layout_height="wrap_content"
            android:text="Add item"
            android:visibility="@{loggedIn ? View.VISIBLE : View.GONE}" />
        <!-- ... login_button and list_todo remain untouched -->
    </LinearLayout>
</layout>
Both elements are going to be shown only if the user is loggedIn, as defined in their android:visibility properties. We can now add a listener, that will trigger a POST request to the backend, to the new button. We achieve that by changing the MainActivity as follows:
package com.auth0.samples.kotlinapp

// ...
import android.widget.EditText

class MainActivity : AppCompatActivity() {

    // ...

    override fun onCreate(savedInstanceState: Bundle?) {
        // ...

        val addItemButton = findViewById(R.id.add_item)
        val itemEditText = findViewById(R.id.item) as EditText
        addItemButton.setOnClickListener {
            val item = itemEditText.text.toString()
            addItem(queue, item, CredentialsManager.getAccessToken(this), {
                itemEditText.text.clear()
                Toast.makeText(this, "Item added", Toast.LENGTH_SHORT).show()
                getItems(this, queue, listToDo)
            })
        }
    }

    // ...
}
The listener of this button makes a call to addItem, which is a function that we still have to create. This function will be responsible for dispatching the POST HTTP request to the backend, with the access_token of the user. Let's create it in the ToDoAPIUtils class:
// ...
import android.util.Log
import com.android.volley.AuthFailureError
import com.android.volley.toolbox.StringRequest

// ...

fun addItem(queue: RequestQueue, item: String, accessToken: String, done: () -> Unit) {
    val postRequest = object : StringRequest(Request.Method.POST, ENDPOINT,
            Response.Listener<String> {
                done()
            },
            Response.ErrorListener {
                error -> Log.w("APIRequest", error.toString())
            }
    ) {
        @Throws(AuthFailureError::class)
        override fun getBody(): ByteArray {
            return item.toByteArray()
        }

        @Throws(AuthFailureError::class)
        override fun getHeaders(): Map<String, String> {
            val headers: Map<String, String> = hashMapOf(
                    "Authorization" to "Bearer $accessToken",
                    "Content-Type" to "text/plain"
            )
            return headers
        }
    }
    //add POST REQUEST to queue
    queue.add(postRequest)
}
The addItem function that we defined above makes use of the StringRequestclass provided by Volley. First, we instruct this class to behave as a POST request to the backend ENDPOINT (our RESTful API's URL). Then we define two listeners: one for a successful request, and the other for a failure (where we just log what went wrong).
If everything works as expected we trigger the done callback, which is the last parameter accepted by the addItem function. Yeah, we can easily pass callback functions like this in Kotlin. This callback, which we defined in the last change to the MainActivity class, is responsible for updating the list of to-do items after a successful POST request.
We also overwrote two methods of the StringRequest class:
- The
getBodyfunction to send the item (typed by the user) as a string in the body of the POST request. - The
getHeadersfunction to mark theContent-Typeof the request astext/plain, and to add theaccess_tokenof the authenticated user.
These changes are everything that we need in our Kotlin app to properly communicate with the secured RESTful endpoint. Now, whenever a user types an item in the text input, our Kotlin app sends a request to the backend with the item and the access_token. The backend then gets this access_token, validates it against a public key provided by Auth0 and then adds the item received to the to-do list.
If we run our application now, we will be able to use all its features. We will be able to see the public (read-only) list of to-do items and then, if we authenticate ourselves, we will be able to update this list.
Building a Home Made Security Solution
In case we don't want to rely on state-of-the-art features provided by Auth0, we can also develop our home made security solution with JWTs. We won't get into the nitty-gritty details of the refactoring process, but here is an overview of the steps needed to grow our own solution:
- We would need to refactor our RESTful API to generate the
access_tokentoken for us, instead of only validating it. - We would also need to refactor the backend to accept new sign ups, password retrieval and so on (features that Auth0 provides by default)
- We would need to add an activity, in our Kotlin app, to handle sign in and sign up.
- We would need to add another activity to handle password retrieval.
The changes to the Kotlin app wouldn't be that hard if we avoid advanced features like integrations with Active Directory and social providers (which are all trivial with Auth0). Regarding the backend refactoring, Auth0's blog provides many articles that address home made solutions on different languages and platforms, like:
You can check these resources if you need to develop your own solution.
Conclusion
Developing a secure Android application with Kotlin is trivial, as we managed to see in this blog post. If you had no previous Kotlin knowledge, chances are that you had no trouble following along. Kotlin integration with existing Java libraries and frameworks make the process of learning it smooth. But, to use this language to its full power, a good amount of coding hours and studying is needed.
Furthermore, we also had a chance to see that securing Kotlin mobile applications with JWTs is easy. When we rely on a trustworthy identity management provider as Auth0, things become even more smooth and secure. We didn't have to implement our own sign in and sign up features on the mobile app, not even on our backend. We just configured a few things on our free Auth0 account, and integrated an open-source library with our app.
By using Auth0, we can also rest assured that if we need to enhance our app security with Multifactor Authentication, add a Breached Password Detection feature, or integrate with other identity manager providers like Facebook or SAML, the process will be smooth and well documented as well.
Published at DZone with permission of Bruno Krebs. See the original article here.
Opinions expressed by DZone contributors are their own.
Comments