Implement OAuth 2.0 Easily with Spring Boot and Spring Security
Join the DZone community and get the full member experience.
Join For Free
In this tutorial, you’ll migrate Spring Boot with OAuth 2.0 support from version 1.5.x to 2.1.x. Spring Boot 2.1.x promotes OpenID Connect to a first-class citizen in the stack, making implementation more accessible than ever. We’ll start with integrating Okta’s OAuth service using Spring Boot 1.5.19 and Spring Security 4.2.x and then replicate the same motion using Spring Boot 2.1.3 and Spring Security 5.1. To make the process even simpler, we’ll minimize the code and configuration even further with Okta’s Spring Boot Starter with Spring Boot 2.1.3.
Three Minute Overview of OpenID Connect and OAuth 2.0
In the beginning, there were siloed web sites that didn’t talk to each other, and it was sad.
Sites like Yelp started wanting access to the contact information you had in your Google Contacts. So, Yelp naturally collected your Google username and password so that it could access your contacts. You gave Yelp your permission, so this was all good, Yes? No!
With your username and password, Yelp could access your email, your docs —everything you had in Google — not just your contacts. And, worse, Yelp had to store your password in a way that it could use it in plaintext, and there was no standard way to revoke your consent to Yelp to access your Google account.
We needed an authorization framework that would allow you to grant access to certain information without you giving up your password — cue OAuth.
Three revisions later, we’re at OAuth 2.0 (there was 1.0 and 1.0a before it), and all’s right with the world. Now, an application like Yelp (a Client Application) can request an Access Token from a service like Google (an Authorization Server).
You (the Resource Owner) log into Google with your credentials and give your Consent to Yelp to access your contacts (and only your contacts). Access Token in hand, Yelp makes a request of the Google Contacts API (the Resource Server) and gets your contacts. Yelp never sees your password and never has access to anything more than you’ve consented to. And, you can withdraw your consent at any time.
In this new world of consent and authorization, only one thing was missing: identity. Cue OpenID Connect. OIDC is a thin layer on top of OAuth 2.0 that introduces a new type of token: the Identity Token. Encoded within these cryptographically signed tokens in JWT format, is information about the authenticated user. This opened the door to a new level of interoperability and Single SignOn.
OAuth (and by extension OIDC) use a number of defined Flows to manage the interactions between the Client App, the Authorization Server and the Resource Server. In this post, you’ll focus on the Authorization Code Flow. This flow is meant to be kicked off from your browser and goes like this:
- Yelp wants access to your contacts. It presents a button to link your Google Contacts.
- When you click the button, you’re redirected to Google where you log in with your username and password (if you’re not already logged in).
- Google shows you a screen telling you that Yelp would like read-only access to your contacts.
- Once you give your consent, Google redirects back to Yelp, via your browser, with a temporary code (called an authorization code).
- Using this code, Yelp contacts Google to trade it for an Access Token.
- Google validates the code and if all checks out, issues an Access Token with limited capabilities (read-only access to your contacts) to Yelp.
- Yelp then presents the Access Token to the Google Contacts API.
- Google Contacts API validates the token and, if the request matches the capabilities identified by the token, returns your contact list to Yelp.
OAuth 2.0 and Spring Boot
The Spring Framework is in its 17th year. The Spring Framework and the many projects it encompasses (like Spring Security) is vast.
It’s fair to say that the engine at the heart of Spring and its many projects is configuration. Spring Boot brought the concept of “convention over configuration” to the world of Spring so that you could get a production-ready application up and running very quickly. It does this through an opinionated auto-configuration system (which you can override if need be).
Spring Security formalizes the approach to authentication and authorization in the Spring Framework.
OAuth and OIDC are a natural fit for the Spring Security constructs and, in the latest version of Spring Boot (version 2.1.3 as of this writing) and Spring Security (version 5.1.4 as of this writing), these standards are now first-class citizens.
If you’ve been using Spring Boot 1.5.x for OAuth and OIDC, you’ll need to do a little migration work to come into the new world of Spring Boot 2.1.x, but it’s worth it.
In the example code that you walk through in the migration path, you integrate with Okta’s OAuth and OIDC services. However, you could follow this guide for any OAuth and OIDC compliant provider.
Configure OpenID Connect
Okta makes it a snap to configure OIDC and OAuth 2.0 for your applications. All you have to do is provide some basic information, and Okta does all the heavy lifting. It’s OaaS! (OAuth as a Service).
Get Okta set up with OIDC and OAuth 2.0 for the Spring Boot examples found in the code. You only need to do this configuration once for use in each of the three code examples.
First, head on over and create yourself a free developer Okta organization. Follow the instructions to activate your organization.
Create an OIDC Application in Okta
Click Applications from your Okta Admin UI menu.

Click Add Application and click the Web option.
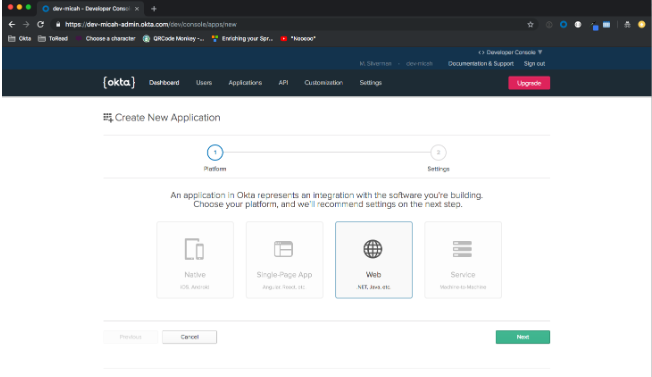
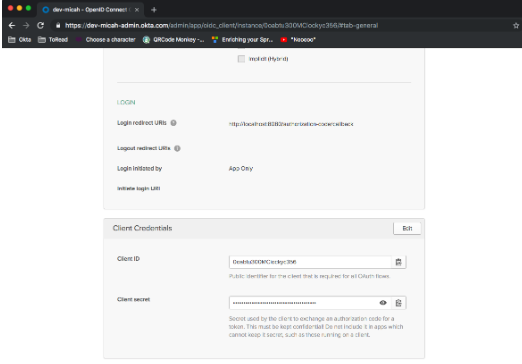
Click Next. Enter a Name for the app. Change the value for Login Redirect URIs to: http://localhost:8080/login/oauth2/code/okta. Add another Login Redirect Uri: http://localhost:8080/login. Leave all the other default values.
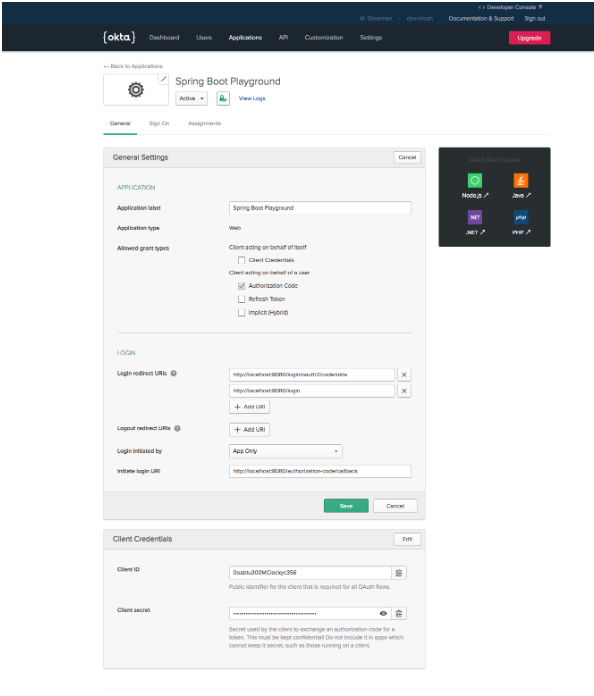
NOTE: You add two different login redirect uris to support the different versions of Spring Boot. In the 2.1.x version, you’d use: http://localhost:8080/login/oauth2/code/okta.
Click Done. Scroll down and capture the Client ID and the Client Secret values.
That’s it! Four steps. Not too bad.
Play the Spring Boot OpenID Connect and OAuth 2.0 Game
The code example is broken up into three maven modules: oauth2-demo-1.5, oauth2-demo-2.1, and okta-oauth2-demo-2.1. These are wholly enclosed examples that do not have parent relationships between them. They do each have the right version spring-boot-starter-parent for that example. This makes the pom.xml files more verbose than necessary, but it makes it so that you can run each version of the Client Application and each version of the Resource Server completely standalone. You could even use different JVM versions for each.
Each version of the example code has four primary files
pom.xml- identifies dependenciesapplication.yml- required configuration for OIDC & OAuthDemoApplication.java- the Client ApplicationDemoResourceServer.java- the Resource Server
In each case, I set a goal of minimizing dependencies, configuration, and annotations to get the job done. Also, application code, controller code, and configuration code are artificially included in single files. This was to keep the example clear and concise. In a real-world application, you would separate these concerns into their own classes.
When you launch the DemoApplication, it will be listening on http://localhost:8080. When you launch the ResourceServer, it will be listening on http://localhost:8081.
By default, Spring Security protects all paths (whether you’re using OIDC and OAuth, or not). When you first navigate to the DemoApplication at http://localhost:8080/, you’re redirected to Okta to authenticate. You’re then redirected back and you’ll see your full name in your browser.
Next, if you navigate to http://localhost:8080/api, the Client Application will make an API call to the Resource Server using the Access Token that was set when you authenticated above. This is all done behind the scenes. In your browser, you’ll see a response indicating that you were able to access a protected resource. And, for good measure, you could try navigating directly to http://localhost:8081/api. You should see that request fail as there is no access token.
Take a look at the differences amongst each version of the code.
Delving the Spring Boot Resource Server Code
In each of the examples, the Resource Server code is nearly identical:
public class OAuth2DemoResourceServer_1_5 {
public static void main(String[] args) {
SpringApplication app = new SpringApplication(OAuth2DemoResourceServer_1_5.class);
app.setDefaultProperties(Collections.singletonMap("server.port", "8081"));
app.run(args);
}
("/api")
String api() {
return "Made it to protected api on resource server!";
}
}
Looking at this code alone - without the context of dependencies and configuration - you might be inclined to think that it’s just a regular old REST controller. But, it hooks into the OAuth framework thanks to those dependencies and configuration.
The one big difference in the code is that for the Spring Boot 1.5.x version, you need to include the @EnableResourceServer annotation on the class. In the Spring Boot 2.1.x versions, you do not need that annotation.
The rest of the differences are in dependencies and configuration and will be covered below.
Using Spring Boot 1.5.x, Spring Security 4.2.x, and OAuth 2.0
This version of Spring Boot and Spring Security went a long way to make working with OAuth 2.0 civilized. You see below that there’s not too much to it. It gets even better in the new release!
Resource Server Dependencies and Configuration
Take a look at the pom.xml file for the Resource Server:
xxxxxxxxxx
<dependencies>
<dependency>
<groupId>org.springframework.boot</groupId>
<artifactId>spring-boot-starter-security</artifactId>
</dependency>
<dependency>
<groupId>org.springframework.boot</groupId>
<artifactId>spring-boot-starter-web</artifactId>
</dependency>
<dependency>
<groupId>org.springframework.security.oauth</groupId>
<artifactId>spring-security-oauth2</artifactId>
</dependency>
</dependencies>
As you can see, Spring Security 4.2.x has OAuth2 support as a secondary dependency.
Take a look at the application.yml configuration file:
xxxxxxxxxx
security
oauth2
client
clientIdokta client id
clientSecretokta client secret
resource
tokenInfoUrihttps//yourOktaDomain.okta.com/oauth2/default/v1/introspect
All that’s required is a clientId, a clientSecret and a tokenInfoUri.
Okta uses JWTs for access tokens. This means that you could validate the JWT locally be (a) obtaining the public key that matches the private key used to sign it and (b) parsing the values out of the payload of the JWT (like, when it expires).
However, with Spring Boot 1.5, that requires additional configuration and additional code. So, to keep everything as simple as possible, this version of the Resource Server uses an Introspect request instead. The impact of this choice, though, is that the Resource Server makes an API call to Okta every time it gets a request in order for Okta to validate the access token.
You’ll see in the other examples that JWT handling is built-in and easier to configure and manage. Also, it’s worth noting that previous versions of the Okta Spring Boot Starter included support for validating and parsing JWT access tokens, so if you must use Spring Boot 1.5.x, take a look at the matching version of the Okta Spring Boot Starter.
Client Application Dependencies, Configuration, and Code
The Client Application has the same three dependencies as the Resource Server: spring-boot-starter-security, spring-boot-starter-web, and spring-security-oauth2.
Here’s the application.yml file:
xxxxxxxxxx
security
oauth2
client
clientIdokta client id
clientSecretokta client secret
accessTokenUrihttps//yourOktaDomain.okta.com/oauth2/default/v1/token
userAuthorizationUrihttps//yourOktaDomain.okta.com/oauth2/default/v1/authorize
clientAuthenticationSchemeform
scopeopenid profile email
resource
userInfoUrihttps//yourOktaDomain.okta.com/oauth2/default/v1/userinfo
serverhttp//localhost8081
Here, you’re explicitly configuring each of the components required in the OAuth Authorization Code Flow. The userAuthorizationUri is where the Client Application will redirect to kick off the flow with the Authorization Server (Okta). Once Okta redirects with the temporary authorization code, the Client Application will use the accessTokenUri value to exchange the authorization code with the Authorization Server for an access token. The clientId and clientSecret are required for both of these interactions with the Authorization Server. The userInfoUri is used to obtain information about the authenticated user and requires the access token.
The value for server is a custom property used by the Client Application to identify where to access the Resource Server. It’s complete configuration coordinates are: security.oauth2.resource.server.
Take a look at the Client Application Code:
xxxxxxxxxx
public class OAuth2DemoApplication_1_5 {
("#{ @environment['security.oauth2.resource.server'] }")
private String resourceServerUrl;
private OAuth2ProtectedResourceDetails resource;
public OAuth2DemoApplication_1_5(OAuth2ProtectedResourceDetails resource) {
this.resource = resource;
}
public static void main(String[] args) {
SpringApplication.run(OAuth2DemoApplication_1_5.class, args);
}
("/")
String home(OAuth2Authentication authentication) {
return "Hello " + authentication.getName();
}
("/api")
String api(OAuth2Authentication authentication) {
return tokenRelayTemplate(authentication)
.getForObject(resourceServerUrl + "/api", String.class);
}
private OAuth2RestTemplate tokenRelayTemplate(OAuth2Authentication authentication) {
OAuth2AuthenticationDetails details =
(OAuth2AuthenticationDetails) authentication.getDetails();
OAuth2ClientContext context = new DefaultOAuth2ClientContext(
new DefaultOAuth2AccessToken(details.getTokenValue())
);
return new OAuth2RestTemplate(resource, context);
}
The @EnableOAuth2Sso annotation is necessary to hook into the spring-security-oauth2 library in this class.
The root mapping method - @GetMapping("/") - takes an OAuth2Authentication object as its parameter. The getName() displays the full name. The Authorization Code Flow will be kicked off automatically by Spring Security when you access this path.
In order to have the Client Application make an API call to the Resource Server, you make use of a RestTemplate. This is a mechanism to make RESTful API calls in general, and in this case, you use an OAuth2RestTemplate instance to be able to pass along the access token that was automatically (and internally) set as part of the Authorization Code Flow. Take a look at that in more detail.
The guts of the api method are nice and compact: return tokenRelayTemplate(authentication).getForObject(resourceServerUrl + "/api", String.class);
You pass the OAuth2Authentication object into the call to the private tokenRelayTemplate method and then from there, it’s just a standard RestTemplate.getForObject method call with the URL to your Resource Server’s API endpoint (http://localhost:8081/api).
The heavy lifting is done in the tokenRelayTemplate method. You cast the authentication.getDetails() method call (which returns an Object) to OAuth2AuthenticationDetails. This is the first “ding” in this code - the need to cast a method call result.
Once you have the OAuth2AuthenticationDetails object, you can use its getTokenValue() method to get the raw access token (in the case of Okta, this will be a JWT). This allows us to complete the creation of the OAuth2RestTemplate, and the access token will now automatically be sent in an HTTP Authorize header when the request of the Resource Server is made.
Using Spring Boot 2.1.x, Spring Security 5.1.x, and OAuth 2.0
With this version of Spring Boot and Spring Security, OAuth 2.0 and OpenID Connect are brought into the fold as first-class citizens. This changes the dependencies, configuration, and code - all for the better.
Resource Server Dependencies and Configuration
Here’s the pom.xml file:
xxxxxxxxxx
<dependencies>
<dependency>
<groupId>org.springframework.boot</groupId>
<artifactId>spring-boot-starter-security</artifactId>
</dependency>
<dependency>
<groupId>org.springframework.boot</groupId>
<artifactId>spring-boot-starter-oauth2-resource-server</artifactId>
</dependency>
<dependency>
<groupId>org.springframework.boot</groupId>
<artifactId>spring-boot-starter-web</artifactId>
</dependency>
</dependencies>
Once again you have three dependencies, but this time you get rid of the direct Spring Security oauth2 reference and instead use a formal Spring Boot Starter: spring-boot-starter-oauth2-resource-server. This gives us all of the sensible defaults and auto-configuration of other starters.
Next up is the application.yml configuration file:
xxxxxxxxxx
spring
security
oauth2
resourceserver
jwt
jwk-set-urihttps//yourOktaDomain.okta.com/oauth2/default/v1/keys
Well, this is a breath of terse fresh air! All your Resource Server needs is the jwks (JWT Key Set) endpoint. This endpoint returns a set of public keys that the Resource Server uses to validate the cryptographic signature of the access token.
This isn’t just a benefit from the perspective of a smaller configuration file. With the exact same code (minus the @EnableResourceServer annotation), you get the benefit of being able to validate the access token locally, alleviating the need for additional Introspect calls to the Authorization Server. Our Resource Server will snag the public key(s) once and then validate incoming access tokens locally - very efficient.
Client Application Dependencies, Configuration, and Code
Here’s the pom.xml file for the Client Application:
xxxxxxxxxx
<dependencies>
<dependency>
<groupId>org.springframework.boot</groupId>
<artifactId>spring-boot-starter-oauth2-client</artifactId>
</dependency>
<dependency>
<groupId>org.springframework.boot</groupId>
<artifactId>spring-boot-starter-webflux</artifactId>
</dependency>
<dependency>
<groupId>org.springframework.boot</groupId>
<artifactId>spring-boot-starter-security</artifactId>
</dependency>
<dependency>
<groupId>org.springframework.boot</groupId>
<artifactId>spring-boot-starter-web</artifactId>
</dependency>
</dependencies>
This time around, in addition to the spring-boot-starter-security and spring-boot-starter-web Spring Boot Starters, you have the spring-boot-starter-oauth2-client starter. This gives us all the sensible defaults and auto-configuration for the Client Application. This new approach also reduces the amount of code you have to bring into your project. You have a separate starter for your Resource Server and a separate starter for your Client Application.
The last dependency, spring-boot-starter-webflux, is what you’re going to use to make the API calls to the Resource Server instead of using RestTemplate. More on that below.
Next up, application.yml:
xxxxxxxxxx
spring
security
oauth2
client
provider
okta
issuer-urihttps//yourOktaDomain.okta.com/oauth2/default
registration
okta
client-idokta client id
client-secretokta client secret
resource
serverhttp//localhost8081
In this case, you just need a client-id, client-secret and an issuer-uri. The OAuth integration will automatically retrieve the authorization and token endpoints of the Authorization Server using a well-known endpoint. You can try it yourself by browsing to:
https://{yourOktaDomain}.okta.com/oauth2/default/.well-known/oauth-authorization-server
You’ll get back a JSON document that has all the configuration information for your Okta Authorization Server, including the link to the JWT key set URI.
You also have a custom configuration for the resource server at the coordinates: spring.security.oauth2.resource.server.
Notice that okta is embedded in this configuration. Like: spring.security.oauth2.client.provider.okta.issuer-uri. It’s not that Spring Security has any particular knowledge of Okta. Rather, it’s that you can now use okta as a named provider in your code. Take a look at that next.
Here’s the Client Application:
xxxxxxxxxx
public class OAuth2DemoApplication_2_1 {
("#{ @environment['spring.security.oauth2.resource.server'] }")
private String resourceServerUrl;
private WebClient webClient;
public OAuth2DemoApplication_2_1(WebClient webClient) {
this.webClient = webClient;
}
public static void main(String[] args) {
SpringApplication.run(OAuth2DemoApplication_2_1.class, args);
}
("/")
String home( OidcUser user) {
return "Hello " + user.getFullName();
}
("/api")
String api() {
return this.webClient
.get()
.uri(this.resourceServerUrl + "/api")
.retrieve()
.bodyToMono(String.class)
.block();
}
public static class OktaWebClientConfig {
WebClient webClient(
ClientRegistrationRepository clientRegistrations,
OAuth2AuthorizedClientRepository authorizedClients
) {
ServletOAuth2AuthorizedClientExchangeFilterFunction oauth2 =
new ServletOAuth2AuthorizedClientExchangeFilterFunction(
clientRegistrations, authorizedClients
);
oauth2.setDefaultOAuth2AuthorizedClient(true);
oauth2.setDefaultClientRegistrationId("okta");
return WebClient.builder()
.apply(oauth2.oauth2Configuration())
.build();
}
}
}
You no longer need the @EnableOAuth2Sso annotation. OAuth2 and OIDC are now first-class citizens in the Spring Boot and Spring Security ecosystems.
Take a look at the root mapping. That will kick of the Authorization Code Flow. This time, you can inject an OidcUser object which is populated with all the information from the ID Token that was obtained as part of this flow. You use OidcUser.getFullName() to return the full name of the authenticated user.
Through constructor dependency injection, you have access to a WebClient object. The new guidance for Spring, in general, is to use WebClient instead of RestTemplate and the latest versions of Spring Boot and Spring Security follow this. WebClient is in scope, thanks to the spring-boot-starter-webflux dependency. The api method makes use of the WebClient object to make an api call to the Resource Server as configured in the application.yml` file (http://localhost:8081/api). This looks like an ordinary HTTP GET method request to an endpoint. However, the Access Token obtained during the Authorization Code Flow is sent along as part of this request, which is a requirement of the Resource Server.
To understand the mechanism behind this, you can examine the embedded @Configuration class which exposes the WebClient as a Bean.
Since WebClient is ordinarily used in the context of reactive applications, you need a little glue to make it work in the context of the traditional Servlet approach, which is how this example is organized.
You create a ServletOAuth2AuthorizedClientExchangeFilterFunction object for this purpose. And, since you could have any number of Client Applications configured, you set the default to the named configuration: okta (shown previously in the application.yml file).
You use WebClient’s builder pattern methods to apply the ServletOAuth2AuthorizedClientExchangeFilterFunction object that you setup and return the WebClient object. It is this object that is injected into the Client Application and ensures that when you make the api call, the Access Token is included in the Authorization header.
Spring Boot 2.1.x and the Okta Spring Boot Starter
Our final iteration is to incorporate the Okta Spring Boot Starter. So far, both the generic Spring Boot 1.5.x and Spring Boot 2.1.x examples could have been configured for any OAuth 2.0 / OIDC provider. Okta has created its own Spring Boot Starter that is listed on https://start.spring.io and can easily be incorporated into your application.
As you’ve done for each of the previous examples, take a look at the dependencies, configuration, and code for this example.
Resource Server Dependencies and Configuration
Here’s the pom.xml file for the resource server:
xxxxxxxxxx
<dependencies>
<dependency>
<groupId>org.springframework.boot</groupId>
<artifactId>spring-boot-starter-web</artifactId>
</dependency>
<dependency>
<groupId>com.okta.spring</groupId>
<artifactId>okta-spring-boot-starter</artifactId>
<version>1.1.0</version>
</dependency>
</dependencies>
You’re down to 2 dependencies while keeping the code for your Resource Server exactly the same.
Take a look at the application.yml:
xxxxxxxxxx
okta
oauth2
clientIdokta client id
clientSecretokta client secret
issuerhttps//yourOktaDomain.okta.com/oauth2/default
audiencehttp//localhost8081
You now have an easy to read relatively flat configuration. You just need the clientId, clientSecret, issuer and, for added security an audience value that matches the base URL of the Resource Server. In addition, validating the cryptographic signature of the JWT Access Token, it will ensure that the audience value encoded in the payload matches the configured audience value from the application.yml file.
Client Application Dependencies, Configuration, and Code
Here are the dependencies for the Client Application from the pom.xml file:
xxxxxxxxxx
<dependencies>
<dependency>
<groupId>org.springframework.boot</groupId>
<artifactId>spring-boot-starter-web</artifactId>
</dependency>
<dependency>
<groupId>org.springframework.boot</groupId>
<artifactId>spring-boot-starter-webflux</artifactId>
</dependency>
<dependency>
<groupId>com.okta.spring</groupId>
<artifactId>okta-spring-boot-starter</artifactId>
<version>1.1.0</version>
</dependency>
</dependencies>
You have the same 2 dependencies as you did for the Resource Server as well as spring-boot-starter-webflux so that the Client Application can use the WebClient object to make API requests.
The application.yml file is exactly the same as the Resource server. You’ve now achieved complete parity for the configuration of the Resource Server and the Client Application. You also have the benefit of being able to reuse the okta.oauth2.audience value in the Client Application. Here’s where you’re bringing it into scope thanks to Spring Boot’s environment variable support:
xxxxxxxxxx
("#{ @environment['okta.oauth2.audience'] }")
private String resourceServerUrl;
The rest of the Client Application code is the same as the Spring Boot 2.1.x example (without the Okta starter support).
Here’s the code that uses the WebClient object to make the API request of the Resource Server:
xxxxxxxxxx
return this.webClient
.get()
.uri(this.resourceServerUrl + "/api")
.retrieve()
.bodyToMono(String.class)
.block();
(Notice the this.resourceServerUrl reference)
Into the Future with Spring Boot,Spring Security, OpenID Connect, and OAuth 2.0
The code for this post can be found on GitHub OktaDeveloper repo.
Follow these links for more information about OIDC, OAuth 2.0, JWT, and the various Flows.
Spring Boot and Spring Security’s first-class support for OpenID Connect and OAuth 2.0 adds a new level of interoperability with providers (such as Okta) with minimal dependencies, minimal configuration, and minimal code.
https://start.spring.io is your friend for creating Spring Boot apps using the latest version with the dependencies you need, including Okta’s Spring Boot Starter.
Want to learn more about the latest with Spring Boot? Check out these posts:
Further Reading
Published at DZone with permission of Micah Silverman. See the original article here.
Opinions expressed by DZone contributors are their own.
Comments