

Getting Started With PyIceberg: A Pythonic Approach to Managing Apache Iceberg Tables
If you're an ML Engineer and want to quickly run a feature engineering in your model, PyIceberg provides a lightweight implementation.
Join the DZone community and get the full member experience.
Join For FreeModern data platforms are evolving rapidly—driven by a need for scalability, flexibility, and analytics at scale. Lakehouse architecture sits at the center of this evolution, combining the low-cost storage of data lakes with the reliability and structure of data warehouses.
To power these lakehouses, organizations are turning to open table formats like Apache Iceberg. Originally developed at Netflix, Apache Iceberg was built to manage petabyte-scale analytics in cloud object storage. It brings database-style features—ACID transactions, schema evolution, partition pruning, and time travel—to large-scale files stored in systems like Amazon S3 or Azure Data Lake.
But most Iceberg implementations today rely on heavy compute engines like Spark, Flink, or Trino. That’s a hurdle for developers and ML engineers who want to experiment locally, version feature sets, or manage metadata—without deploying clusters. In this article we will learn how to implement PyIceberg for a supply chain company
Enter PyIceberg.
What Is PyIceberg?
PyIceberg is an official tool in Python that helps you work with large datasets stored in the Apache Iceberg format. Apache Iceberg is a modern way of organizing huge data tables, especially on cloud platforms like Amazon S3 or Google Cloud Storage. It makes sure your data stays clean, consistent, and easy to manage—even if you’re dealing with lakhs or crores of records. Usually, to work with Iceberg, you’d need heavy software like Spark or Flink (which runs on Java), but PyIceberg removes that headache—you can do most things using just Python.
With PyIceberg, you can easily check the structure of your data tables, add new information, or even see how the data looked at a specific point in time. This “time travel” feature is especially helpful for machine learning teams—when you need to recreate the exact dataset used in training a model, or when you want to debug something that worked before but is failing now. Since it works without needing a large server setup, PyIceberg makes local testing, development, and automation much easier.
For many companies and data teams moving towards cloud-native platforms and open formats, PyIceberg is a very handy tool. It helps you manage data like a pro without depending on big infrastructure. You can validate data, test pipelines, explore schema changes, and keep everything under control—all from your Python environment. As more teams start using Apache Iceberg, PyIceberg is becoming the go-to option for those who want something powerful but also lightweight and developer-friendly.
With PyIceberg, you can:
- Create, modify, and inspect Iceberg tables locally
- Append data from Pandas or Arrow tables
- Perform schema evolution
- Explore table metadata and snapshots
- Reproduce ML training data using Iceberg time travel
It’s fast, flexible, and lightweight—perfect for modern Python-based workflows.
Real-World Example: Feature Store for Supply Chain Forecasting
Let’s say you work for a retail supply chain company. Your job is to build a daily feature store that feeds machine learning models which predict product demand across regions.
You need to:
- Version your features (so ML models are reproducible)
- Evolve schema as new signals are added
- Inspect metadata without spinning up Spark
- Enable local testing and development
This is a perfect use case for PyIceberg.
Folder Structure
supplychain_forecast/
├── .venv/ # Virtual environment
├── warehouse/ # Iceberg warehouse (local)
│ └── metadata/ # Iceberg metadata files
├── pyiceberg.db # SQLite catalog
├── feature_pipeline.py # Create & append features
├── schema_evolution.py # Add new columns
├── snapshot_inspector.py # View snapshot history
├── notebooks/
│ └── iceberg_explore.ipynb # Jupyter exploration
├── data/
│ └── raw_input.csv # External inputs
├── requirements.txt # Python dependencies
└── README.md
Architecture Diagram
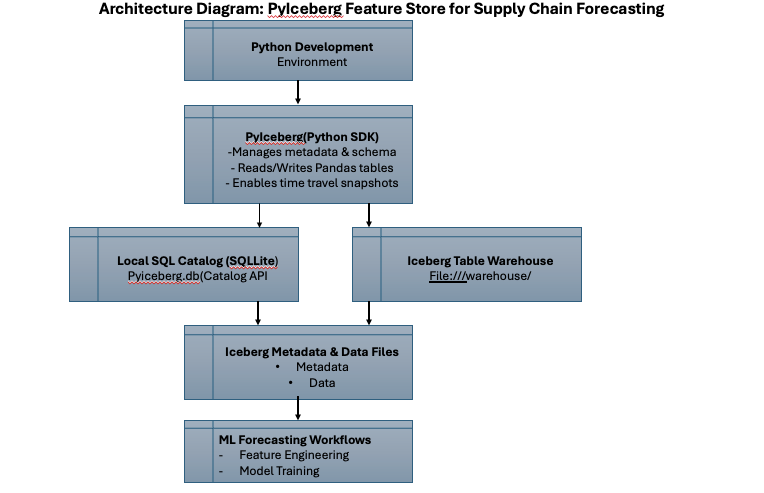
Setup and Installation
Let's work on the setting up of the environment
pip install "pyiceberg[sql,pyarrow]" pandas Create and activate a virtual environment:
python -m venv .venv
source .venv/bin/activate # Windows: .venv\Scripts\activate
Step 1: Create the Feature Table
# feature_pipeline.py
from pyiceberg.catalog import load_catalog
from pyiceberg.schema import Schema
from pyiceberg.types import StringType, IntegerType, DateType, FloatType, BooleanType, StructType
import pandas as pd
import pyarrow as pa
from datetime import date

# Step 1.1: Load catalog
catalog = load_catalog(
name="local",
type="sql",
uri="sqlite:///warehouse/pyiceberg.db",
warehouse="file:///warehouse"
)

# Step 1.2: Define schema
schema = Schema(
StructType(fields=[
("date", DateType(), False, "Forecast date"),
("sku_id", StringType(), False, "SKU identifier"),
("region", StringType(), False, "Sales region"),
("units_sold", IntegerType(), True, "Actual sales"),
("inventory", IntegerType(), True, "Stock level"),
("promo_flag", BooleanType(), True, "Was promoted?"),
("day_of_week", StringType(), True, "Signal for ML")
])
)

# Step 1.3: Create Iceberg table
table = catalog.create_table("features.daily_sku_demand_v1", schema)

# Step 1.4: Append initial data
df = pd.DataFrame([
{
"date": date(2025, 7, 8),
"sku_id": "SKU_123",
"region": "West",
"units_sold": 120,
"inventory": 340,
"promo_flag": True,
"day_of_week": "Tuesday"
},
{
"date": date(2025, 7, 8),
"sku_id": "SKU_456",
"region": "East",
"units_sold": 95,
"inventory": 200,
"promo_flag": False,
"day_of_week": "Tuesday"
}
])
arrow_table = pa.Table.from_pandas(df)
table.append(arrow_table)

print("Table created and data written.")
Step 2: Evolve the Schema
# schema_evolution.py
from pyiceberg.types import FloatType

table = catalog.load_table("features.daily_sku_demand_v1")

with table.update_schema() as update:
update.add_column("forecast_demand", FloatType(), "ML prediction")
update.add_column("forecast_confidence", FloatType(), "Confidence level")

print( "Forecast columns added.")
Step 3: Inspect Metadata and Snapshots
# snapshot_inspector.py
table = catalog.load_table("features.daily_sku_demand_v1")

for snapshot in table.snapshots:
print(f"Snapshot ID: {snapshot.snapshot_id}, Time: {snapshot.timestamp_ms}")
To load data from a past snapshot:
snapshot_id = table.snapshots[0].snapshot_id
df_old = table.scan(snapshot_id=snapshot_id).to_pandas()
Why This Matters for ML and DataOps
| Benefit | Why It Helps |
|---|---|
| Time Travel | Reproduce past training sets with snapshot IDs |
| Schema Evolution | Add new features without migrations |
| Local Development | Work without Spark, Hive, or EMR |
| Fast Feedback Loop | Test new features in notebooks immediately |
| Modular Table Management | Ideal for versioned, testable data products |
Limitations to Keep in Mind
- Not yet suitable for high-throughput writes
- No support for compaction or partition rewriting
- Lacks distributed query capability (can be layered with DuckDB)
PyIceberg is a game-changer for Python-native data lakehouse development. It gives engineers and ML teams powerful tooling to:
- Create and evolve Iceberg tables
- Use time travel for versioned features
- Prototype rapidly using familiar tools (Pandas, Arrow, Jupyter)
- Whether you're tracking demand forecasts or running experiments, PyIceberg brings the power of Apache Iceberg to your laptop—without the overhead.
Opinions expressed by DZone contributors are their own.
Comments