OpenAPI (Swagger) and Spring Boot Integration
In this article, take a look at OpenAPI (Swagger) and Spring Boot integration.
Join the DZone community and get the full member experience.
Join For Free
Recently. while working on a requirement, there came a need to upload a file for further processing. Mostly in REST APIs, we are accustomed to using JSON input and output while it is XML for SOAP web services.
This leads us to research how to satisfy the requirement. In Spring, and mainly in Spring Boot, the auto-configuration feature gives us big-time help even though sometimes we have to disable some features to add custom once or to change the order they are sorted in.
The @Order annotation defines the sorting order of an annotated component or bean. It has an optional value argument that determines the order of the component. The default value is Ordered.LOWEST_PRECEDENCE. This marks that the component has the lowest priority among all other similar components.
In this article, I will describe how we can integrate OpenAPI (Swagger) specification to a spring boot project, particularly focusing on handling multipart/form-data. In the demo app, we will try to upload a document, particularly an avatar for a user account. We are going to use MultipartResolver, particularly CommonsMultipartResolver for an added advantage. There is no default resolver implementation used for Spring DispatcherServlets, as an application might choose to parse its multipart requests itself. To define an implementation, create a bean with the id "multipartResolver" in a DispatcherServlet's application context. Such a resolver gets applied to all requests handled by the DispatcherServlet.
As it has been mentioned in the documentation, there are two concrete implementations included in Spring, as of Spring 3.1:
CommonsMultipartResolver for Apache Commons FileUpload
To use CommonsMultipartResolver to handle the file upload, we need to add the following dependency:
xxxxxxxxxx
<dependency>
<groupId>commons-fileupload</groupId>
<artifactId>commons-fileupload</artifactId>
<version>1.3.3</version>
</dependency>
And define CommonsMultipartResolver bean:
xxxxxxxxxx
(name = "multipartResolver")
public CommonsMultipartResolver multipartResolver() {
CommonsMultipartResolver multipartResolver = new CommonsMultipartResolver();
multipartResolver.setMaxUploadSize(100000);
return multipartResolver;
}
StandardServletMultipartResolver for the Servlet 3.0+ Part API
For more flexibility and configurability, I choose to use CommonsMultipartResolver. Among the advantages, it provides "maxUploadSize", "maxInMemorySize", and "defaultEncoding" settings as bean properties.
Let’s get practical:
Create swagger definition
Create the Spring Boot Project (I will follow 3 tier model)
Define Database configurations and entity classes
Create JPA Data Repository layer
Create Services and Rest Controllers
Build and run the Project
Tools and Technologies Used
Eclipse (you can use your preferred editor)
Swagger editor (https://editor.swagger.io/) — Swagger - 2.0
Spring Boot — 2.0.4.RELEASE, Spring Data Jpa (https://thoughts-on-java.org/what-is-spring-data-jpa-and-why-should-you-use-it/)
JDK — 1.8 or later
Maven
Audience: It is expected that you have a basic understanding of Spring Boot.
Step 1: Why Swagger, You May Ask?
Earlier, there were no industry standards for developing APIs or documenting them. Swagger emerged as an approach to building APIs and soon became the most popular framework for this purpose. Swagger is the largest framework for designing APIs using a common language and enabling the development across the whole API lifecycle, including documentation, design, testing, and deployment. The framework provides a set of tools that help programmers generate client or server code and many more. For more details, I recommend checking out swagger.io.
I have created a minimal definition that serves enough for this post. Please refer to the definition file included in the project. I will not go in details of how to define Swagger specs. For details, I recommend referring to https://swagger.io/.
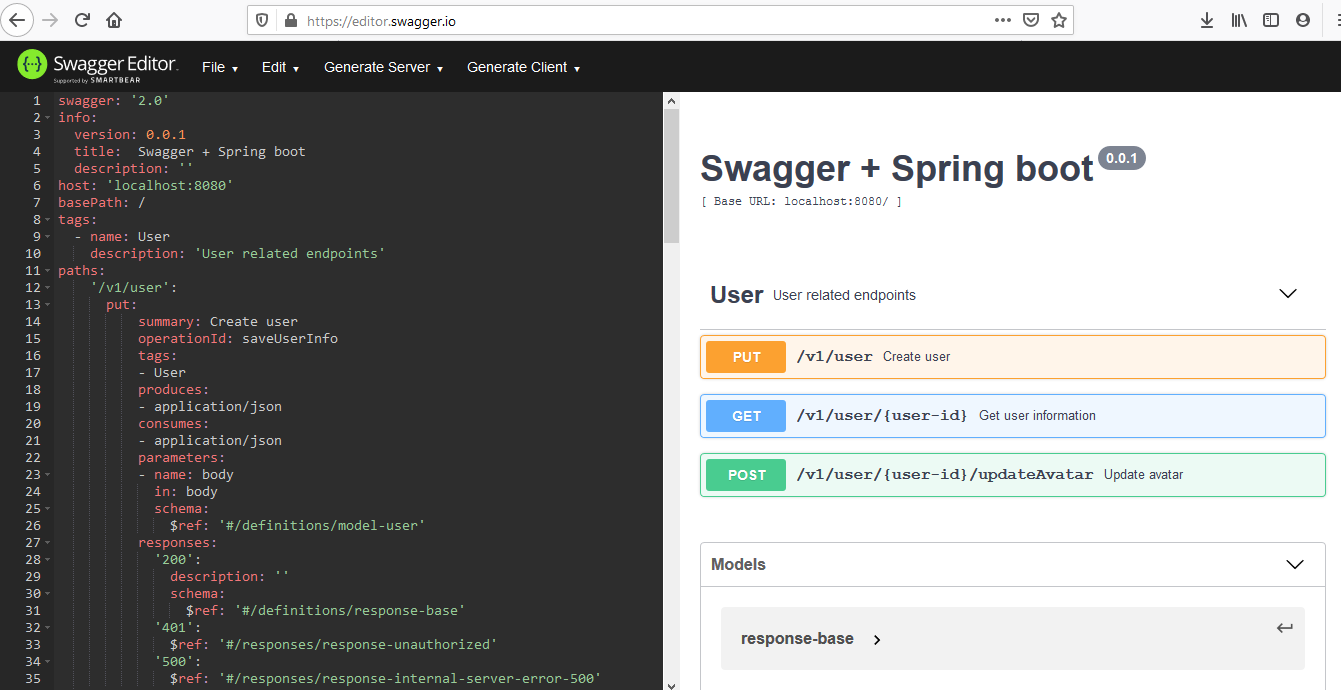
The following are the endpoints for our demo app:
Create a user(avatar should be updated later)
Get user information by user id
Update avatar image (uses multipart/form-data)
Step 2: Create and Import Project
Let's create and import our application in your favorite IDE. There are many ways to create a Spring Boot application, the simplest way is to use Spring Initializr http://start.spring.io/.
You can also import the sample project from here.
Step 3: Define Database Configurations and Entity Classes
There is a single entity for which we will be adding user-name and avatar image. For my convenience, the avatar will only be a string reference to the location/path on the server where the files are located (can also be saved in a database column).
xxxxxxxxxx
package dzone.aman.restapidemo.dal.models;
import javax.persistence.Column;
import javax.persistence.Entity;
import javax.persistence.GeneratedValue;
import javax.persistence.GenerationType;
import javax.persistence.Id;
import javax.persistence.Table;
(name = "users")
public class User {
(strategy=GenerationType.AUTO)
long id;
(name = "first_name")
private String firstName;
(name = "last_name")
private String lastName;
(name = "avatar")
private String avatar;
public long getId() {
return id;
}
public void setId(long id) {
this.id = id;
}
public String getFirstName() {
return firstName;
}
public void setFirstName(String firstName) {
this.firstName = firstName;
}
public String getLastName() {
return lastName;
}
public void setLastName(String lastName) {
this.lastName = lastName;
}
public String getAvatar() {
return avatar;
}
public void setAvatar(String avatar) {
this.avatar = avatar;
}
}
And persistence config (the code is self-explanatory):
xxxxxxxxxx
package dzone.aman.restapidemo.config;
import java.util.Properties;
import javax.persistence.EntityManagerFactory;
import javax.sql.DataSource;
import org.springframework.context.annotation.Bean;
import org.springframework.context.annotation.Configuration;
import org.springframework.dao.annotation.PersistenceExceptionTranslationPostProcessor;
import org.springframework.data.jpa.repository.config.EnableJpaRepositories;
import org.springframework.jdbc.datasource.DriverManagerDataSource;
import org.springframework.orm.jpa.JpaTransactionManager;
import org.springframework.orm.jpa.JpaVendorAdapter;
import org.springframework.orm.jpa.LocalContainerEntityManagerFactoryBean;
import org.springframework.orm.jpa.vendor.HibernateJpaVendorAdapter;
import org.springframework.transaction.PlatformTransactionManager;
import org.springframework.transaction.annotation.EnableTransactionManagement;
(basePackages = { "dzone.aman.restapidemo.dal.repositories" })
public class PersinstenceConfig {
public LocalContainerEntityManagerFactoryBean entityManagerFactory() {
LocalContainerEntityManagerFactoryBean em = new LocalContainerEntityManagerFactoryBean();
em.setDataSource(dataSource());
em.setPackagesToScan("dzone.aman.restapidemo.dal.models");
JpaVendorAdapter vendorAdapter = new HibernateJpaVendorAdapter();
em.setJpaVendorAdapter(vendorAdapter);
em.setJpaProperties(additionalProperties());
return em;
}
public DataSource dataSource() {
DriverManagerDataSource dataSource = new DriverManagerDataSource();
dataSource.setDriverClassName("org.h2.Driver");
dataSource.setUrl("jdbc:h2:file:C:\\Users\\prg\\Desktop\\projects\\testdb"); // temporary database location
dataSource.setUsername("sa");
dataSource.setPassword("");
return dataSource;
}
public PlatformTransactionManager transactionManager(EntityManagerFactory emf) {
JpaTransactionManager transactionManager = new JpaTransactionManager();
transactionManager.setEntityManagerFactory(emf);
return transactionManager;
}
public PersistenceExceptionTranslationPostProcessor exceptionTranslation() {
return new PersistenceExceptionTranslationPostProcessor();
}
Properties additionalProperties() {
Properties properties = new Properties();
properties.setProperty("hibernate.hbm2ddl.auto", "update"); //hibernate entity to db generation strategy
properties.setProperty("hibernate.dialect", "org.hibernate.dialect.H2Dialect");
return properties;
}
}
Step 4: Create Repository
Spring Data makes it very easy to work with entities by merely defining repository interfaces. It takes the domain class to manage as well as the id type of the domain class as type arguments. It comes with a set of predefined methods and allows for the possibility of adding custom methods in each interface, which we will not cover in this post.
xxxxxxxxxx
package dzone.aman.restapidemo.dal.repositories;
import org.springframework.data.repository.CrudRepository;
import org.springframework.stereotype.Repository;
import dzone.aman.restapidemo.dal.models.User;
public interface UserRepository extends CrudRepository<User, Long> {}
Step 5: Create Services and Rest Controllers
I won’t go into describing how to create services and controllers since I assume that you have enough knowledge.
Let’s put all together and check what we have done so far.
Run the project with: mvn clean spring-boot:run
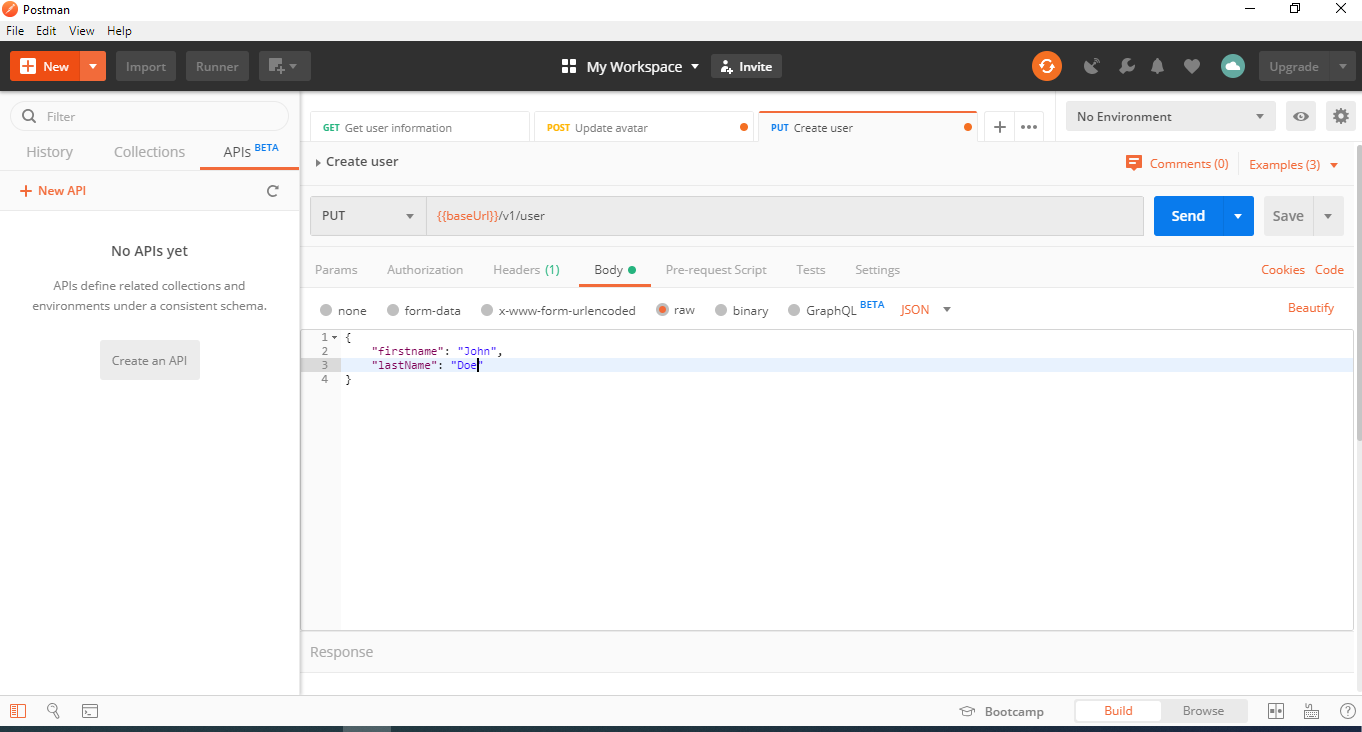
From postman (or other tools), try to call “http://localhost:8080/v1/user” as the following. You should see resultCode = 200 if everything goes as expected.
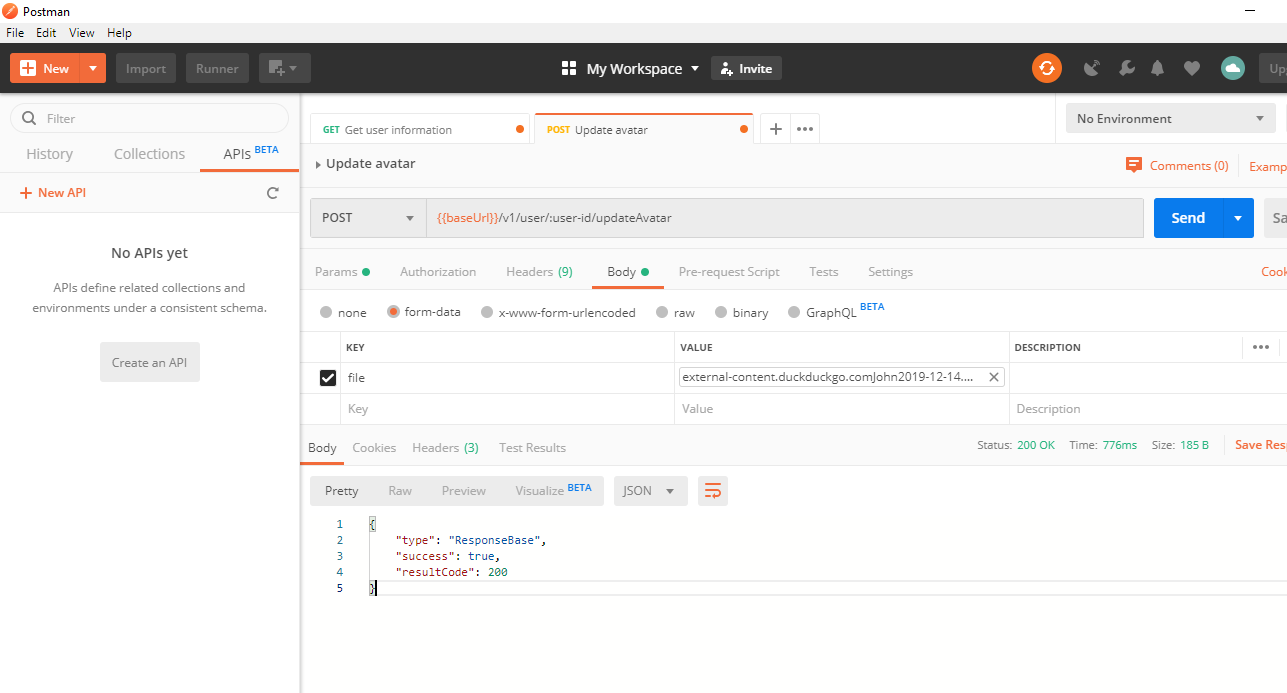
Update avatar:
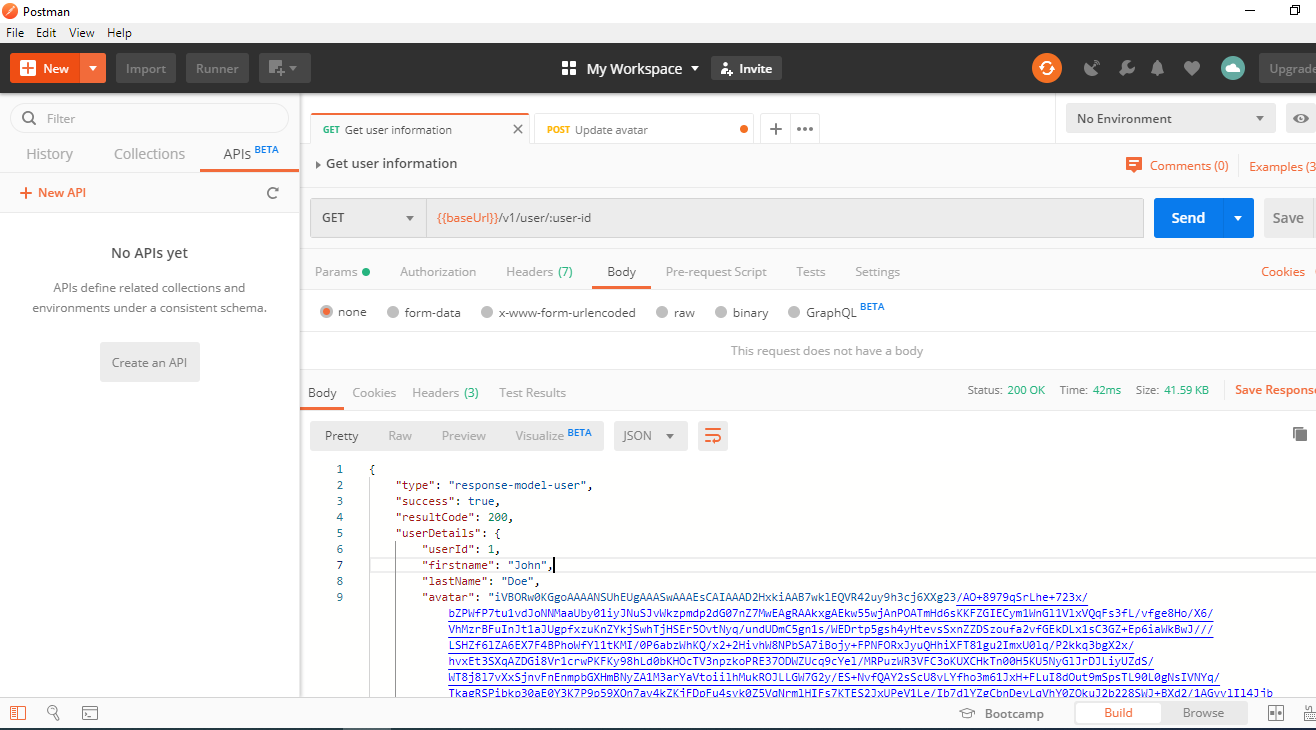
Check if it has been saved:
Note: Don’t forget to create a folder named “images” or name it how you like in application.yaml.
You can get the complete example from GitHub.
Thank for following this to the end :)
Further Reading
Opinions expressed by DZone contributors are their own.
Comments