Releasing MuleSoft API
In this tutorial, learn how to set up MuleSoft environment-related deployment folders and tag the release version with custom-generated tags.
Join the DZone community and get the full member experience.
Join For FreeMuleSoft Anypoint is an enterprise platform of an API event-driven architecture that allows developers to create design and build an API, and to name a few capabilities where you can share API templates and application assets. It also has a central web interface to manage, integrate, secure, and monitor API performance.
Open API Specification
MuleSoft API development supports Open API specification.
The Open API Specification (OAS) is a standard practice of programming language and agonistic interface for HTTP APIs and provides service content discovery capabilities without actual access to code ,documentation, network traffic inspection.
For this tutorial, we won't be covering the creation of the open API specification, but just to note: an Open API spec file needs to be created and defined inside the folder content.
MuleSoft Versioning
MuleSoft uses 3 digits semantic versioning scheme which denotes the major, minor, and patch release.
{Major}.{Minor}.{Patch}The Major version is for when you make incompatible or breaking API changes. The Minor version is for when you add functionality in a backward-compatible manner. The Patch version is when you make changes like documentation update without altering the spec.
The API version is different from the above versioning scheme and is specified in the OAS definition. An API contains each asset version signifying major/minor updates. Version v1 can contain a number of asset versions; for example, 1.0.0, 1.0.1, 1.0.2, etc., and version v2 can contain asset versions, example2.0.0, 2.0.1, 2.0.2, etc.
Asset Lifecycle States
For the Asset Development Lifecycle, we will be using the MuleSoft lifecycle states below.
Development State
This is an iterative process of design and development.
- Sample asset in development state config file:
{
	"assetId": "hello-worldsample-v1",
    "status": "development",
	"version": "1.0.1",
	"classifier": "oas"
}
Stable State
The asset is ready for consumption and in MuleSoft this is denoted by setting the status to "published" which actually means stable.
- Sample asset in the stable state config file:
{
	"assetId": "hello-worldsample-v1",
    "status": "published",
	"version": "1.0.1",
	"classifier": "oas"
}
Deprecated State
Deprecated flags the API and can be used to earmark the API for deletion. We won't be using this state in this tutorial.
- Asset Id: Id of an asset (API) published to the Exchange (API Catalog)
- Asset version: Version of the asset (API) published to the Exchange (API catalog)
- Classifier: The type of API specification; in this case, it is OAS (Open API specification)
Automated release tags allocated according to asset state:
| ASSET STATE | FOLDER | CUSTOM RELEASE VERSIONING LOGIC | SAMPLE RELEASE TAG |
|---|---|---|---|
|
Development |
global config file |
develop-mulesoftAPIVersion.timestamp |
develop-1.0.1.166720192 |
|
Stable |
global config file |
stable-mulesoftAPIVersion.timestamp |
stable-1.0.1.166720192 |
Custom Release Tagging Scheme
In this tutorial, we have devised a custom tagging scheme that we can utilize during our release phase to tag the codebase with this custom tag. This helps us to track the particular MuleSoft release development all the way to the deployment of an API to a particular environment as it gets promoted to the production environment.
Ideally, you don't have to follow the same logic for tagging. You can devise your own custom based on the Asset and environment-related deployments in MuleSoft.
Since we will be configuring a custom tag based on a particular environment deployment, the MuleSoft version will be used inside the tag indicated below with mulesoftAssetVersion with the provided sample as "1.0.1".
- Automated release tags according to environment deployment:
| ENVIRONMENT | FOLDER | CUSTOM RELEASE VERSIONING LOGIC | SAMPLE RELEASE TAG |
|---|---|---|---|
|
Development |
dev |
dev-deploy-mulesoftAssetVersion.timestamp |
dev-deploy-1.0.1.166720192 |
|
Quality Assurance |
qa |
qa-deploy-mulesoftAssetVersion.timestamp |
qa-deploy-1.0.1.166720192 |
|
Production |
prod |
prod-deploy-mulesoftAssetVersion.timestamp |
prod-deploy-1.0.1.166720192 |
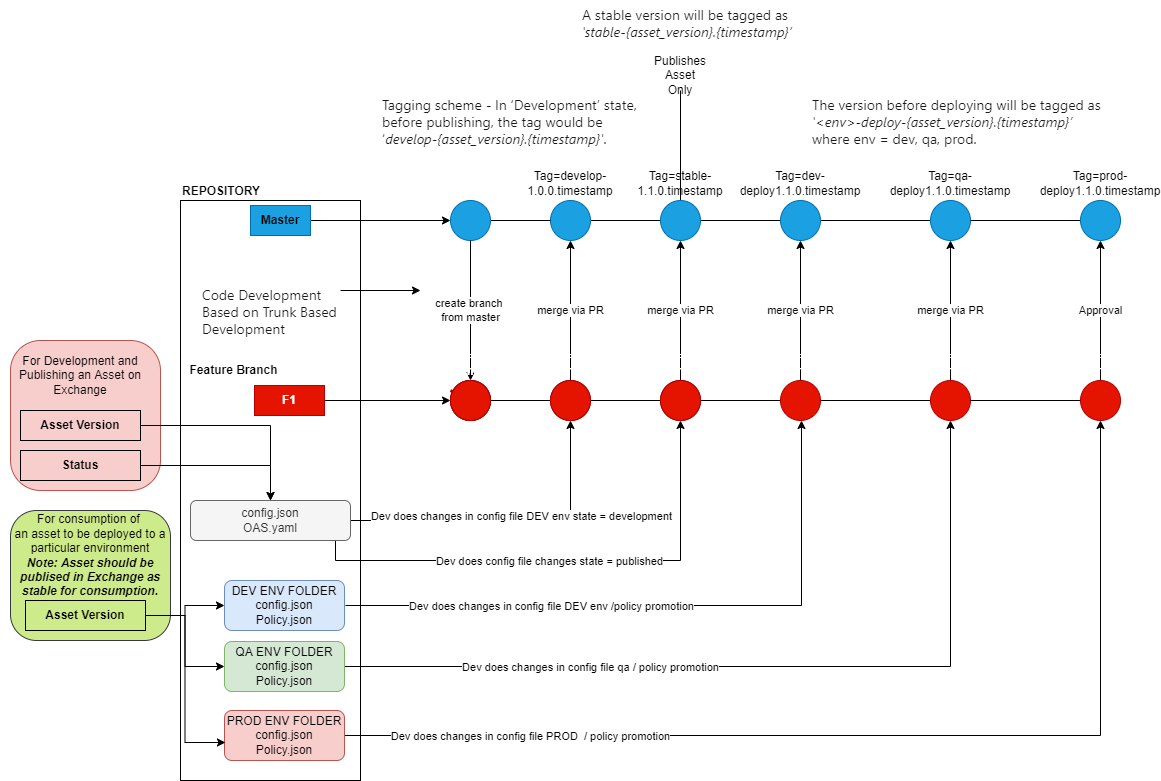
For this tutorial, we have set up the below automated custom release versioning and tagging scheme.
The code development is based on Trunk based development with a single stream of development. The sequence of changes as indicated in the below diagram starts when a developer cuts a feature branch for their development purposes. They have the flexibility to amend the changes in the global config (sits outside the environment folders) or the OAS file for development and publishing for the particular asset to the MuleSoft Exchange. At the end of the development, they can set the Asset state to published or development and create a pull request to merge onto the master branch.
Once the asset is available on an exchange, the developer can configure the environment-related asset config files or API policy files which are environment-specific and enable the developer to consume any of the published asset versions in the environment-specific asset config for API deployment purposes only. For example, the Dev environment can deploy 1.0.3 of an asset, while the QA environment can use 1.0.2 and the prod can deploy 1.0.1. API policies can be utilized in a similar fashion while Dev and QA use a different set of API policies and Prod can use a different set of API policies.
The Azure CI/CD pipeline has been set up in a way that once the pull the request for merge to master has been approved, it automatically senses the changes for the states in the global asset config file and environment-specific file changes and triggers the deployment of an Asset or MuleSoft API based on the changes applied to certain files then creates a tag based on a set of changes that the developer has initiated.
MuleSoft Custom Release Version Tagging Scheme
Since the Azure CI/CD pipeline is outside the scope of this tutorial, we won't be covering this in this tutorial.
Create Folder Structure
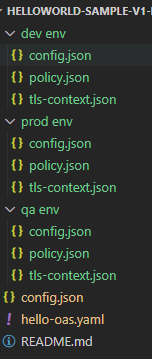
To create a folder structure according to your environment requirements, we have created the below folder structure.
Parent Folder Name
You can set this to the name of your API and major version; for example, helloWorldSample-V1 (note that V1 in this instance indicates the major version of the API).
config.json(sitting outside the environment folders) - Used for the development and publishing of the particular asset to the MuleSoft exchangehello-oas.yaml(sitting outside the environment folders) - API OAS file for development and publishing for the particular asset to MuleSoft runtimeREADME.md- Read me file for description, and tutorial notes about the repository contentdev envconfig.json- Used for an API deployment on MuleSoft with the particular associated asset name and version specified inside this filepolicy.json- Used to define custom API policy payload that will applied to the API on the environmenttls-context.json- Used to define environment-level custom TLS context for binding to inbound / outbound API requests.
qa env- Same folder structure asdev env; Note: the actual content of individual JSON files will vary according to environment-specific requirements.prod env- Same folder structure asdev env; Note: the actual content of individual JSON files will vary according to environment-specific requirements.
Content of Files
- Config.json (sitting outside the environment folders):
{
	"assetId": "helloWorldSample-v1",
    "status": "published", #change this to "development" if you are developing the asset.
	"version": "1.0.1",
	"classifier": "oas"
}- hello-oas.yaml (sitting outside the environment folders):
You can create the sample hello-oas.yaml file or an example file by referring to this link.
dev env(folder)config.json
{
	"assetId": "helloWorldSample-v1",
	"version": "1.0.1",
	"classifier": "oas"
}policy.json(sample policy file):
{
  "policy": [
     {
      "configurationData": {
        "clusterizable": true,
        "exposeHeaders": true,
        "rateLimits": [
          {
            "timePeriodInMilliseconds": 5000,
            "maximumRequests": 1000
          }
        ]
      },
      "order": 1,
      "pointcutData": null,
      "assetId": "rate-limiting",
      "assetVersion": "1.0.0",
      "groupId": "$(groupId)"
    },
    {
      "configurationData": {
        "credentialsOriginHasHttpBasicAuthenticationHeader": "customExpression",
        "clientIdExpression": "#[attributes.headers['client_id']]",
        "clientSecretExpression": "#[attributes.headers['client_secret']]"
      },
      "order": 2,
      "disabled": false,
      "pointcutData": null,
      "groupId": "$(groupId)",
      "assetId": "client-id-enforcement",
      "assetVersion": "1.3.2"
    }
  ]
}tls-context.json(sample JSON file) - Note: "masked $(variables)" to be passed via pipeline; you can change this to any other valid variable or value.
{
  "tlsContext_InputParameters": {
    "technology": "mule4",
    "endpoint": {
      "type": "rest",
      "deploymentType": "CH",
      "proxyUri": "https://0.0.0.0:8092/api",
      "isCloudHub": true,
      "referencesUserDomain": false,
      "responseTimeout": null,
      "muleVersion4OrAbove": true,
      "tlsContexts": {
        "inbound": {
          "tlsContextId": "$(inboundtlsContextId)",
          "name": "$(inboundTlsname)",
          "secretGroupId": "$(inboundsecretGroupId)"
        },
        "outbound": {
          "tlsContextId": "$(outboundtlsContextId)",
          "name": "$(outboundTlsname)",
          "secretGroupId": "$(outboundsecretGroupId)"
        }
      }
    }
  }
}
Capture Config Changes
For this, we used Python code to capture the list of changes and then generate a JSON file based on the list of changes.
Import Libraries
import subprocess;
from subprocess import Popen, PIPE;
import sys;
import getopt;
import os;
Create JSON Functions
import json;

def get_json_key_value(filename, key):
    with open(filename, 'r') as config_file:
        config_data = json.load(config_file)
        return (config_data[''+key+''])

def create_json_file(json_data, json_file):
    jsonString = json.dumps(json_data)
    jsonFile = open(json_file, "w")
    jsonFile.write(jsonString)
    jsonFile.close()
Create cmd Functions
from subprocess import *;
from os import chdir

def run_cmd(git_command, use_shell=True):
    """Run's the given git command, throws exception on failure"""
    return check_output(git_command, shell=use_shell)

def create_folder(path):
    '''Check if directory exists, if not, create it'''
    import os

    # You should change 'test' to your preferred folder.
    CHECK_FOLDER = os.path.isdir(path)

    # If folder doesn't exist, then create it.
    if not CHECK_FOLDER:
        os.makedirs(path)
        print("created folder : ", path)

    else:
        print(path, "folder already exists.")
Create an Array
Create an array for the modified files and a tags dictionary inside an array.
modified_files = []
tag_dict = []
counter = 0

# Output folder path
outputFolder = ".output"
Create Timestamp Function
import calendar;
import time;

def get_timestamp():
    return calendar.timegm(time.gmtime())
Get and append the array of modified files using the Git command to gather the list of file changes.
  modified_file_list = (subprocess.Popen(['git show --pretty"=format:" --name-only'], shell=True,stdout=subprocess.PIPE).communicate()[0].decode('utf-8').strip())
modified_files.append(modified_file_list.split())# Create dictionary for modified files and assign tags
for modified_file in modified_files:
for file in modified_file:
counter += 1
## For Asset Status set to development
if (((file == "config.json") or (file.endswith('.yaml'))) and ((get_json_key_value("config.json", "status")) == 'development')):
tag_dict.append({'order': counter, 'fileChanged': file, 'tag': 'develop-'+(
get_json_key_value("config.json", "version"))+'.'+str(get_timestamp())})
## For Asset Status set to published
if (((file == "config.json") or (file.endswith('.yaml'))) and ((get_json_key_value("config.json", "status")) == 'published')):
tag_dict.append({'order': counter, 'fileChanged': file, 'tag': 'stable-'+(
get_json_key_value("config.json", "version"))+'.'+str(get_timestamp())})
## For Development environment deployment
if (file.startswith('dev/')):
tag_dict.append({'order': counter, 'fileChanged': file, 'tag': 'dev-deploy-'+(
get_json_key_value("config.json", "version"))+'.'+str(get_timestamp())})
## For QA environment deployment
if (file.startswith('qa/')):
tag_dict.append({'order': counter, 'fileChanged': file, 'tag': 'qa-deploy-'+(
get_json_key_value("config.json", "version"))+'.'+str(get_timestamp())})
## For Prod environment deployment
if (file.startswith('prod/')):
tag_dict.append({'order': counter, 'fileChanged': file, 'tag': 'prod-deploy-'+(
get_json_key_value("config.json", "version"))+'.'+str(get_timestamp())}Create Output Folder
# Create .output folder if it does not exisit
create_folder(outputFolder)
Create JSON Tags File
# Create Tags json file
create_json_file(tag_dict, outputFolder+"/git_tags.json")
If all is configured properly, the script will generate the below JSON tags file.
[
  {
    "order": 1,
    "fileChanged": "config.json",
    "tag": "stable-1.0.0.1663027933"
  },
  {
    "order": 2,
    "fileChanged": "dev/config.json",
    "tag": "dev-deploy-1.0.0.1663027933"
  },
  {
    "order": 3,
    "fileChanged": "qa/config.json",
    "tag": "qa-deploy-1.0.0.1663027933"
  },
  {
    "order": 4,
    "fileChanged": "prod/config.json",
    "tag": "prod-deploy-1.0.0.1663027933"
  }
]
We then capture the appropriate Tags using the bash script and then assign it variables using jq.
The variables can then be used in the pipeline to automatically trigger further deployment tasks.
# Use jq to read the Json Tags and assign it to the variable
API_STATUS=`${JQ_TOOL_PATH}jq -r '.[]| select(.tag | startswith("develop-") or startswith("stable-")) |.tag' ${API_CONFIG_FILE}`
DEV_DEPLOY_STATUS=`${JQ_TOOL_PATH}jq -r '.[]| select(.tag | startswith("dev-deploy-"))|.tag' ${TAG_FILE}`
QA_DEPLOY_STATUS=`${JQ_TOOL_PATH}jq -r '.[]| select(.tag | startswith("qa-deploy-"))|.tag' ${TAG_FILE}`
PROD_DEPLOY_STATUS=`${JQ_TOOL_PATH}jq -r '.[]| select(.tag | startswith("prod-deploy-"))|.tag' ${TAG_FILE}`
# Assign Azure Variables
echo "##vso[task.setvariable variable=TAG_API_STATUS;]${API_STATUS}"
echo "##vso[task.setvariable variable=TAG_dev_DEPLOY_STATUS;]${DEV_DEPLOY_STATUS}"
echo "##vso[task.setvariable variable=TAG_qa_DEPLOY_STATUS;]${QA_DEPLOY_STATUS}"
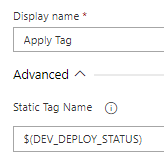
echo "##vso[task.setvariable variable=TAG_prod_DEPLOY_STATUS;]${PROD_DEPLOY_STATUS}"We used the Pipeline task below in Azure DevOps to create a tag at the end of the deployment tasks.

Assign the Tag with the appropriate variable at the end of the deployment, as in the example below.
Conclusion
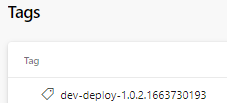
Once the pipeline has run successfully you can test this by changing any of the environment-level files and merging them to the master via pull request. The rest of the steps are basically automated. Then you can browse to the code repository tags section and then you should see the below tag as an example.
Opinions expressed by DZone contributors are their own.
Comments