TestCafe Integration With Cucumber
Join the DZone community and get the full member experience.
Join For FreeTestCafe: A Node.JS Tool to Automate End-To-End Testing
It is an open-source tool, that allows us to write automation tests in JavaScript or TypeScript languages, execute the tests, and publish the test results.
It does not use Selenium Webdriver and plugins to run the tests in browsers. It can create stable tests, perform assertions, launch concurrent tests, use PageObject to create readable tests, and also include the tests in CI/CD pipeline.
It supports automatic waits for page loads and uses web proxy for test execution. It can be used with any IDE that supports development using Node.js (most popular being VSCode IDE).
Cucumber
It is a tool that supports Behavior Driven Development (BDD). It allows us to write scenarios from the user’s perspective in plain English language, making it easy to understand for all the stakeholders like business analysts, product owners, developers, testers, and end-users.
The users can write acceptance test scenarios to describe the behavior of the application. It utilizes the Gherkin keywords like Given, When, Then to write the test scenarios in simple and understandable language.
Cucumber also helps in mapping the test scenarios steps to the actual test code. Cucumber scripts are supported in multiple languages, including JavaScript.
Use Case
A project team is using TestCafe’s powerful scripting engine to design automation test scenarios and perform end-to-end testing of web applications.
Now, the client has asked to implement BDD and test the applications from the user’s perspective. The project team must use a BDD framework like Cucumber, which allows them to write the business flows in plain English language and map them to the actual test code.
The project must design a framework that accepts test scenarios from the user, map them to the automation test code, design and execute the test scenarios, and provide interactive test reports.
Such a framework can be designed by integrating the Cucumber scenarios with the TestCafe automation tests. This helps in achieving automated end-to-end testing of applications from the user’s perspective.
Let's look at how to implement the integration of TestCafe with Cucumber.
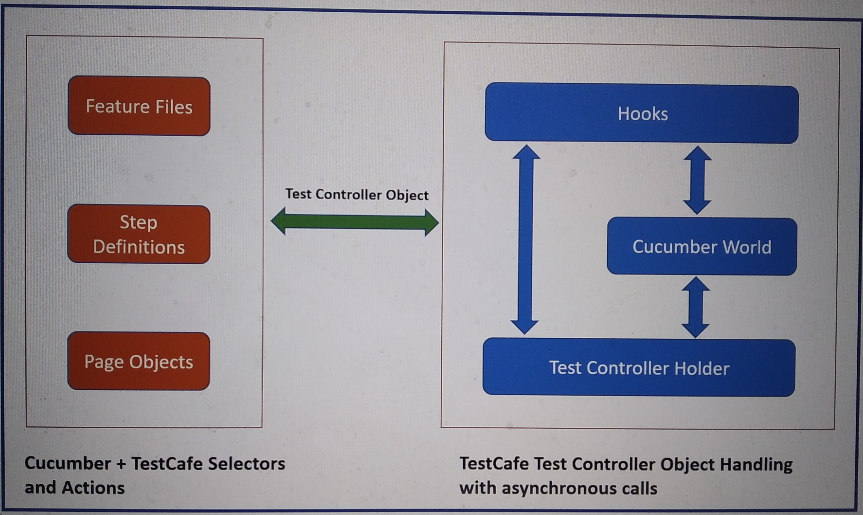
The above block diagram represents the model to perform the integration of Cucumber with TestCafe.
Cucumber + TestCafe Selectors and Actions
| Feature Files | User can write the test scenarios in plain language using gherkin keywords |
| Step Definitions | Methods can be generated for each test step in the feature file scenarios and updated with TestCafe Actions for automating the application |
| Page Objects | UI elements can be defined with their selectors in the page object files. This improves readability and is one of the most popular design patterns in test automation |
TestCafe Test Controller Object Handling with asynchronous calls
The main objective is to inject the Test Controller object into the context of each cucumber step definition method. rquellh has provided a solution to this problem by using Test Controller Holder, Cucumber World, and Hooks.
| Cucumber World | An integral part of Cucumber JavaScript and is an isolated context for each cucumber scenario, exposed to hooks and steps |
| Hooks | It creates a dummy test file. This test file captures the test controller object and passes it back to Test Controller Holder. It waits for setting up of the test controller object asynchronously, and then adds the object to Cucumber World scope with the help of Test Controller Holder |
| Test Controller Holder | It holds the object, until the Cucumber script execution finishes and then, the object is free |
Installation and Pre-Requisites:
- Download Node.js from https://nodejs.org/en/download/ and install in the machine
- Download VSCode (Visual Studio Code) from https://code.visualstudio.com/ and install in the machine
- The test application is https://devexpress.github.io/testcafe/example/
Steps to integrate Cucumber With TestCafe
- Create a new project folder with the name: Cucumber_TestCafe_Project at the desired location in the machine (ex. C:\Users\Public)
- Open VSCode IDE and open the project folder Cucumber_TestCafe_Project
- Let us change the icon pack in VSCode to view beautiful and distinctive icons for different file formats
- Navigate to extensions, search for VSCode Great Icons and click the "Install' button
- Open the command palette by using the shortcut CTRL + SHIFT + P
- Type "Preferences: File Icon Theme"
- Select "VSCode Great Icons" from the populated list
- In the project folder, create a new file with the name: package.json
- Implement the following package.json:
xxxxxxxxxx
{
"name": "integrate-testcafe-cucumber",
"description": "An integration of TestCafe and Cucumber-JS",
"dependencies": {
"cucumber": "^5.1.0",
"cucumber-html-reporter": "^2.0.3",
"npm": "^6.0.0",
"testcafe": "^1.1.0"
}
}
The above code of the package.json has configured the dependencies that are required in the project.
6. Execute the command “npm install” in the VSCode Shell Terminal to install all the dependencies packages (node_modules) in the project folder
7. Setup Cucumber Language Support: Use an extension “Cucumber (Gherkin) Full Support” to enable syntax highlighting, auto-completion for CucumberJS feature files, and step definitions. This eases the work of maintaining the cucumber files in VSCode
- In the project folder, create a new folder with the name: .vscode
- In this folder, create a new file the name: settings.json
- Implement the following settings.json:
xxxxxxxxxx
/* Plugin settings for Cucumber related files like feature file and step definitions file
This allows auto-completion of gherkin commands and assist in designing the cucumber files
*/
{
"cucumberautocomplete.steps": [
"features/step_definitions/*.js"
],
"cucumberautocomplete.syncfeatures": "features/*.feature",
"cucumberautocomplete.strictGherkinCompletion": true
}
- Navigate to extensions, search for Cucumber (Gherkin) Full Support and click the "Install' button
Create a Cucumber Feature File
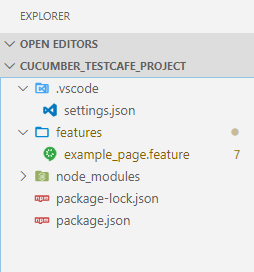
8. In the project folder, create a new folder with the name: features
9. In this folder, create a new file with the name: example_page.feature
10. Here is the code for the feature file:
xxxxxxxxxx
# Add your test scenarios in the Cucumber Feature file.
# Since, we are using the Cucumber (Gherkin) Full Support extension in VSCode,
# please notice the syntax highlighting and completion, while writing the scenarios.
Feature: Example Page User Details
Scenario: The one where user enters all the details on Example Page
Given user navigates to the example form page
When user enters "John Doe" in the name field
And user selects "JavaScript API" as TestCafe Interface
And user checks the I have tried TestCafe checkbox
And user enters "Good Tool" in feedback description field
And user clicks on Submit button
Then "Welcome John Doe" message appears
The above code represents the user scenario for entering all the details on the Example page and expecting a Welcome message from the application.
11. The project structure looks like below:
12. Execute the command “./node_modules/.bin/cucumber-js.cmd” in the VSCode Shell Terminal to run the cucumber scenarios and generate the step definitions for the scenario steps
Create cucumber step definitions file
13. Inside the features folder, create a new folder with the name: step_definitions
14. In this folder, create a new file with the name: example_page_steps.js
15. Copy the generated step definitions from the terminal and paste in the example_page_steps.js file. Also, make the step definition functions async
16. Here is the code for the step definition file:
xxxxxxxxxx
Given('user navigates to the example form page', async function () {
});
When('user enters {string} in the name field', async function (string) {
});
When('user selects {string} as TestCafe Interface', async function (string) {
});
When('user checks the I have tried TestCafe checkbox', async function () {
});
When('user enters {string} in feedback description field', async function (string) {
});
When('user clicks on Submit button', async function () {
});
Then('{string} message appears', async function (string) {
});
The above code represents the structure of all the steps specified in the feature file.
Create Page Objects to Store Selectors for Web Elements
17. Inside the features folder, create a new folder with the name: support
18. Inside the support folder, create a new folder with the name: pages
19. In this folder, create a new file with the name: example_pageObjects.js
20. Here is the code for the page objects file:
xxxxxxxxxx
const {Selector} = require('testcafe');
/*
Create and export a module with name "elements". This module contains functions.
Each function is returning a Selector for a particular web element and bind to testController.
This module can be imported and called from Step Definitions to access the web elements.
*/
exports.elements = {
nameTxtBox: function() {
return Selector('#developer-name').with({ boundTestRun: testController });
},
interfaceMenu: function() {
return Selector('#preferred-interface').with({ boundTestRun: testController });
},
testCafeCheckBox: function() {
return Selector('#tried-test-cafe').with({ boundTestRun: testController });
},
descriptionTxtBox: function() {
return Selector('#comments').with({ boundTestRun: testController });
},
submitBtn: function() {
return Selector('#submit-button').with({ boundTestRun: testController });
},
messageElement: function() {
return Selector('#article-header').with({ boundTestRun: testController });
}
}
The above code represents the selectors for all the web elements involved in the test scenario.
Modify the cucumber step definitions file and specify the TestCafe commands inside the step definition methods
21. Open the example_page_steps.js file, and specify the TestCafe commands, interacting with elements from example_pageObjects.js
22. Here is the complete code for the step definition file:
xxxxxxxxxx
/*
1. Import module from newly created page object file.
2. Import the required keywords from Cucumber.
3. Import the Selector from TestCafe.
*/
const examplePage = require('../support/pages/example_pageObjects.js');
const {Given, When, Then} = require('cucumber');
const { Selector } = require('testcafe');
Given('user navigates to the example form page', async function () {
await testController.navigateTo('https://devexpress.github.io/testcafe/example/');
});
When('user enters {string} in the name field', async function (string) {
const nameField = examplePage.elements.nameTxtBox();
await testController.typeText(nameField, string);
});
When('user selects {string} as TestCafe Interface', async function (string) {
const interfaceField = examplePage.elements.interfaceMenu();
const interfaceOption = interfaceField.find('option');
await testController.click(interfaceField).click(interfaceOption.withExactText(string));
});
When('user checks the I have tried TestCafe checkbox', async function () {
const triedTestCafeCheckBox = examplePage.elements.testCafeCheckBox();
await testController.click(triedTestCafeCheckBox);
});
When('user enters {string} in feedback description field', async function (string) {
const descriptionField = examplePage.elements.descriptionTxtBox();
await testController.typeText(descriptionField, string);
});
When('user clicks on Submit button', async function () {
const submitButton = examplePage.elements.submitBtn();
await testController.click(submitButton);
});
Then('{string} message appears', async function (string) {
const welcomeMessageElement = examplePage.elements.messageElement();
await testController.expect(welcomeMessageElement.innerText).contains(string);
});
The above code represents the interaction of web elements with TestCafe actions inside the cucumber step definition methods.
Inject TestCafe test controller into cucumber step definitions
23. We have already created features, step definitions with TestCafe commands, and page objects. The main goal is to inject the TestCafe test controller object into the context of each cucumber step definition. This is accomplished by creating 3 files, namely TestControllerHolder, CucumberWorld, and Hooks.
24. Inside the support folder, create a new file with the name: testControllerHolder.js
25. Here is the code for the testControllerHolder file:
xxxxxxxxxx
const testControllerHolder = {
testController: null,
captureResolver: null,
getResolver: null,
// This function is used to capture the testController object and return a promise to be resolved when the Cucumber script finishes.
// This function will be called by the TestCafe test in the beginning.
capture: function(t) {
testControllerHolder.testController = t;
if (testControllerHolder.getResolver) {
testControllerHolder.getResolver(t);
}
return new Promise(function(resolve) {
testControllerHolder.captureResolver = resolve;
});
},
// This function is used to free the testController object.
// This function will be called by the TestCafe test in the ending.
free: function() {
testControllerHolder.testController = null;
if (testControllerHolder.captureResolver) {
testControllerHolder.captureResolver();
}
},
// This function is used to resolve and get the testControllerObject.
// This function will be called by CucumberWorld and helps in setting up the controller asynchronously,
// then add it to Cucumber’s world scope.
get: function() {
return new Promise(function(resolve) {
if (testControllerHolder.testController) {
resolve(testControllerHolder.testController);
} else {
testControllerHolder.getResolver = resolve;
}
});
}
};
// Exporting the module for other files to import and use
module.exports = testControllerHolder;
The above code represents the functions to capture, free, and get the TestCafe test controller object with a promise. These functions will be called from CucumberWorld and Hooks files.
26. Inside the support folder, create a new file with the name: cucumberWorld.js
27. Here is the code for the cucumberWorld file:
xxxxxxxxxx
// World is an isolated context for each cucumber scenario, exposed to the hooks and steps.
// Import setWorldConstructor from cucumber-js.
const {setWorldConstructor} = require('cucumber');
const testControllerHolder = require('./testControllerHolder');
function CustomWorld() {
/*
1. The waitForTestController promise object waits for TestCafe to finish setting up the controller asynchronously,
then adds it to Cucumber’s world scope as testController.
2. It calls the testControllerHolder.get function to trigger the promise to return the testController.
*/
this.waitForTestController = testControllerHolder.get()
.then(function(tc) {
return testController = tc;
});
}
setWorldConstructor(CustomWorld);
The above code represents the World in Cucumber-js, which is an isolated context for each cucumber scenario, exposed to the hooks and steps. This function is called from the hooks file.
28. Inside the support folder, create a new file with the name: hooks.js
29. Here is the code for the hooks file:
xxxxxxxxxx
/*
1. Import fs and use it to create and write text into a file.
2. Import testControllerHolder module from testControllerHolder.js file.
3. Import hook keywords from cucumber.
4. Create a timeout variable with a value.
*/
const fs = require('fs');
const createTestCafe = require('testcafe');
const testControllerHolder = require('./testControllerHolder');
const {AfterAll, setDefaultTimeout, Before, After} = require('cucumber');
const timeout = 100000;
let cafeRunner = null;
/*
Objective: We need to inject the TestCafe test controller object into the context of each step definition.
1. We are creating a dummy test file by function "createTestFile".
2. The cucumbertest.js file reads as a TestCafe test file with fixtures.
3. It doesnot execute the test, rather it captures the TestCafe controller and passes it back to testControllerHolder.js
4. It is performed by calling testControllerHolder.capture function. This passes in the test controller, which responds with a Promise,
to be resolved when the Cucumber script finishes and calls testControllerHolder.free function
5. Until then, the TestCafe script waits in the background, allowing us to use the test controller to execute all the cucumber scenarios.
*/
function createTestFile() {
fs.writeFileSync('cucumbertest.js',
'import testControllerHolder from "./features/support/testControllerHolder.js";\n\n' +
'fixture("cucumberfixture")\n' +
'test\n' +
'("test", testControllerHolder.capture)')
}
// Create a runner function with configurations like src, screenshots, browsers.
function runTest(browser) {
createTestCafe('localhost', 1337, 1338)
.then(function(tc) {
cafeRunner = tc;
const runner = tc.createRunner();
return runner
.src('./cucumbertest.js')
.screenshots('reports/screenshots/', true)
.browsers(browser)
.run();
});
}
// Setting the default time out value
setDefaultTimeout(timeout);
/*
1. Before hook runs before each Cucumber test.
2. It calls the "runTest" function, which contains the runner configuration.
3. Then, it calls the "createTestFile" function. It generates a dummy file, cucumbertest.js, behaving as the source of the tests.
4. Then, it calls the waitForTestController of cucumberWorld.js to add testController to Cucumber’s world scope.
5. Then, it also maximizes the test controller window.
*/
Before(function() {
runTest('firefox');
createTestFile();
return this.waitForTestController.then(function(testController) {
return testController.maximizeWindow();
});
});
// After hook runs after each Cucumber test. It is used to unlink the test and make testController "null".
// It calls the testControllerHolder.free function.
After(function() {
fs.unlinkSync('cucumbertest.js');
testControllerHolder.free();
});
// AfterAll hook runs after all the tests execution. It check the last runs status to be "test-done-confirmation",
// and then, close the cafeRunner and exit the process.
// It checks with a wait timeout of 500.
AfterAll(function() {
let intervalId = null;
function waitForTestCafe() {
intervalId = setInterval(checkLastResponse, 500);
}
function checkLastResponse() {
if (testController.testRun.lastDriverStatusResponse === 'test-done-confirmation') {
cafeRunner.close();
process.exit();
}
}
waitForTestCafe();
});
The above code represents the hooks, which includes functions for:
- Creating a new test file and trigger the capture function of testControllerHolder
- Creating a test runner
- Before function to activate test runner, create a test file, and waitForTestController by triggering the function of cucumberWorld
- After function to free the test controller object by triggering the free function of testControllerHolder
- Afterall function to close and exit the test runner, when test done confirmation is received
Generate HTML Reports Using Cucumber-HTML-Reporter
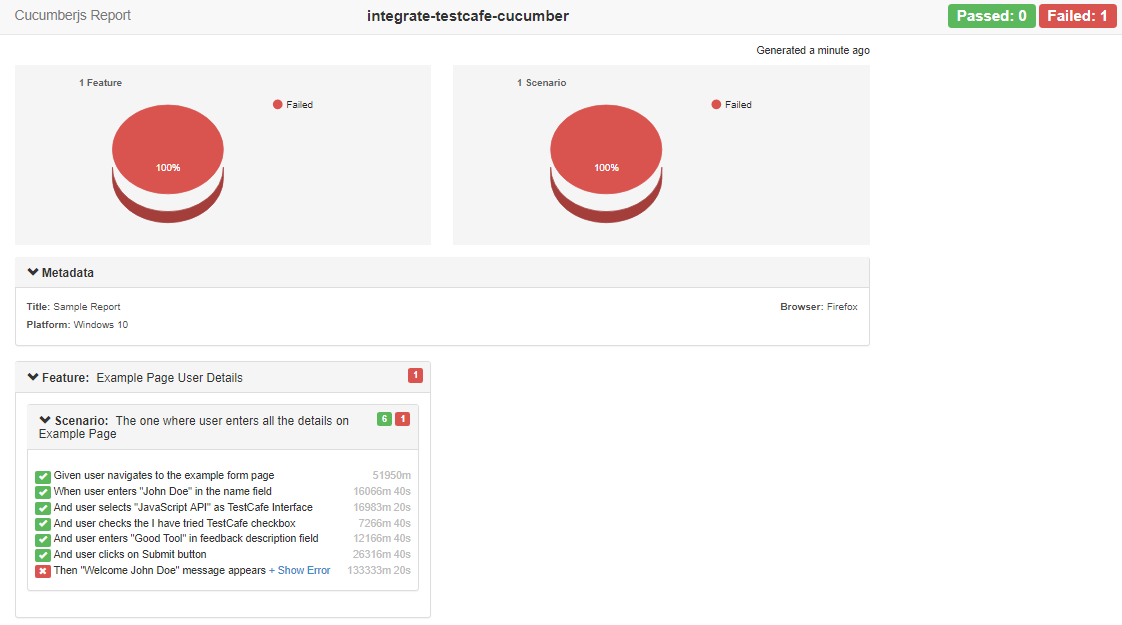
30. We want to generate an interactive HTML report with graphical representation (pie charts) and detailed information about the execution of test steps. We will use cucumber-HTML-reporter to read the report.json file and convert it into an interactive HTML report
31. Dependencies for cucumber-HTML-reporter is already defined in the package.json file
32. In the project folder, create a new file with the name: index.js
33. Here is the code for the index file:
xxxxxxxxxx
/* Plugin settings for "cucumber-html-reporter" plugin.
These settings help us in configuring the HTML report to be generated from JSON report.
We can provide information like metadata to be published in the HTML report, theme of the report,
and other options like scenarioTimestamp, reportSuiteAsScenarios.
*/
var reporter = require('cucumber-html-reporter');
var options = {
theme: 'bootstrap',
jsonFile: 'reports/report.json',
output: 'reports/cucumber_report.html',
reportSuiteAsScenarios: true,
scenarioTimestamp: true,
launchReport: true,
metadata: {
"Title": "Sample Report",
"Browser": "Firefox",
"Platform": "Windows 10"
}
};
reporter.generate(options);
The above code represents the settings to generate an HTML report from the JSON report, along with metadata information to be displayed in the report.
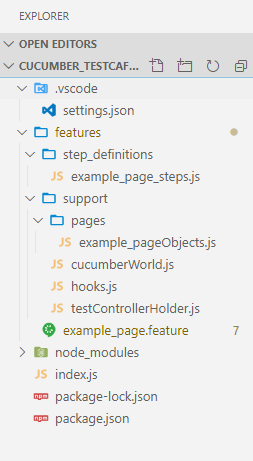
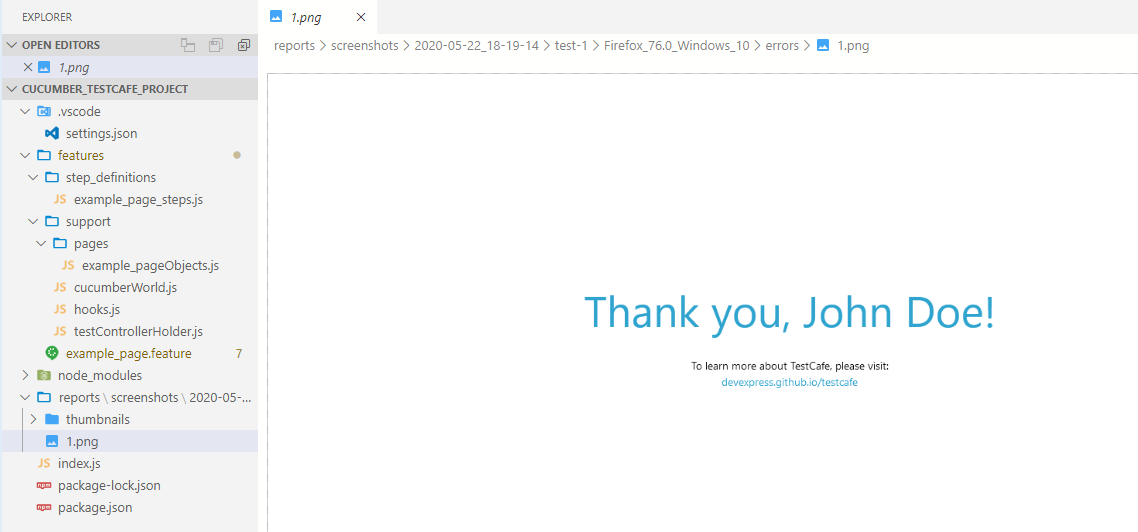
34. We have designed the project to integrate Cucumber with TestCafe. The project structure looks like below:
Execute the Cucumber_TestCafe_Project
35. Execute the command “./node_modules/.bin/cucumber-js.cmd” in the VSCode Shell Terminal to run the project
36. Observe the test automation in real-time and the test results in the terminal
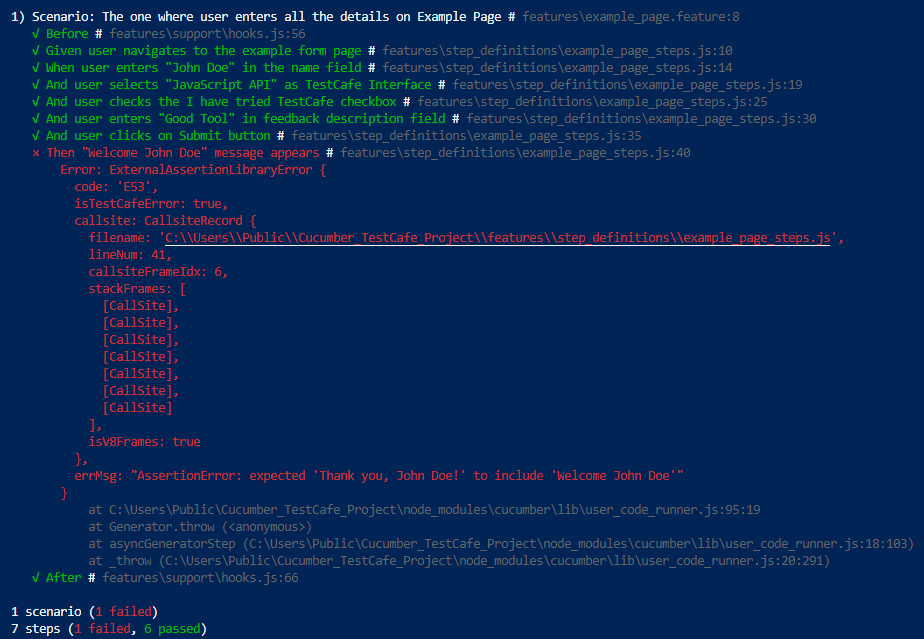
37. Navigate to reports folder in the Cucumber_TestCafe_Project folder and view the screenshot of the application for the failed test step
38. To generate JSON report along with test execution, execute the command “./node_modules/.bin/cucumber-js.cmd --format json:./reports/report.json” in the VSCode Shell Terminal
39. Navigate to reports folder in the Cucumber_TestCafe_Project folder and view the report.json
40. To generate an interactive HTML report, execute the command “node index.js” in the VSCode Shell Terminal
41. Navigate to reports folder in the Cucumber_TestCafe_Project folder and view the cucumber_report.html in a browser
Opinions expressed by DZone contributors are their own.
Comments