Spinnaker Meets Minikube: Part 1
Get started with Spinnaker and learn how to run various microservices on a Minikube cluster using Halyard and Docker.
Join the DZone community and get the full member experience.
Join For FreeSpinnaker is a continuous integration/continuous delivery tool that was started by Netflix in its quest for more agility. This posting will show how to get hands-on experience running Spinnaker on Windows 10.
Minikube provides the ability to run a Kubernetes cluster on local Linux, Mac, or Windows. It can therefore serve as a sandbox environment for Spinnaker training, experimentation or even to keep ones local development environment up to date with all the latest commits.
Two subsequent postings will demonstrate how to:
- Deploy a very basic Spring Boot microservice to a Kubernetes cluster using Github, Docker Hub, and Spinnaker. The pattern thus established can be extended so one always have the latest version of all microservices running.
- Build a basic pipeline to demonstrate the ability of Spinnaker to make Kubernetes (kubectl) deployment and configuration commands reproducible without human error, one of the aims of DevOps. This pipeline will deploy a micro-service locally and, after user approval, deploy the same to a staging environment. As such it can be extended towards a CI\CD framework that pushes the latest set of micro-services towards the first staging environment.
This hands-on tutorial presumes knowledge of Windows, basic networking, SSH, vi, and a few basic Linux commands. It will, furthermore, be good hands-on exposure to Kubernetes and Kustomize should the reader be unfamiliar with it. Accounts at Github and Docker hub will also be a plus.
After completion, the reader should have Spinnaker running, but more importantly be in a better position to understand the guides on the official Spinnaker website.
System Requirements
This guide was tested on a notebook with 40 GB of RAM running Windows 10 Professional.
The requirement for Spinnaker Minikube on Windows is an installation of Hyper-V, 16 GB of RAM, and four cores. The author used 17 GB.
Halyard, the configuration service of Spinnaker, runs as a Docker container and requires 2 GB of RAM over and above the requirements of Docker.
Based on the above, the minimum requirement to run on a single machine should be Windows 10, 32 GB of RAM, and four cores. However, the Minikube cluster can be run on a second machine over a local network. The IP address of the cluster hosting Spinnaker is after all configured in the KubeConfig of Halyard as can be seen below. The Spinnaker install guide also shows how to run Spinnaker on a single instance of Ubuntu as an alternative to the distributive fashion, but this way is less scalable and for smaller constellations. Hyper-V is not required for this second approach for obvious reasons.
Before We Begin
Configuration of Halyard can take a long time the first few times. A backup can be created at any stage so the process can be resumed at a later stage.
The exposed IP address of the Hyper-V network adaptor (default switch) changes every time one restarts the virtual machine running Minikube. Towards the very bottom, an explanation is given on what to do should this happen.
Sometimes the Minikube IP address does not show on the Hyper-V manager. One can also get it from Hyper-V by right-clicking -> connect, typing root, and running ifconfig from the resulting root prompt.
Unless otherwise stated, all commands are to be run from a Halyard prompt.
Install a Cluster
The first step is to follow one of the myriad online guides to install Hyper-V onto your machine. On the author's notebook running Windows 10 Professional, this only involved downloading and running the install. However, be prepared to tinker in the CMOS to switch on virtualization.
Once Hyper-V is running, you can proceed to download and install Minikube. Open Powershell Administrator and run the following command after the install has finished:
minikube start --vm-driver="hyperv" --memory=17000 --cpus=4 --hyperv-virtual-switch="Default Switch" --v=7 –alsologtostderr --embed-certsThis tells Minikube to:
- Use the native Windows Hypervisor instead of a Docker driver on top of Hyper-V.
- Prepare a Kubernetes cluster with 17GM ram and four CPUs.
- Use the Hyper-V default switch to network the new virtual machine into the host machine.
- Use verbosity of logging at level seven.
- Embed certificates into the KubeConfig so it can be propagated to all kubelets of the Spinnaker microservice ecosystem.
Upon successful completion, head over to the Hyper-V manager and take note of the IP address of the cluster for future use:
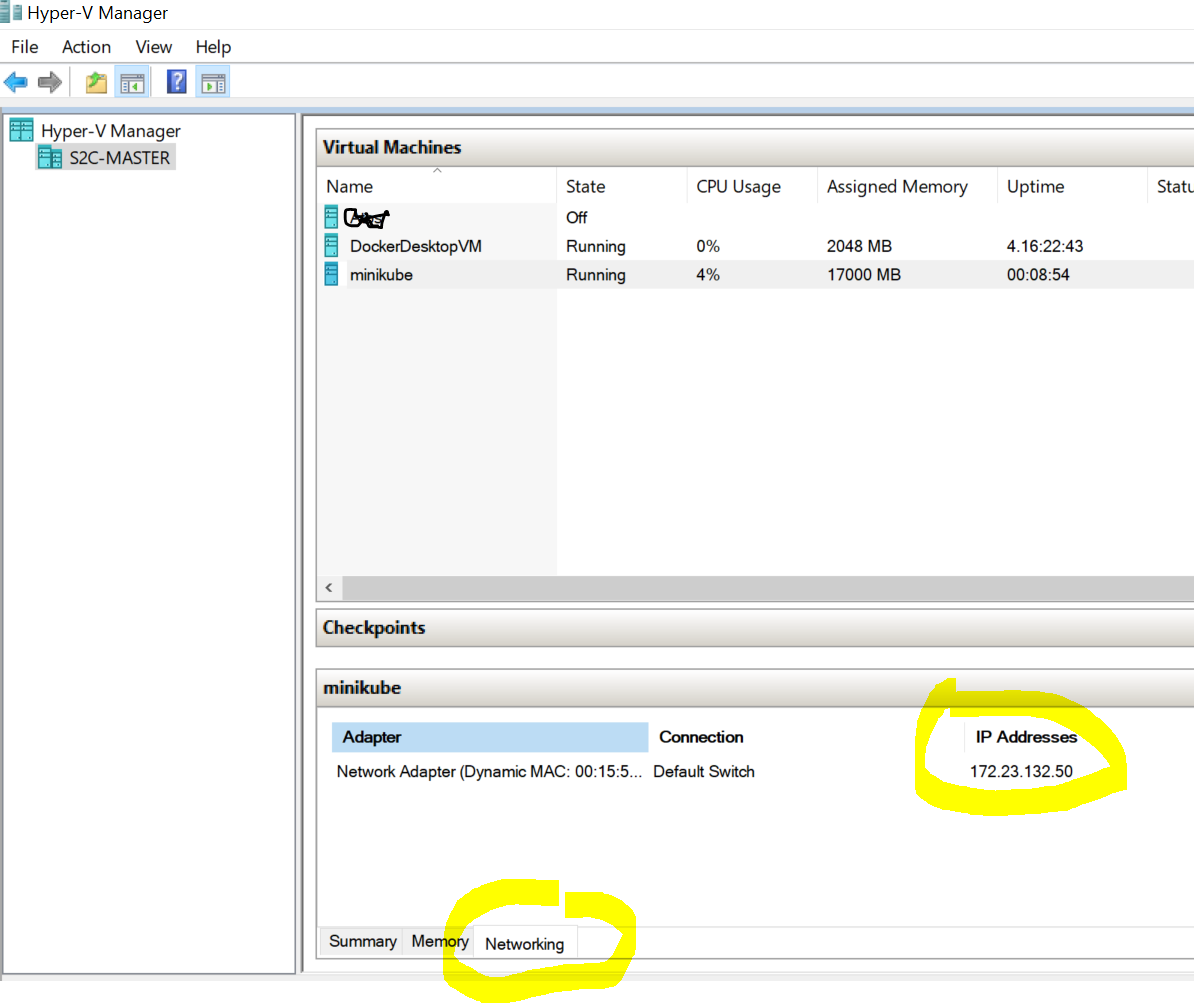
Note the docker desktop running Halyard. We will get to this next.
Halyard the director
Follow the steps of the Spinnaker guide to install Halyard using Docker.
- Find the KubeConfig of the Spinnaker cluster at
c:\Users\%YOUR_USER_NAME%\.kube\config, with YOUR_USER_NAME representing your home directory. - Make a directory
c:\Users\%YOUR_USER_NAME%\.haland copy the KubeConfig from step one into it. - Run the following command from normal PowerShell:
The KubeConfig file you copied intodocker run -p 8084:8084 -p 9000:9000 --name halyard --rm -v /c/Users/skaap/.hal:/c/Users/skaap/.hal/ -d c:\Users\%YOUR_USER_NAME%\.halc:\Users\%YOUR_USER_NAME%\.halwill now be available for use by Halyard. - Connect to Hal and get a Halyard prompt:
docker exec -it halyard bash - Run this command to enable command completion:
source <(hal --print-bash-completion)
Halyard is now up and running. Next, we have to configure a database for Spinnaker.
MinIO the keeper of metadata
Spinnaker can use various databases, as can be seen here. We will use MinIO, an AWS S3 clone that can run out of the cloud.
- On Windows, download and install the MinIO server from here.
- Start MinIO server on port 9002, since the default port 9000 is being used to expose Halyard:
C:\minio.exe server c:\minnio_data --console-address ":9001" --address ":9002"
Ignore the warnings about the default user name and password being used. For production use, this, of course, has to be addressed. - Connect to Halyard and configure S3 as the storage provider of Spinnaker:
hal config storage s3 edit --endpoint http://192.168.68.112:9002 --access-key-id minioadmin --secret-access-key minioadmin
Ignore the warning to set the Spinnaker version for now. We will set it towards the end. - Set S3 as the storage provider of Spinnaker:
hal config storage edit --type s3
Next, we will configure Kubernetes as the host for Spinnaker.
Kubernetes as Cloud Provider
Spinnaker can run on various cloud providers. We will run it on our Minikube cluster and follow the steps to configure Kubernetes as a cloud provider:
- From Halyard prompt, create a folder called .kube in
/home/spinnaker:mkdir ~/.kube
- Copy the KubeConfig exposed from Windows into the new folder:
cp /c/Users/$YOUR_USER_NAME/.hal/config ~/.kube/
- Test that Halyard can access the Minikube cluster:
kubectl get svc
You should have something similar to the following as output:bash-5.0$ kubectl get svc NAME TYPE CLUSTER-IP EXTERNAL-IP PORT(S) AGE kubernetes ClusterIP 10.96.0.1 <none> 443/TCP 6h28m.
Should you see something else, open~/.kube/configin vi. The IP address should be the same as the one noted earlier from the Hyper-V manager:- cluster: certificate-authority-data: LS0tLS1CRUdJTiBDRVJUSUZJQ0FURS0tLS0tCk1JSURCakNDQWU2Z0F3SUJBZ0lCQVRBTkJna3Foa2lHOXcwQkFRc0ZBREFWTVJNd0VRWURWUVFERXdwdGFXNXAKYTN extensions: - extension: last-update: Tue, 24 Aug 2021 21:39:09 SAST provider: minikube.sigs.k8s.io version: v1.22.0 name: cluster_info server: https://172.23.132.50:8443 name: minikube - Enable Kubernetes as the cloud provider of Spinnaker:
hal config provider kubernetes enable
- Add the Minikube account to the Spinnaker configuration that faithful Halyard is recording:
hal config provider kubernetes account add my-k8s-account --context minikube
- Configure Spinnaker to run its micro-services in distributed fashion instead of all on one Ubuntu server:
hal config deploy edit --type distributed --account-name my-k8s-account
Next, Spinnaker will be started so its microservices can be created and some of them be exposed outside the Kubernetes cluster.
Starting Spinnaker
The exposed IP address of the Minikube cluster changes all the time. This IP address will be tracked as a new line entry into the Windows hosts file for ease of reference:
172.23.139.234 spin.s2c.co.za
The final configurations can be started:
- Firstly, retrieve the list of Spinnaker versions alluded to earlier:
hal version list - Select a stable version from the middle of the list:
hal config version edit --version 1.23.7 - The Gate(API) and Deck(UI) microservices should know how to find each using host file resolution instead of direct IP address reads:
hal config security ui edit --override-base-url http://spin.s2c.co.za:9000
hal config security api edit --override-base-url http:/spin.s2c.co.za:8084
Ignore any errors as these commands will be run again with correct ports. At that time the errors should be resolved. - Get Halyard to apply the changes to the Minikube cluster and spin up the Spinnaker microservices:
hal deploy apply
At this point, there might be one warning and one recommendation arising from the same root cause. We will address it in the next section.- WARNING Your UI or API domain does not have override base URLs
set even though your Spinnaker deployment is a Distributed deployment on
remote cloud provider. As a result, you will need to open SSH tunnels against
that deployment to access Spinnaker.
? We recommend that you instead configure an authentication
mechanism (OAuth2, SAML2, or x509) to make it easier to access Spinnaker
securely, and then register the intended Domain and IP addresses that your
publicly facing services will be using.
- A lot is happening behind the scenes as the container image for each Spinnaker microservice is pulled and booted up. This can take a few minutes. One can track progress with two commands:
kubectl -n spinnaker get pods
kubectl -n spinnaker describe pod spin-front50-*
NOTE - The * should be replaced with the rest of the kubelet's name.
- Once all services are up, the following the 'kubectl -n spinnaker get pods' command will report back as follows:
NAME READY STATUS RESTARTS AGE
spin-clouddriver-bb4f898d7-s4xfh 1/1 Running 0 17m
spin-deck-fcfb484bc-92jwb 1/1 Running 0 17m
spin-echo-6b575488df-8lkkt 1/1 Running 0 17m
spin-front50-5594fb5975-nlgpv 1/1 Running 0 17m
spin-gate-6db67c5d44-xk7kw 1/1 Running 0 17m
spin-orca-7d478c7dc4-v976p 1/1 Running 0 17m
spin-redis-65bbfdbd9d-lwn6l 1/1 Running 0 17m
spin-rosco-8464b7fcdb-2v92f 1/1 Running 0 17m
- Should th e READY statusfor one of the microservices not change to '1/'1' and the restart count keep on incrementing , something is wrong. The problem can be diagnosed using two commands:
kubectl -n spinnaker describe pod spin-front50-*
kubectl -n spinnaker logs spin-front50-*
NOTE - The * should be replaced with the rest of the kubelet's name. - In times of extreme need one can also get a bash shell directly on a kubelet/pod:
kubectl exec <pod-name> -it -- /bin/sh
Normally the command "hal deploy connect' follows next to automatically forward ports out of the cluster over SSH. We will follow a different route to open up Spinnaker for use outside the cluster.
Opening Up Spinnaker for Evaluation
DISCLAIMER: This section should only ever be done on Minikube during evaluation/testing of Spinnaker and never in production.
Was it not for the fact that security has not been configured yet, Halyard would be able to apply the configurations and start Spinnaker. As it stands, Spinnaker will start up closed up to the world outside its Kubernetes/Minikube cluster.
One can port-forward out over SSH, but the problem is that we are running all on one machine and port 9000 is already forwarded by Docker. This can be seen in the command that started Halyard. It might be possible to configure the UI/Deck microservice to listen on a different port, as Spinnaker provides for fine-grain configuration. However, since Spinnaker will be running encapsulated inside a local machine, a different route can be taken. We will namely open up some of the Spinnaker micro-services for outside access by changing their type from ClusterIP to NodePort:
- Open a vi-type editor on the Gate/API microservice:
kubectl edit svc spin-gate -n spinnaker
- Change ClusterIP to NodePort in the spec section (you might have to scroll down):
type: NodePort
- Do the same for Deck:
kubectl edit svc spin-deck -n spinnaker
- Next, we note the ports that Deck and Gate are exposed on:
kubectl describe node minikube
The output for Deck should look something like:spin-deck NodePort 10.102.82.144 9000:30741/TCP 42m
This means Deck is exposed on port 30741 for outside access. - Note the port for Gate similarly as in step four directly above. Run the following commands to override the ports of Deck(UI) and Gate(API), e.g. add your own values for 31209 and 30741:
hal config security api edit --override-base-url http://spin.s2c.co.za:31209
hal config security ui edit --override-base-url http://spin.s2c.co.za:30741
- Apply the configuration changes again:
hal deploy apply
Testing the Constellation
Spinnaker should be up and running on the exposed port of Deck: http://spin.s2c.co.za:30741
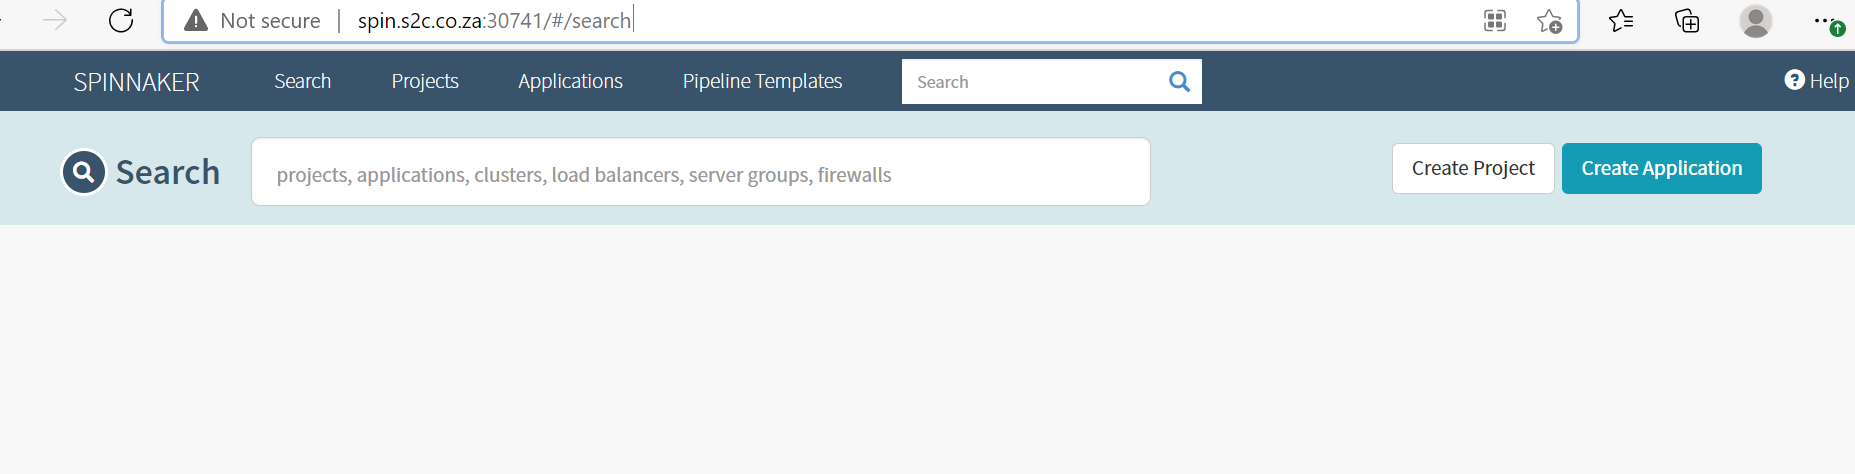
Click on Create Application:
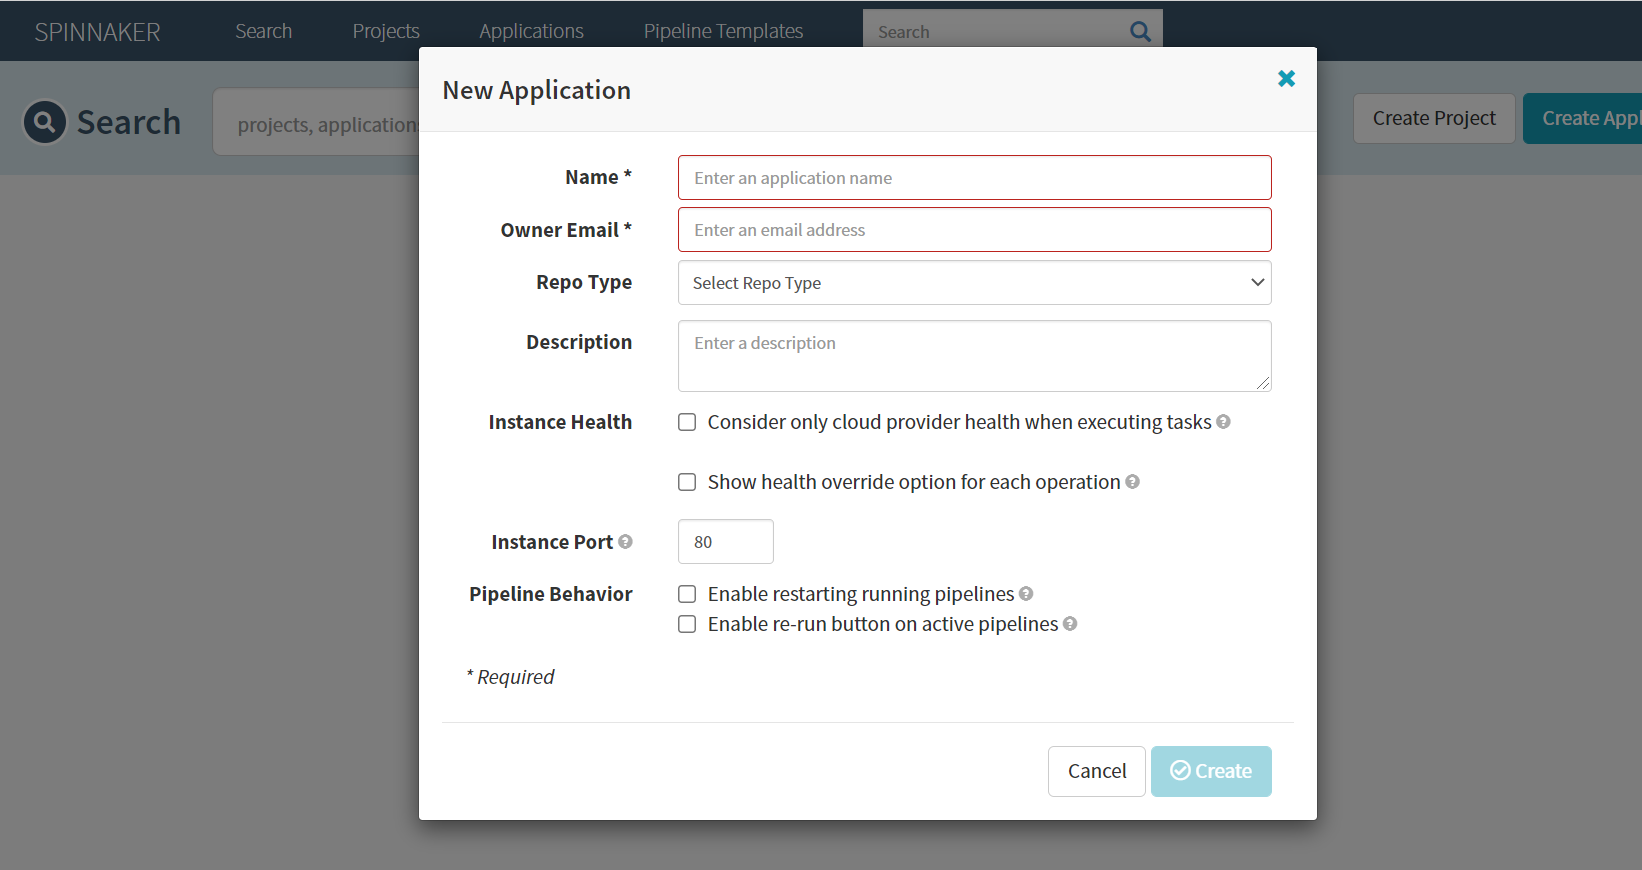
Enter name and email, followed by clicking on Create:
Should the creation of the application take very long and a message concerning Gate eventually pops up it means that something went wrong during the overriding of Gate and Deck. Revisit the commands in the section outlining how to open up Spinnaker for evaluation. Special care should be taken that correct ports are used and the entry in the host file is correct.
Last Comments
The outward IP address of the Minikube cluster should change following a restart from Hyper-V. Should this happen, remember to:
- Change the IP address in the Windows host file.
- Change the IP address in the KubeConfig located at
~/.kube/config. - Run '
hal deploy apply'.
Since all the configurations are tracked by Halyard, one can delete and recreate an exact replica of your Spinnaker cluster at any time. In other words, "hal deploy apply" will deploy and configure all the Spinnaker microservices on a brand new Minikube cluster as per the configurations recorded by Halyard.
As such, it is worthwhile to commit halyard so it can be stopped and restarted at any time by running the following commands from PowerShell on the Windows laptop:
docker ps -l
docker commit a492c0766153 buhrmann/halyard
Where a492c0766153 was the container ID returned by "docker ps -l". The new docker image can now be run anytime:
docker run -p 8084:8084 -p 9000:9000 --name my_halyard --rm -d buhrmann/halyard:latestConclusion
Congratulations! Spinnaker is now running locally out of the cloud, and you placed yourself on the map of Spinnaker knowledge. You should be in a better position to understand the various guides on the official Spinnaker website.
It is now an opportune time to familiarise yourself with the various concepts of Spinnaker and where to find them on the GUI. Since Spinnaker is cloud-neutral, it has its own names to the equivalent Kubernetes entities, as can be seen in this concept mapping.
Unfortunately, your Spinnaker constellation is like a car that can start but cannot get into gear. Since deployment pipelines consuming Docker Images and Deployment Manifests are lacking, one cannot do anything of value yet. This will be the purpose of the next posting in the series — the ability to deploy a microservice to the default namespace of the Minikube cluster.
Opinions expressed by DZone contributors are their own.
Comments